
Securing Azure Function Settings with Azure Key Vault
In this post, we’ll walk through how you can use Azure Key Vault to secure sensitive settings in Azure Functions. If you don’t have a Key Vault setup, I covered setting one up in the post titled ‘Setup Code Signing Certificates in Azure Key Value’
Azure Key Vault
Setting up a Secret
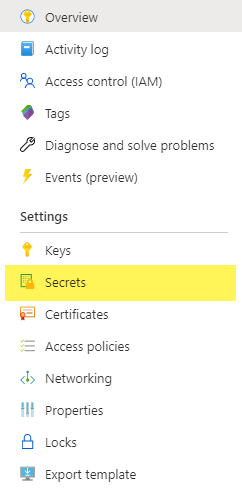
If you have secrets set up in your Key Vault you jump to Secret Details. If not, let’s create a secret in your Key Vault. In the Azure Portal, got to your Key Vault and click on Secrets in the Settings section on the left.
- Click on
+ Generate/Importand you will come to the ‘Create a secret’ blade.
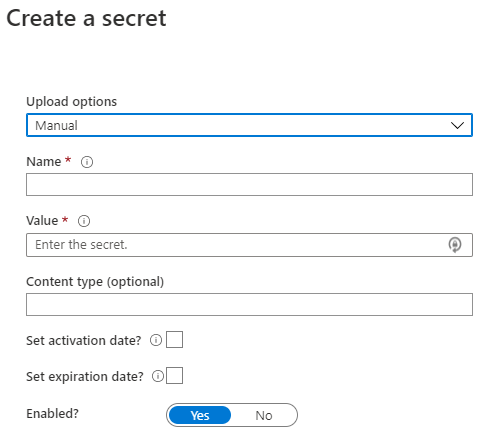
| Name | Value | Description |
| Upload Options | Manual |
Choose manual unless you want to upload a certificate |
| Name | the-name-of-the-secret |
Enter the name for the secret, this should be easy to know what the secret is for. Example: db-connection, twitter-client, etc. |
| Value | the-secret |
Enter (paste) the secret value |
| Content Type | Put in an optional content type. This helps when serving the secrets | |
| Set activation date? | Unchecked to have it be active when you click Create
|
|
| Set expiration date? | Unchecked to have the secret never expire | |
| Enabled? | Yes |
Whether or not to enable the secret on create |
- Click
Create
Secret Details
Now that you have created the secret or already have one, we need to go to secret details to get the Url for the secret.
- Click on the secret name in your Key Vault secrets.
This will take you to blade that looks like this.
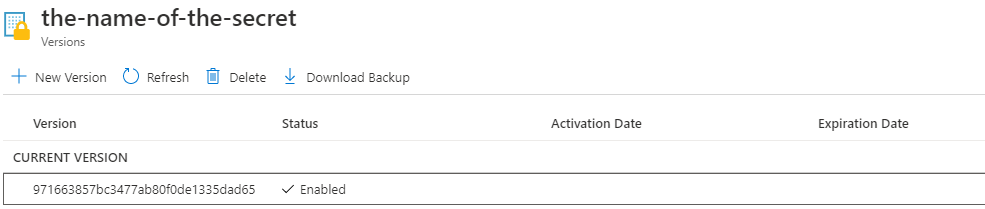
- Click on the current version number.
971663857bc3477ab80f0de1335dad65in this screen shot.
That takes you to the secret details
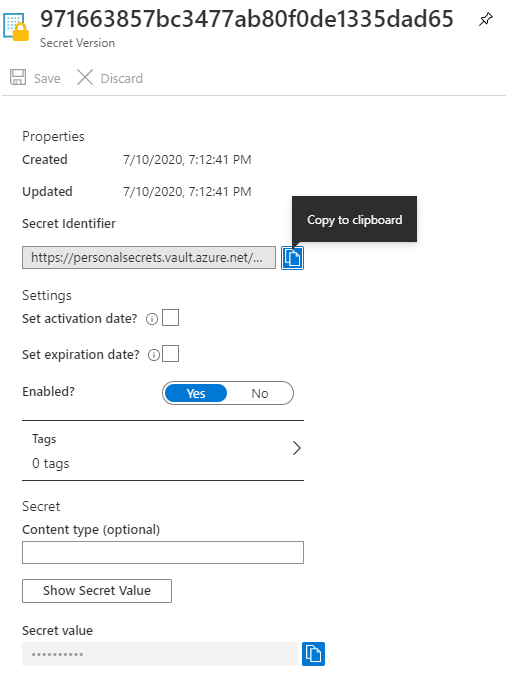
You’ll notice, as in this screenshot, there is a copy button highlighted next to the Secret Identifier that says Copy to Clipboard. Click that button and paste that Url somewhere. We’ll need it in a future step. In this example, the value is https://personalsecrets.vault.azure.net/secrets/the-name-of-the-secret/971663857bc3477ab80f0de1335dad65. If you notice, the format of the url is <vault_name>.vault.azure.net/secrets/<name-of-secret>/<secret-version-number>.
Granting Access to the Secret
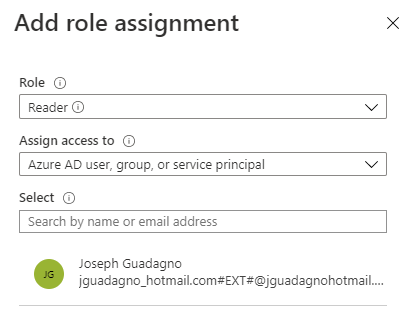
Assuming you have the Azure Function App set up already, click on Access control (IAM) in the left menu. Note, you may have to go back to the home of your Key Vault to see it.
- Click on
+ Add, thenRole Assignment
| Name | Value | Description |
| Role | Reader |
We only need read permissions for this |
| Assign access to | Azure AD user, group, or service principal |
|
| Select | *your function name* |
As you start typing the name, it should start searching for resources that match that |
- Select the match
- Then click save.
Azure Function
Now head over to your Azure Function. In the Settings group, click on Configuration. If you need to create the setting click on + New application setting, otherwise click on an existing setting.
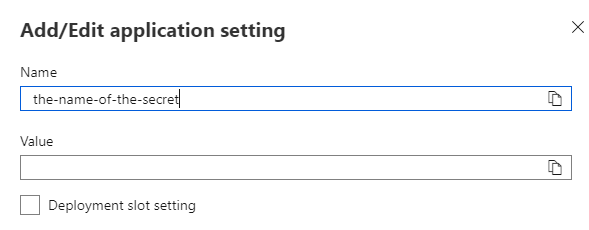
| Name | Value | Description |
| Name | the-name-of-the-secret |
The name you want to call the setting |
| Value | @Microsoft.KeyVault(SecretUri=https://personalsecrets.vault.azure.net/secrets/the-name-of-the-secret/971663857bc3477ab80f0de1335dad65) |
This is the vault you copied previously |
The format of the value is @Microsoft.KeyVault(SecretUri=<secret-url>). Replace the <secret-url> which whatever was copied from the Key Vault Secrets.
Click Ok to save the secret. Then click Save to save the setting(s) to your function. Once the vault is validated, usually in a few seconds, you will see the value in the Source column for that setting change to Key vault Reference.
Wrap up
That’s it. Your application can now only be viewed by someone with the correct permissions in the Key Vault. However, a developer can see the secret in the code if they log it, I think.
Share on
Twitter Facebook LinkedIn RedditLike what you read?
Please consider sponsoring this blog.

