In this post we’ll cover how you can use Azure Pipelines to build, test, sign, and deploy a NuGet package written with .NET Core.
Intro to Yaml
Before we get started, you might want to brush up on YAML. If you do not know what YAML is, it is a human-friendly data serialization standard for all programming languages. I like to think of it as a more modern, less verbose version of XML. If YAML or learning another language/data format scares you, do be worried! You don’t need to read/write YAML in order to use Azure Pipelines. Azure provides a UI to build out your pipeline. That’s how I learned it!
If you understand YAML, check out the Azure YAML schema.
Getting Started
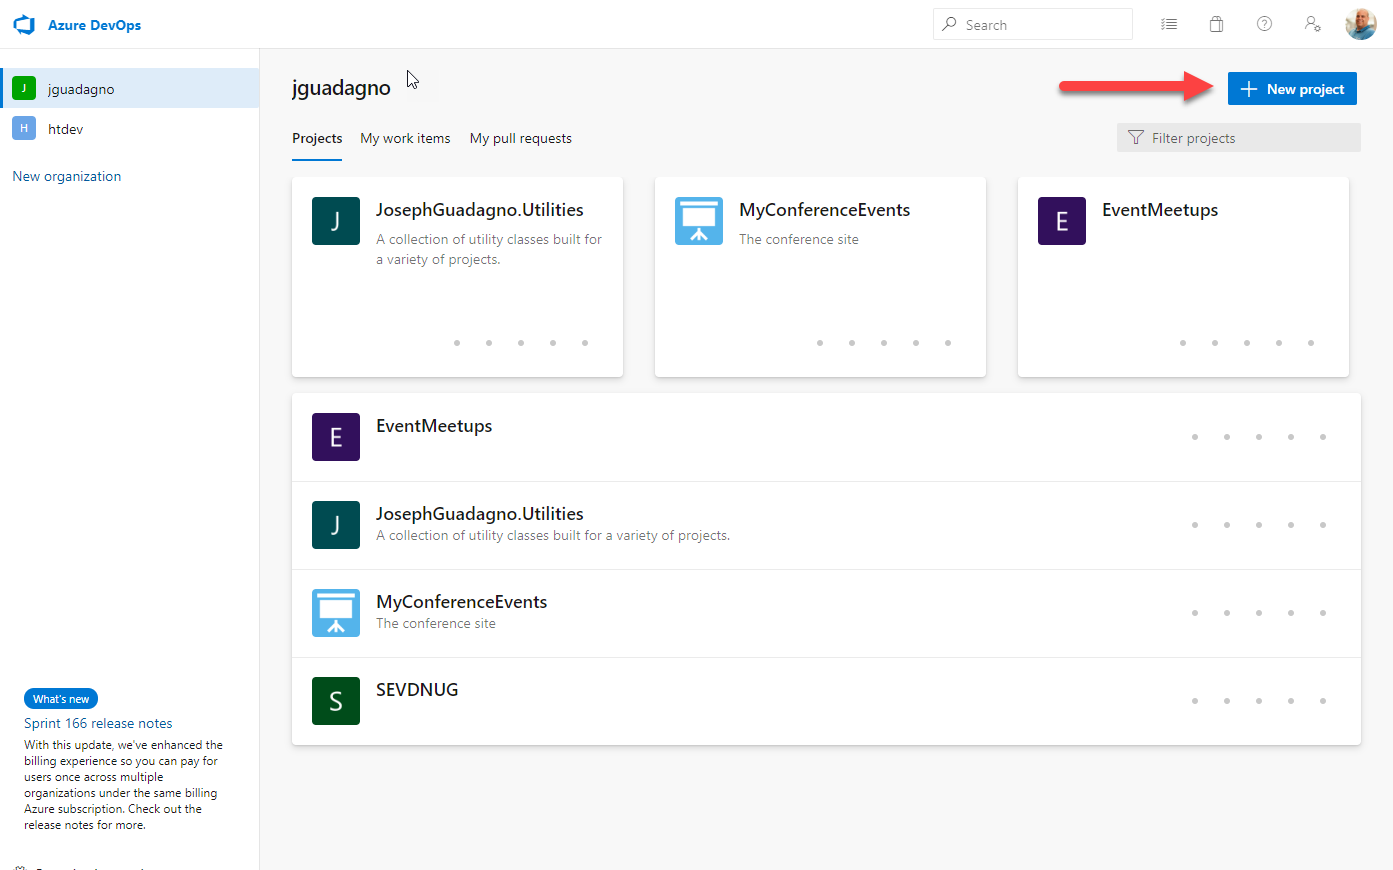
Sign into the Azure DevOps portal, click on Pipelines then Pipelines or visit username.visualstudio.com/Public/_build. Be sure to replace your username with yours or your organizations and Public with whatever project name want to work with created.
If you don’t have any pipelines created, you’ll see this.
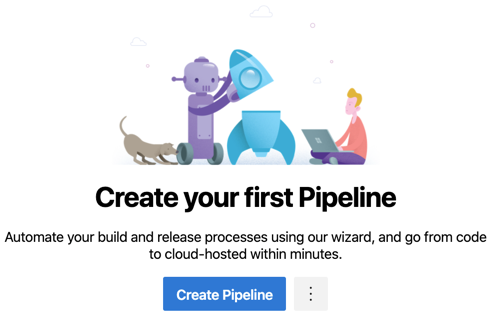
Click ‘Create Pipeline’ to start the Pipeline Wizard.
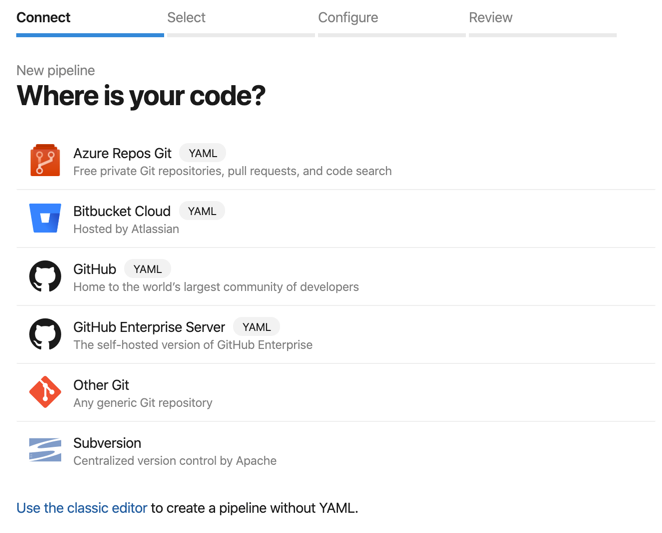
Choose the repository where your source code is. I used ‘Azure Repos Git’
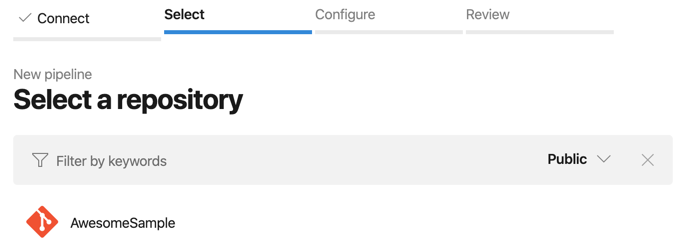
Select the repository. I chose my ‘AwesomeSample’ repository
Now choice your pipeline.
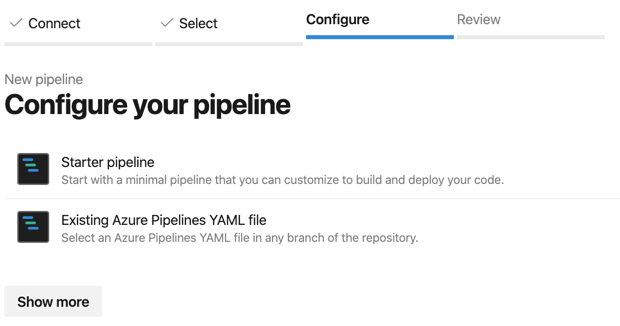
If you chose, ‘Show more’, you will get some templates for common projects like .NET applications, web applications, Android applications, and more.
Click ‘Starter pipeline’ since we are going to build it from scratch. This will bring use to the pipeline editor to review it.
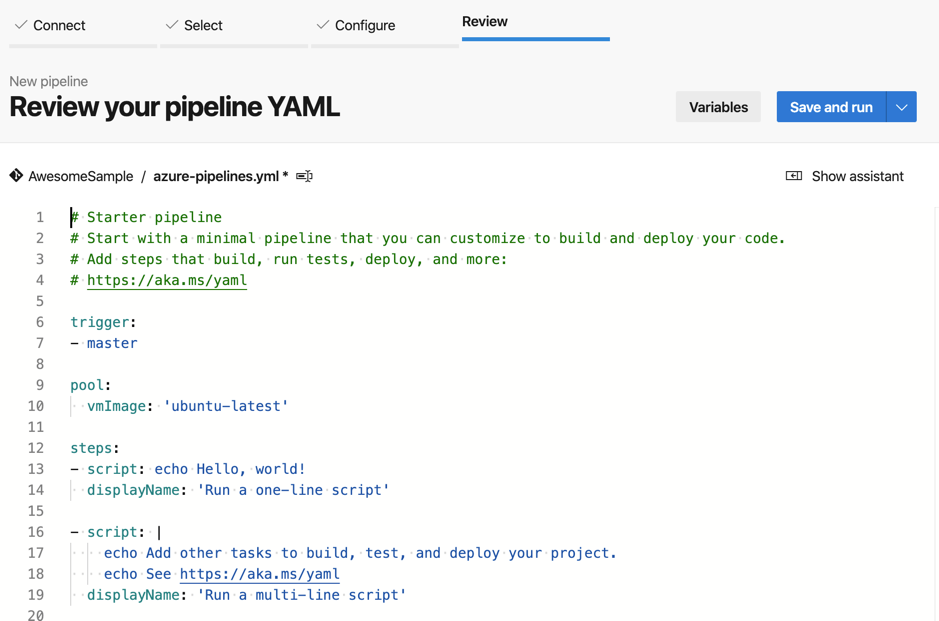
Pipeline Editor
While you are good to go at this point, once you click ‘Save and run’, let’s go through the editor. You’ll notice that is has a familiar feel if you have done and Visual Studio or Visual Studio Code development. In fact, this editor has Intellisense built-in also.
The components of the editor:

1 - Repository Name
2 - Pipeline file name. You can click here to rename the default pipeline name. From what I can tell, most people keep the default.
3 - Variable. This provides access to variables to use through out your pipeline. We may cover this later.
4 - Save and run. This is how you can save and ‘execute’ or ‘run’ your pipeline. If you click on the dropdown icon, you can just save the file without running it.
5 - Show assistant. This provides a mini wizard to chose tasks and settings.
6 - The editor. This is the file editor. Line numbers, Intellisense, and more!
Pipeline Basics
Check the docs, Key Concepts for some key concepts on everything that makes up a pipeline. We are going to cover triggers, pools, variables, steps, and tasks.
Trigger
The trigger of a pipeline is probably exactly what you are thinking it is. This is what will kick off or trigger the script automatically. You can still kick off a script from this page or the pipeline page.
For our script, and simplicity’s sake, we are going to have the script kick off on any commits to the master branch.
Setup Pool
The pool tells Azure when VMs and ‘pooled’ resources it should use. This varies based on the subscription model you have and are willing to pay for. For a list of the built-in agents, see the document called ‘Microsoft-hosted agents’.
Since we are planning to sign the package and the signing only works on Windows machines (at least that I could get to work). We are going to choose a vmImage of windows-latest.
1
2
| pool:
vmImage: 'windows-latest'
|
Steps
Now you can think of the steps as the individual tasks that needs to happen. In fact, you will be creating tasks for each thing we want to do.
.NET version
Now let’s tell the agent what version of .NET to run
1
2
3
4
5
6
| - task: UseDotNet@2
displayName: Setup .NET SDK Version 3.x
inputs:
packageType: sdk
version: 3.x
includePreviewVersions: true
|
The - task: should be on the next line after the steps: element. The value after the task is the task name. In this case, we are running the task call UseDotNet and version 2. The convention for the task name is taskName@versionNumber. Don’t worry, you don’t have to remember them all. You use the assistant to generate the snippet. the displayName can be whatever text you want it to be. This will be shown in the pipeline progress/status page.
inputs vary by tasks. In the case, we are using packageType, version, and includePreviewVersions.
Build project
In order to run the unit tests and ultimately sign the package we need to build the project. Let’s create a ‘Build’ task with the following YAML.
1
2
3
4
5
6
| - task: DotNetCoreCLI@2
displayName: 'Build the Assembly'
inputs:
command: build
versioningScheme: byBuildNumber
arguments: '--configuration $(BuildConfiguration)'
|
You’ll notice after we paste or type in the code in the editor a Settings item appeared. You can click on this to get the assistant to open for that task. It looks something like this.
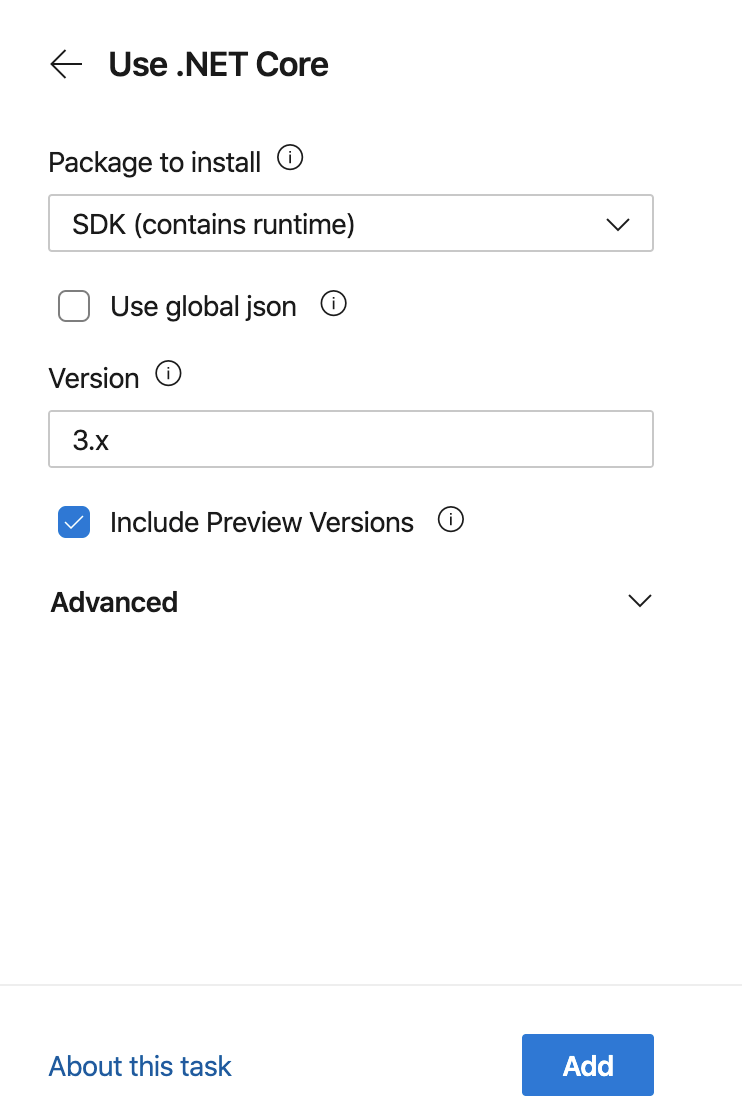
The ‘Assistant’ provides a GUI for editing specifics of a task. In most cases you can click on ‘About this task’ for the task documentation.
I bet you are wondering the $(BuildConfiguration) value is for the arguments property is? These tasks will build the project, as the command input property suggests with the versioningScheme of byBuildNumber. To me, this was one of the hardest pieces to automate so I had proper semantic versioning for the package. For this to work ‘correctly’ and automatically we needed to make some changes to the project file. I added two project groups to my projects .csproj file.
Assembly Versioning
1
2
3
4
5
6
7
8
9
10
11
| <PropertyGroup>
<VersionMajor>1</VersionMajor>
<VersionMinor>0</VersionMinor>
<VersionBuild>0</VersionBuild>
</PropertyGroup>
<PropertyGroup>
<VersionPrefix Condition=" '$(BUILD_BUILDNUMBER)' == '' ">$(VersionMajor).$(VersionMinor).$(VersionBuild)-local</VersionPrefix>
<VersionPrefix Condition=" '$(BUILD_BUILDNUMBER)' != '' And '$(Configuration)' == 'Debug'" >$(VersionMajor).$(VersionMinor).$(VersionBuild)-$(BUILD_BUILDNUMBER)-preview</VersionPrefix>
<VersionPrefix Condition=" '$(Configuration)' != 'Debug'">$(VersionMajor).$(VersionMinor).$(VersionBuild)</VersionPrefix>
</PropertyGroup>
|
The first group is contains the versioning info. Now, the engineer is responsible for versioning the project. Note: The version number will be used for the Assembly, the NuGet package name, and NuGet versioning information.
The second group, defines how the version number is generated. These version numbers are based on where and how the application is being built.
| Version Prefix |
Condition |
Assembly Info |
Comments |
| First |
'$(BUILD_BUILDNUMBER)' == '' |
$(VersionMajor).$(VersionMinor).$(VersionBuild)-local |
BUILD_BUILDNUMBER is only populated on the Azure build agents so it is empty when you build locally |
| Second |
'$(BUILD_BUILDNUMBER)' != '' And '$(Configuration)' == 'Debug'" |
$(VersionMajor).$(VersionMinor).$(VersionBuild)-$(BUILD_BUILDNUMBER)-preview |
This means we are building the Assembly in Azure and choosing the Debug configuration |
| Third |
'$(Configuration)' != 'Debug'" |
$(VersionMajor).$(VersionMinor).$(VersionBuild) |
This means we are building in a Release configuration |
Pipeline Parameter and Variables
Because we want the ability to indicate whether we are building the Debug or Release configuration, we are going to use ‘parameters’ and ‘variables’
Let’s go back to before the trigger, around line 5 or 6 and past this parameter yaml.
1
2
3
4
5
6
7
| parameters:
- name: buildConfig
displayName: Build Configuration to Use
default: Debug
values:
- Debug
- Release
|
This creates a parameter in the pipeline call buildConfig. buildConfig will be displayed with the text of Build Configuration to Use. The buildConfig parameter will only have two choices of Debug and Release and will be presented as a dropdown list. We set the default selection to Debug. Having a default is important if you are running the pipeline on any trigger. Setting the default for the build configuration to Debug ensures that I do not commit Release builds unintentionally.
NOTE: The need to a buildConfig is not needed if you want to control the build configuration by branches. That is a little beyond this post.
Now, that we have the parameter, we need to create a variable to place the selected configuration into.
Below the pool and before the steps, around line 19, insert this YAML to create the variable.
1
2
| variables:
buildConfiguration: $
|
This now creates the variable buildConfigurations based on the buildConfig parameter
Test the project
We’ll want to make sure that all of unit tests for our project pass before we attempt to sign the package. Jump back down to the end of the file, around line 37, and enter the test task
1
2
3
4
| - task: DotNetCoreCLI@2
displayName: 'Run the Unit Tests'
inputs:
command: 'test'
|
Package the Project
Now that the project has been built and the unit tests pass, let’s package the project.
1
2
3
4
5
6
7
| - task: DotNetCoreCLI@2
displayName: Package up the Assembly
inputs:
command: 'pack'
packagesToPack: './src/*.csproj'
nobuild: true
verbosityPack: 'Normal'
|
The nobuild tells dotnet to not build the project. Building the project is not necessary since it was built so that we can run the unit tests.
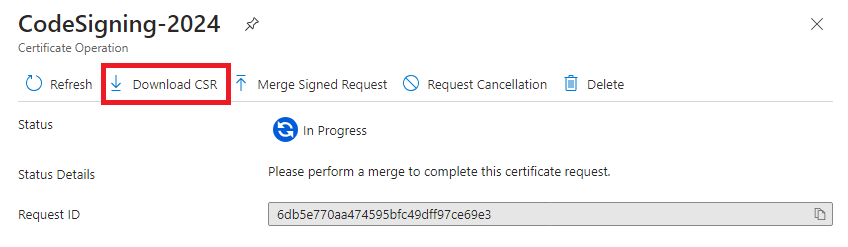
Sign the Package
Phew, the project is packaged, let’s sign it.
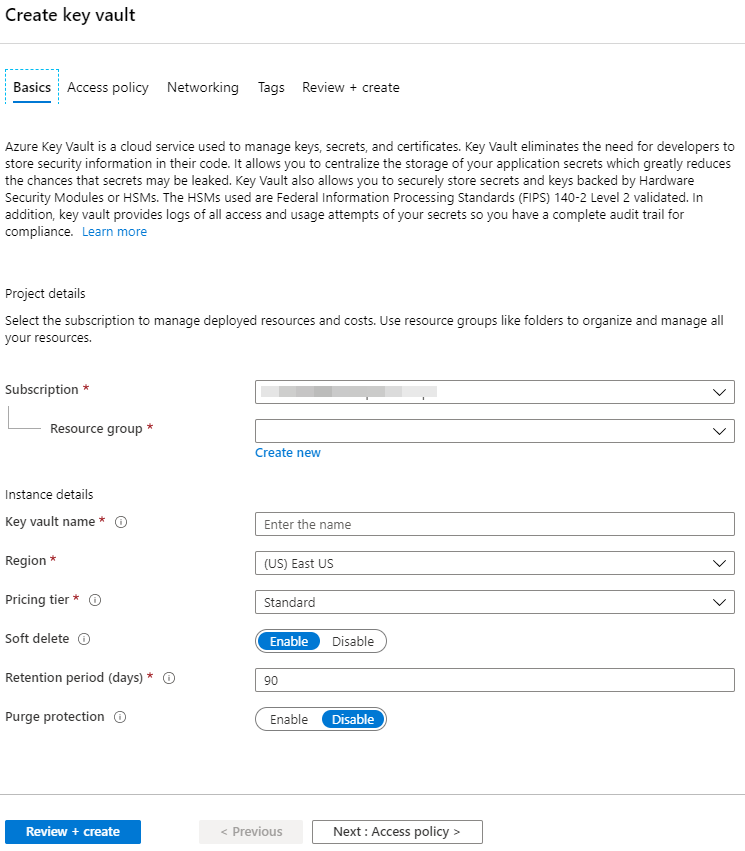
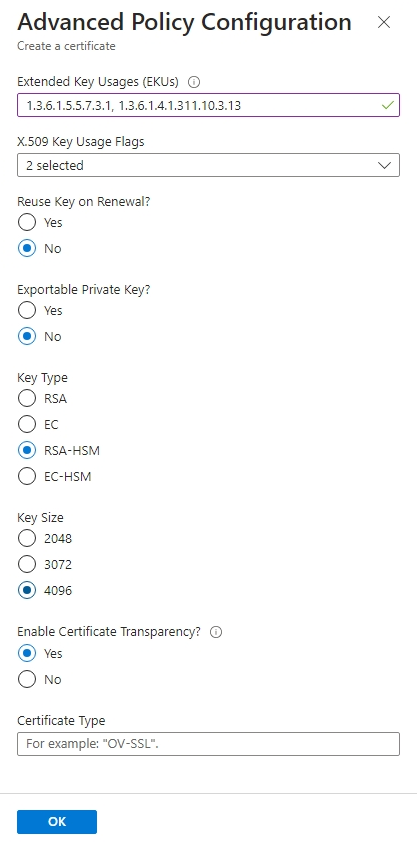
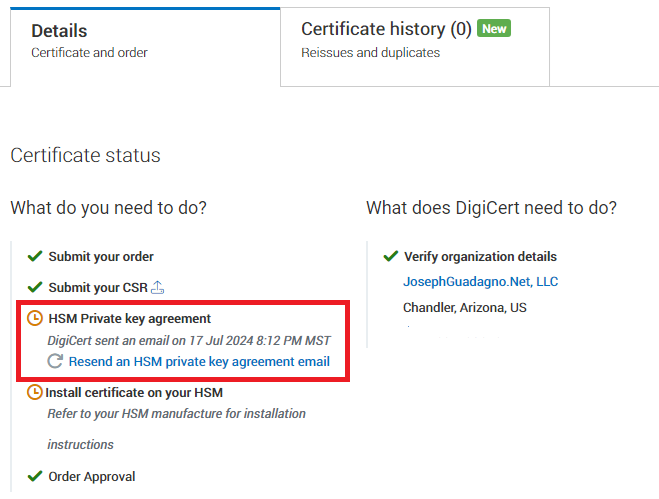
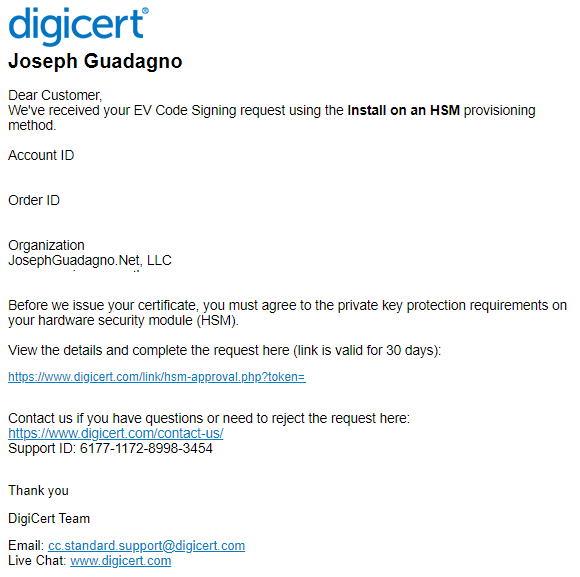
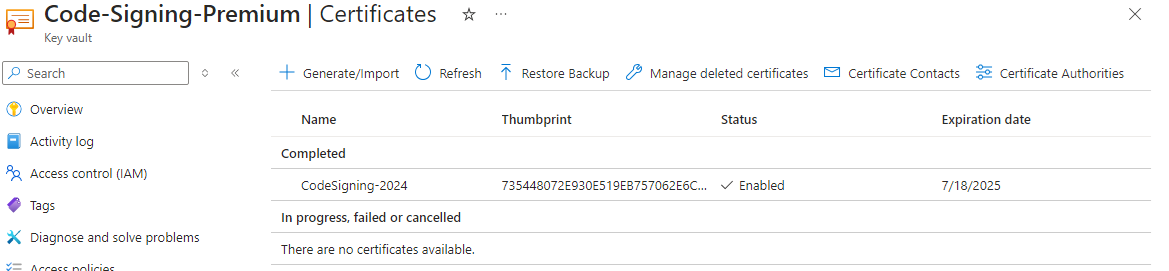
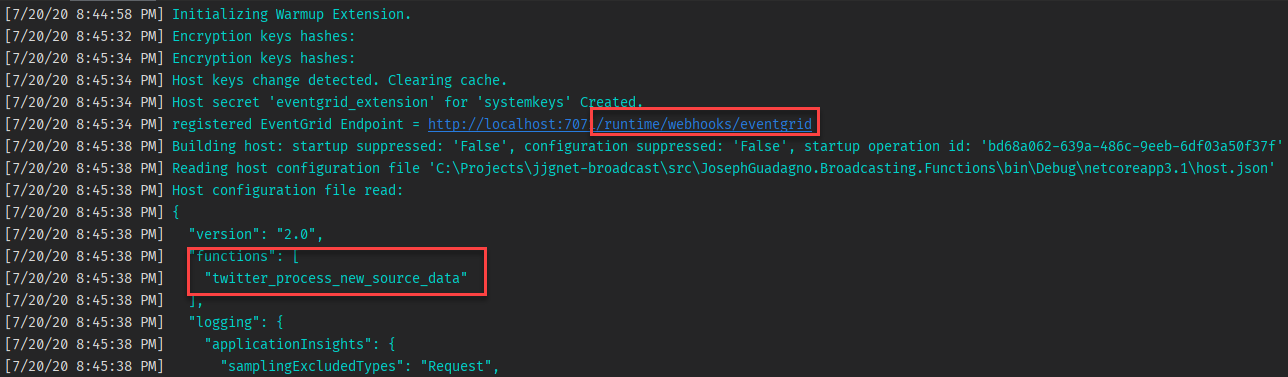
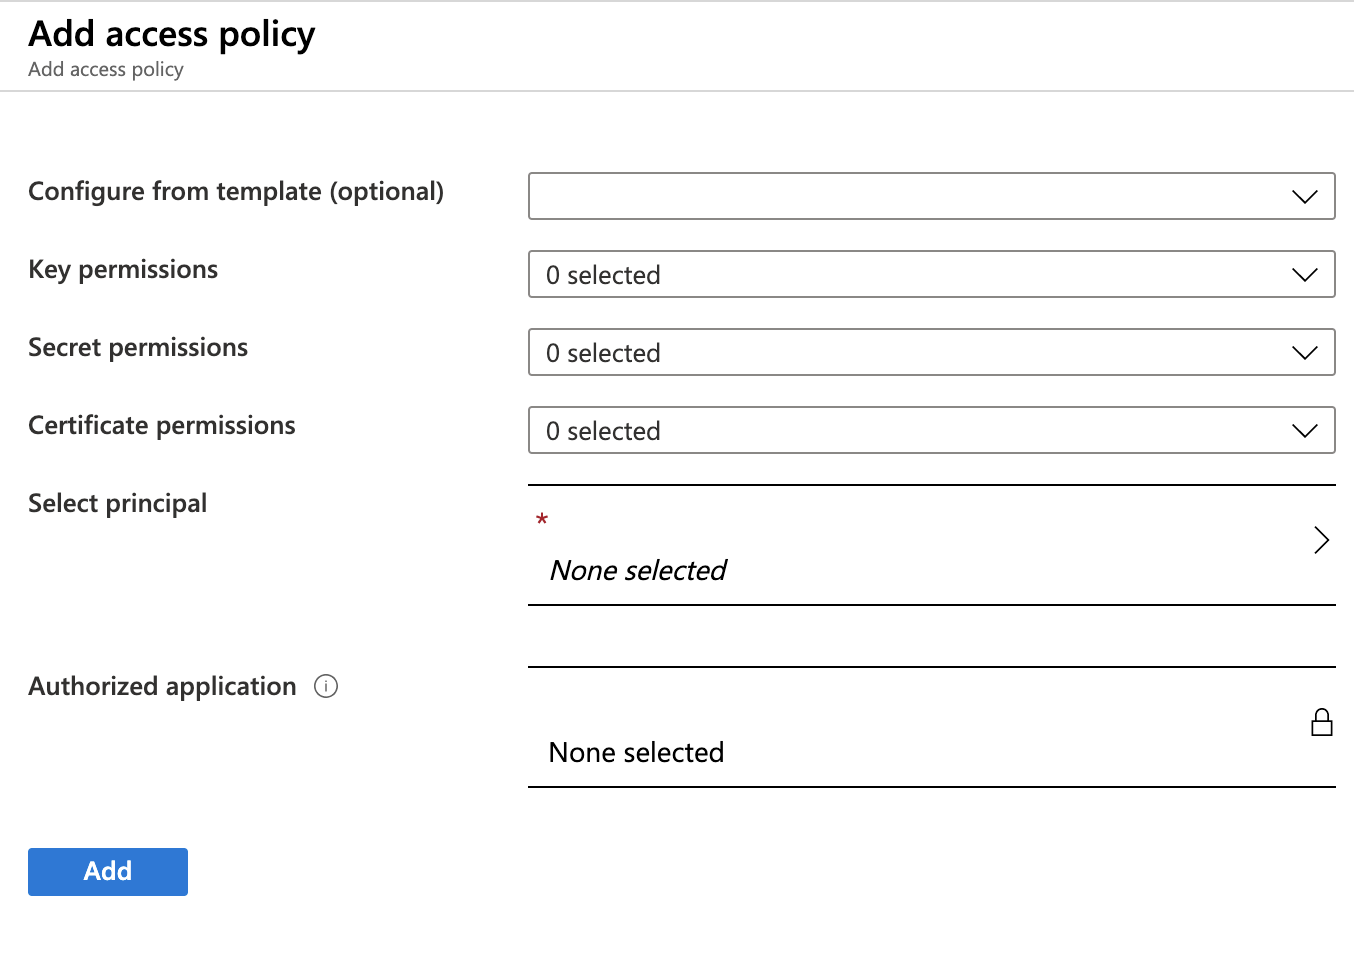
We are going to use Azure Key Vault to use our certificate to sign the package. If you haven’t setup a certificate in a key vault yet, check out Setup Code Signing Certificates in Azure Key Vault
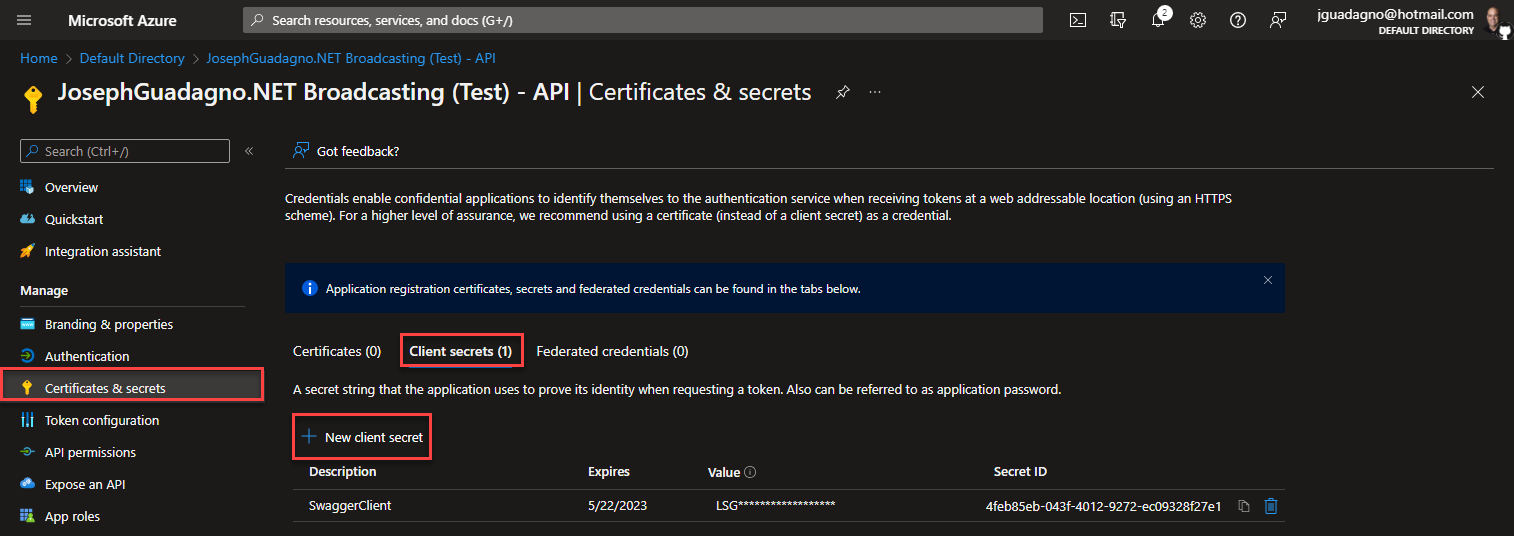
To assist us in using Azure Key Vault certificate signing, we are going to use a community created tool, NuGetKeyVaultSignTool. This tool uses some of the Key Vault APIs. As a result, we are going to need client id and client secret. For more on setting up an application in Azure to access the Key Vault through an API check out Setup an Azure Application with Permissions to Enable Certificate Signing.
We are going to need the client id, client secret, and a few other values for our building and signing of the package. Since you NEVER EVER want to store any secrets in your source code repository, we are going to need an alternate way to access those secrets and keep them out of our source code repository. Azure Pipelines offers Variable for that. So let’s create some.
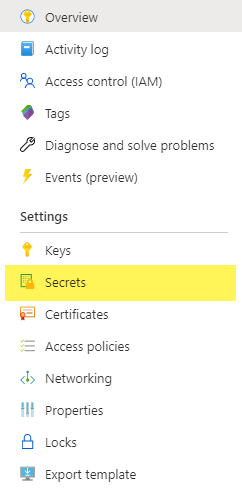
Setup the Variables
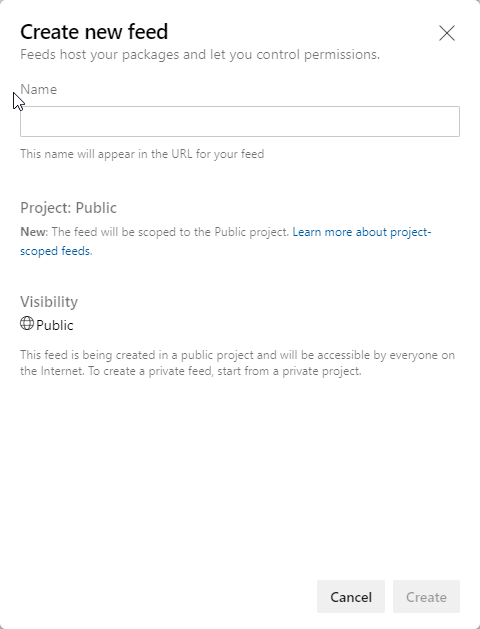
You’ll probably want to open another tab for this step. In the new tab, navigate to the Azure DevOps portal, click on Pipelines, then Library or visit username.visualstudio.com/Public/_library?itemType=VariableGroups. Be sure to replace your username with yours or your organizations and Public with whatever project name you created.
You should see a variable New variable group screen.
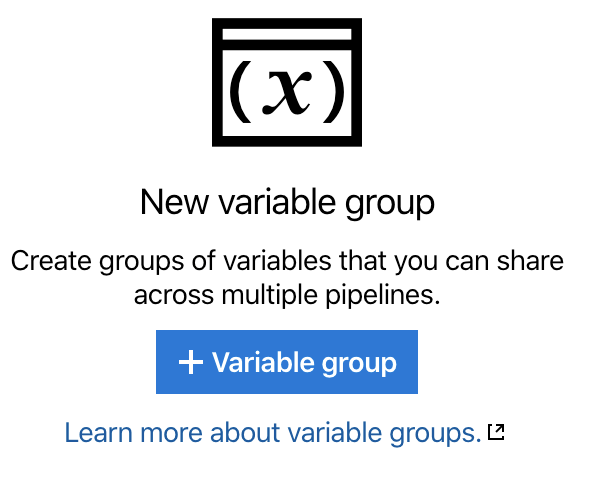
- Click on ‘+ Variable Group’
- Enter the following
| Property |
Value |
Comments |
| Variable Group Name |
CodeSigning |
|
| Description |
This is the group for handling all of the secrets for signing the code |
|
| Allow access to all pipelines |
Selected |
I chose Yes, you choose what is correct for your environment |
| Link secrets from an Azure key vault as variables |
Selected |
This is optional, I chose to do it so only Key Vault admins can see the secrets |
| Azure subscription |
your azure subscription |
Optional, if you chose to link secrets. You will have to authorize the secrets if you haven’t already |
| Key Vault Name |
your vault |
Optional, if you chose to link secrets. You will have to authorize the secrets if you haven’t already |
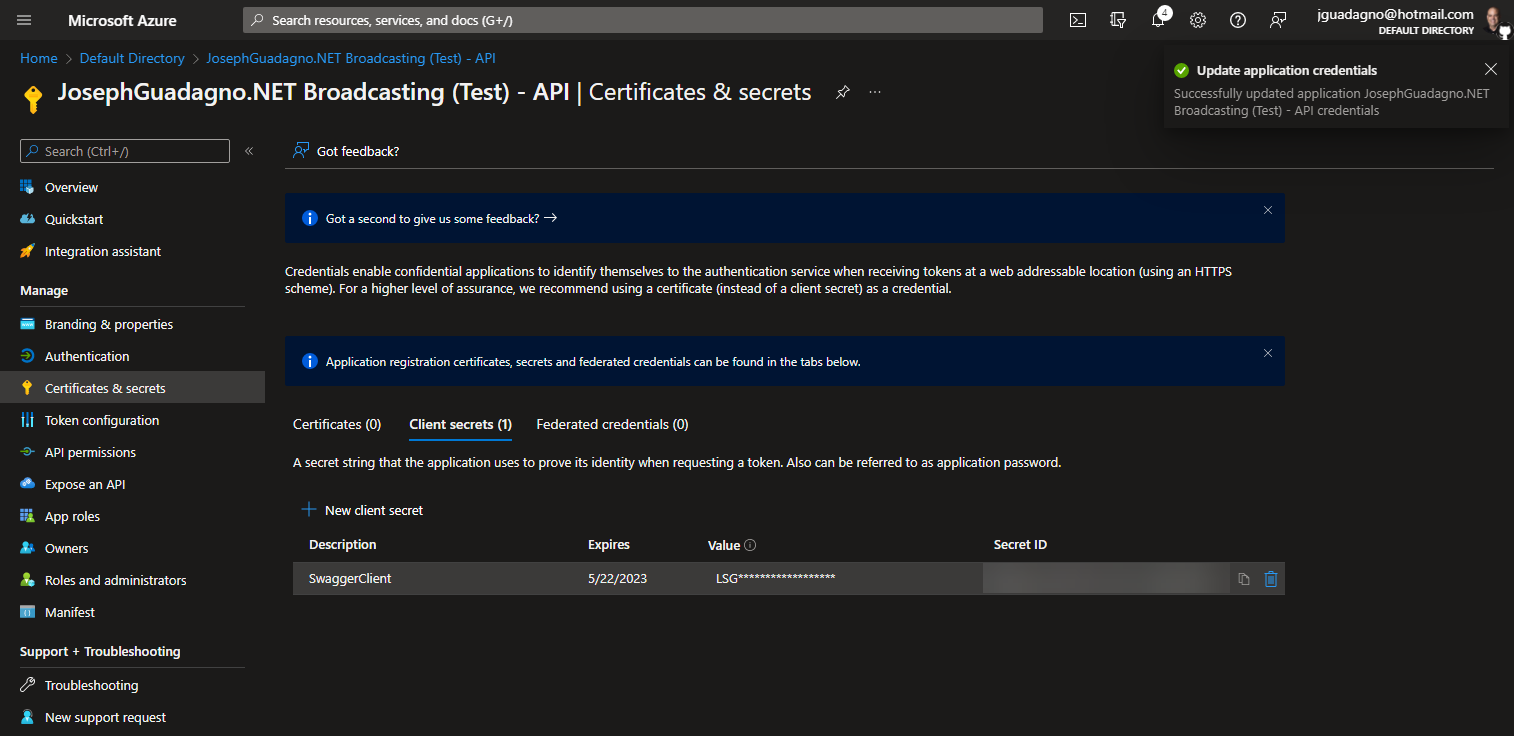
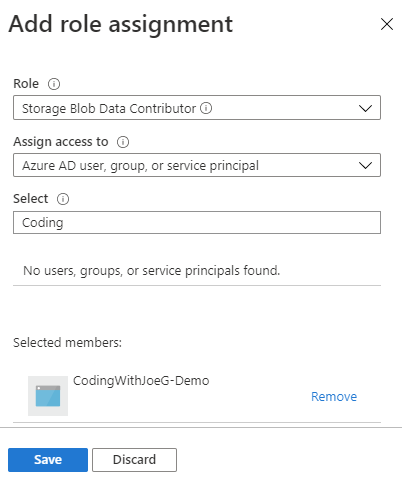
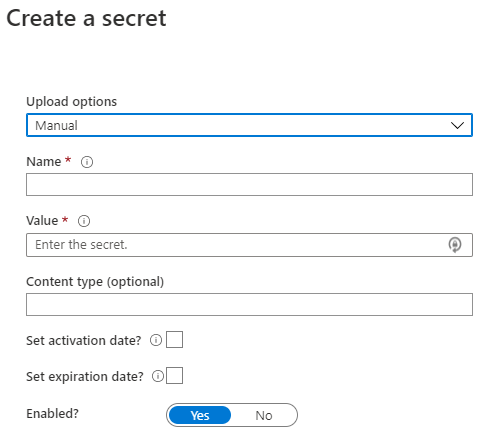
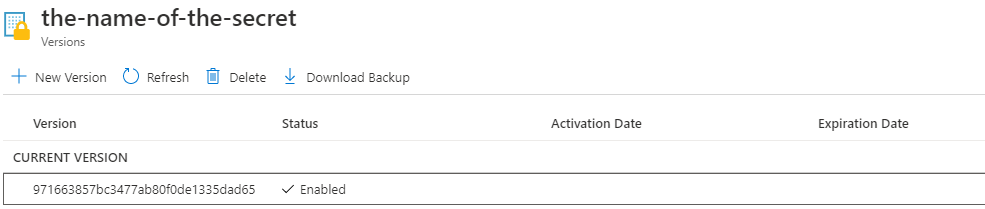
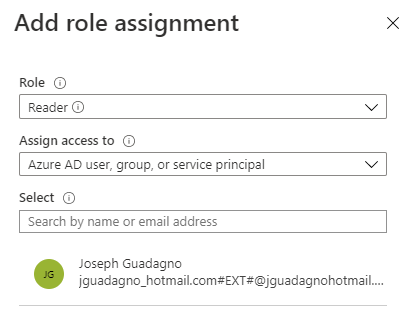
Once the ‘Link secrets from an Azure Key Vault as variables’ is complete and you click ‘+ Add’ under variables, you will be presented with a dialog to ‘Choose secrets’, similar to this one.
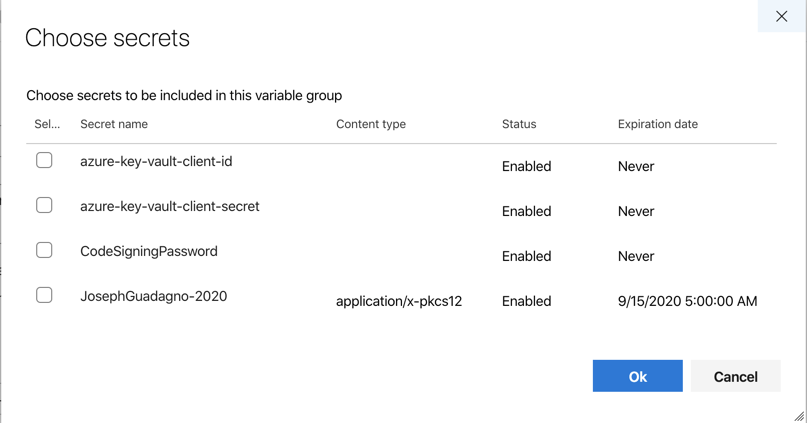
I added the client id and secrets to my vault already, so I selected them and clicked ok.
Now click, Save.
Sign Package
Back to the pipeline editor tab.
We’ll first need to add the new created client id and client secret variables as a variable in the pipeline. Go back to the variables section of our pipeline and add - group: CodeSigning to the section. Because we added a group the original variable buildConfiguration needs to be changed to a name value format. Once done it should look like this.
1
2
3
4
| variables:
- name: buildConfiguration
value: $
- group: CodeSigning
|
Since we are accessing the library now, this pipeline is going to need extra permissions.
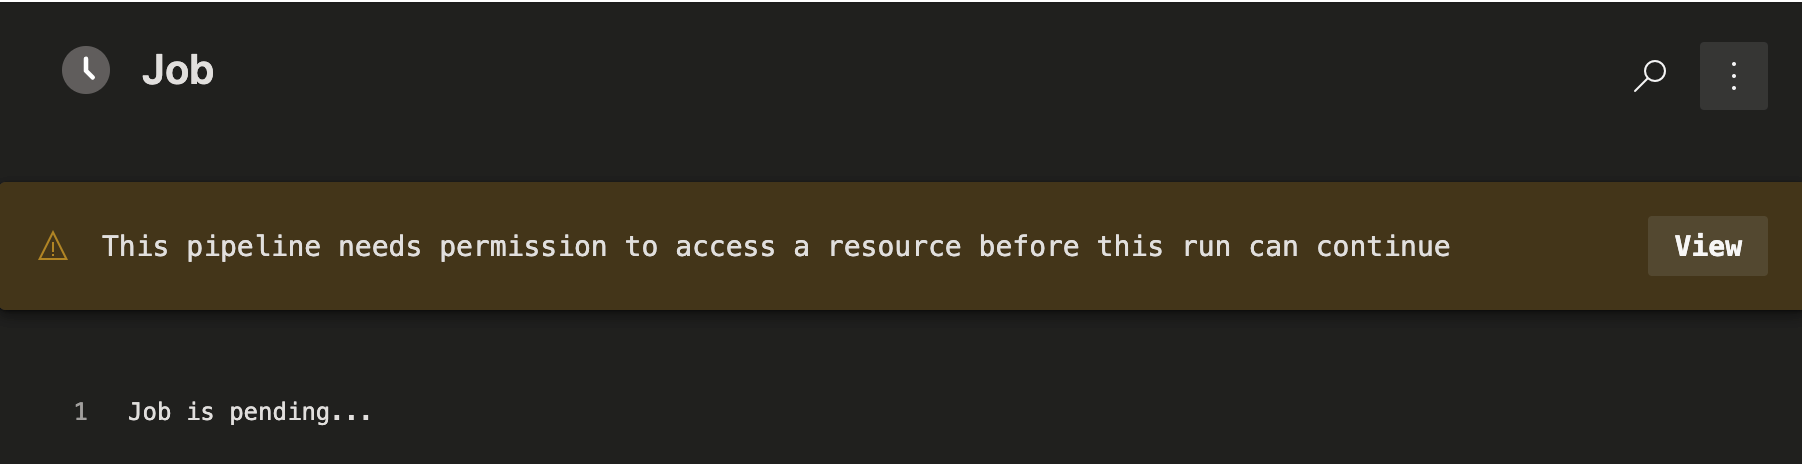
- Click ‘View’
- Click ‘Permit’
You’ll be prompted to confirm the permission.
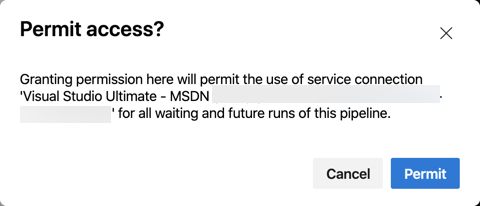
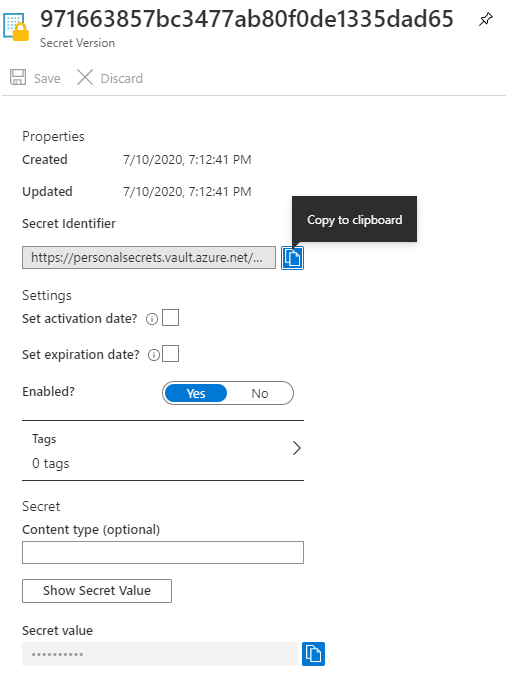
By granting permission, a new hidden task happens to download the certificates. In my case, I get a ‘Download secrets: PersonalSecrets’.
We first need to install the NuGetKeyVaultSignTool, so let’s create a task for it.
1
2
3
4
5
6
| - task: DotNetCoreCLI@2
displayName: Install NuGetKeyVaultSignTool
inputs:
command: 'custom'
custom: 'tool'
arguments: 'install --tool-path . NuGetKeyVaultSignTool'
|
Here we created used the custom option for the DotNetCoreCli task to install the tool.
Now we’ll need to create a script to call the tool
1
2
3
4
5
6
7
8
9
10
11
12
13
14
| - task: PowerShell@2
displayName: Running NuGetKeyVaultSign
inputs:
targetType: 'inline'
script: |
.\NuGetKeyVaultSignTool sign ./src/**/*.nupkg `
--file-digest "sha256" `
--timestamp-rfc3161 "https://timestamp.digicert.com" `
--timestamp-digest "sha256" `
--azure-key-vault-url "https://<yourvaultname>.vault.azure.net/" `
--azure-key-vault-tenant-id "92a85e53-affe-4d2d-ac5d-99383f88e2e3" `
--azure-key-vault-client-id "$(azure-key-vault-client-id)" `
--azure-key-vault-client-secret "$(azure-key-vault-client-secret)" `
--azure-key-vault-certificate "<certificateName>"
|
NOTE There a backticks “`” at the end of every line. This is used so the Powershell tasks knows that we are continuing on the next line.
The first part of the Powershell shell task is the execute the NuGetKeyVaultSignTool with the sign option. The ./src/**/*.nupkg argument will get us the built package. The rest of the arguments go into what the tool needs to sign the package suing Azure Key Vault.
| Argument |
Value |
Comment |
| file-digest |
sha256 |
This shouldn’t need to change depending on your certificate |
| timestamp-rfc3161 |
https://timestamp.digicert.com |
This shouldn’t need to change unless you get your certificate from another source |
| timestamp-digest |
sha256 |
This shouldn’t need to change depending on your certificate |
| azure-key-vault-url |
https://<yourvaultname>.vault.azure.net/ |
Replace this vault with the Url for your Azure Key Vault |
| azure-key-vault-tenant-id |
92a85e53-affe-4d2d-ac5d-99383f88e2e3 |
Replace this with the Azure Tenant Id that this Key Vault is in |
| azure-key-vault-client-id |
$(azure-key-vault-client-id) |
Pulls the value from the CodeSigning group and Azure Key Vault |
| azure-key-vault-client-secret |
$(azure-key-vault-client-secret) |
Pulls the value from the CodeSigning group and Azure Key Vault |
| azure-key-vault-certificate |
<certificateName> |
Replace with the name of your certificate |
Azure Artifact
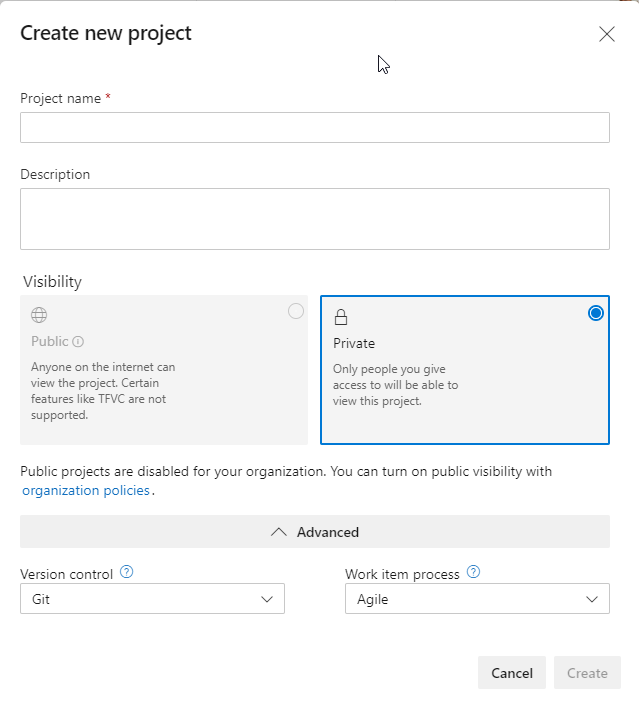
If you haven’t setup up an Azure Artifact repository you can ready the post Setup Azure Artifacts to Host Your NuGet Packages to get started.
The last step is publishing or ‘pushing’ the package off to Azure Artifacts. For this, we are going to continue to use the DotNetCli task with the push command.
1
2
3
4
5
6
7
| - task: DotNetCoreCLI@2
displayName: 'Publish the NuGet Package'
inputs:
command: 'push'
packagesToPush: '$(Build.ArtifactStagingDirectory)/*.nupkg'
nuGetFeedType: 'internal'
publishVstsFeed: '<libraryGuid>'
|
| Argument |
Value |
Comment |
| command |
push |
|
| packagesToPush |
$(Build.ArtifactStagingDirectory)/*.nupkg |
The Build.ArtifactStagingDirectory is an global variable that Azure Pipelines exposes to indicate the directory where build artifacts are placed |
| nuGetFeedType |
internal |
Internal is used if the Artifact is located in the same organization |
| publishVstsFeed |
<libraryGuid> |
The GUID that identifies the library. It’s not easy to find, so after you paste the YAML into the editor. Use the assistance to edit the tasks |
Running the Pipeline
We started this task to get triggered whenever there was a commit to the master branch. Once we click save in the editor, if you haven’t been saving at each task, we will be prompted for a commit message.
- Click the ‘Save’ button, or ‘Save and Run’ if you haven’t been saving along with the post.
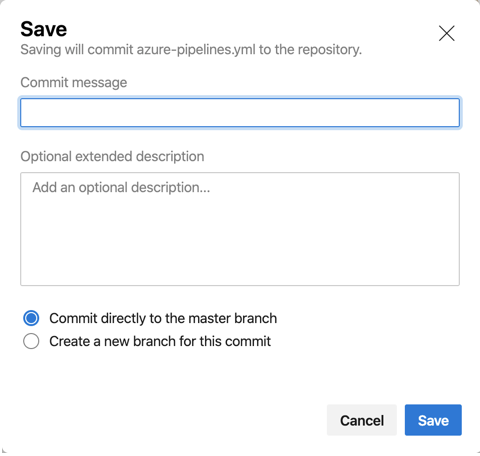
- Enter a commit message
- Any optional text (optional)
- ‘Commit directly to the master branch’ for this post, should be selected
- Click ‘Save’
At this point the commit is being saved and a pipeline run is being triggered. Open up a new tab with the pipeline showing.
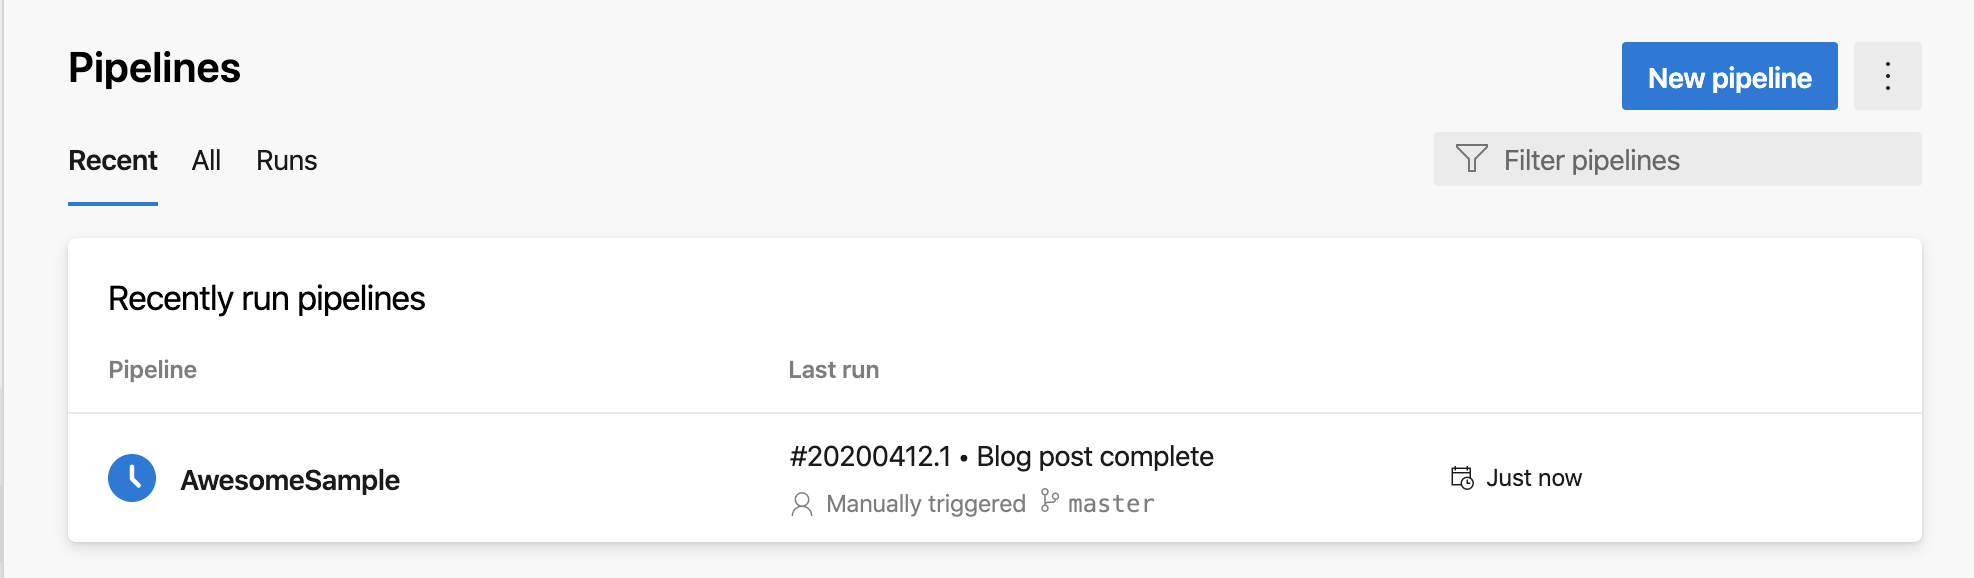
You’ll see the repository name, ‘AwesomeSample’ in this case, with the Last Run. This image in front of the repository name indicates the start of the run. In the case of the image above, it’s being queued. If it fails, you will get an  . If you click on the commit message, in this case #20200412.1 - Blog post complete, you will get to the job details to see what went wrong.
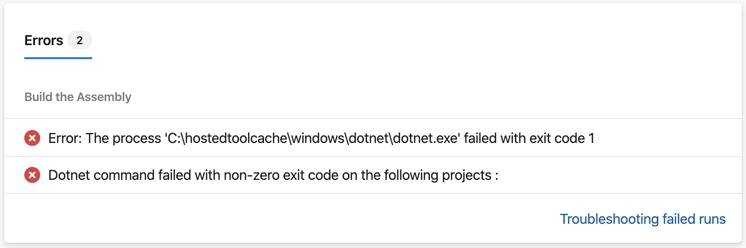
This shows us that there was a failure with one of the dotnet.exe tasks. If you click on the Job below, you can see exactly what happened.
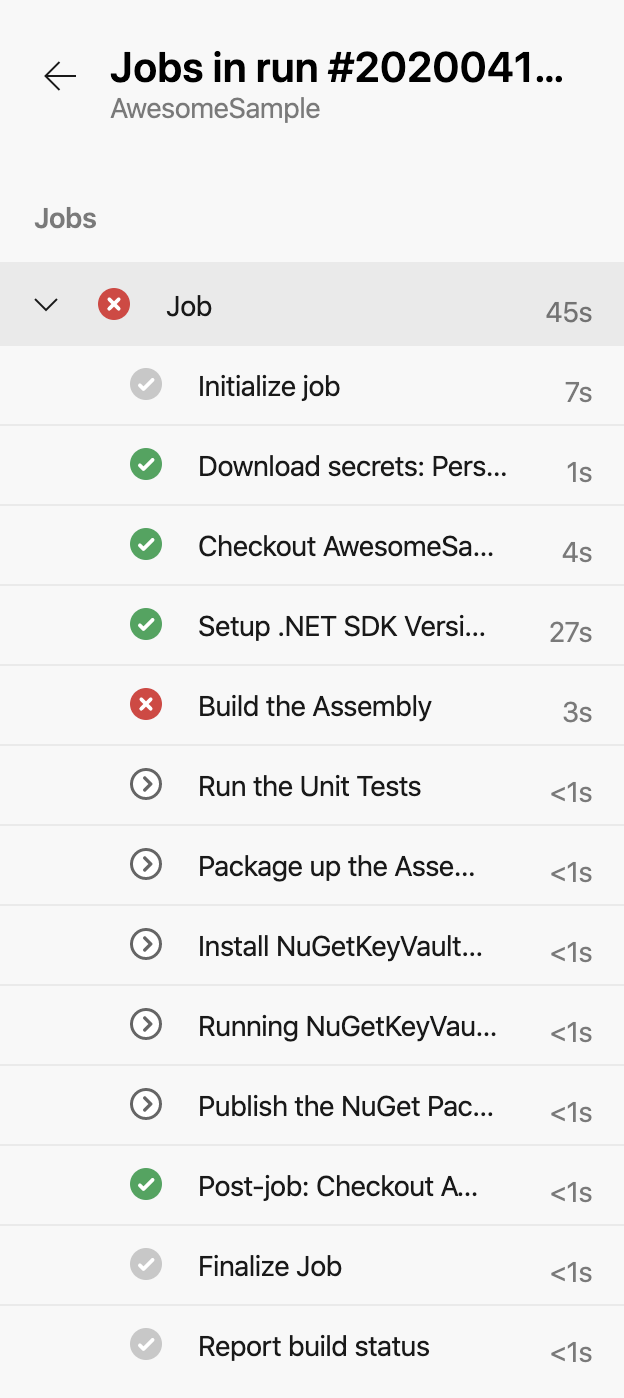
We see that the task ‘Build the Assembly’ failed, if you click on it, you will see the details.
This was just for illustration, I had the paths and folders different from what the pipeline scripts were expecting. In addition, I was missing the Visual Studio solution, otherwise you have to update the tasks with folder paths. If you build is successful, you will see a  to the job. And if you click on the job you’ll see next to all of the tasks.
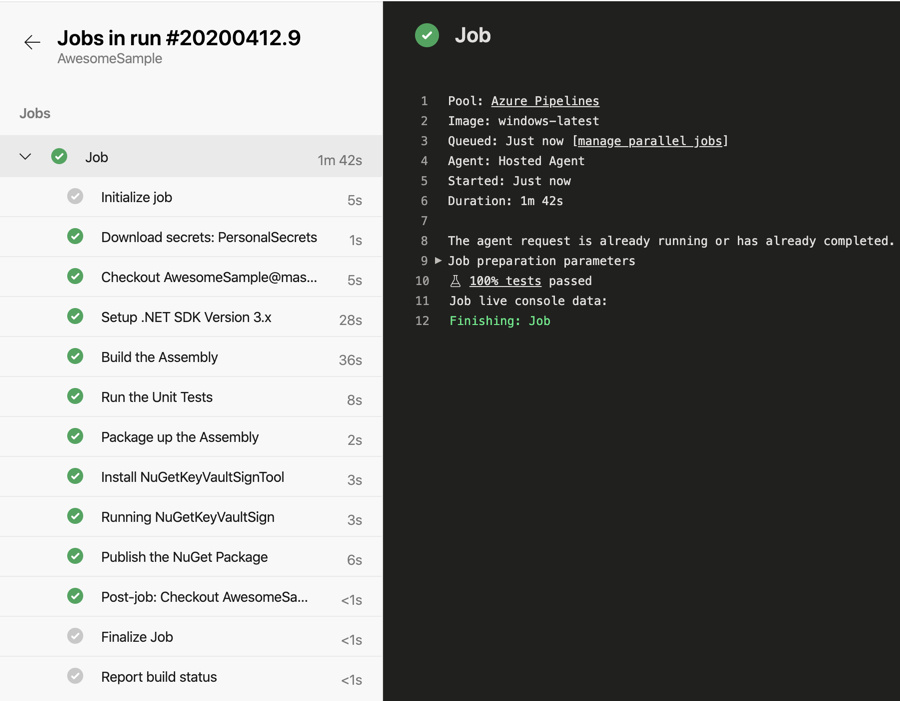
Oh, and you’ll get an email on the success (and failures).
Checking out the Artifact
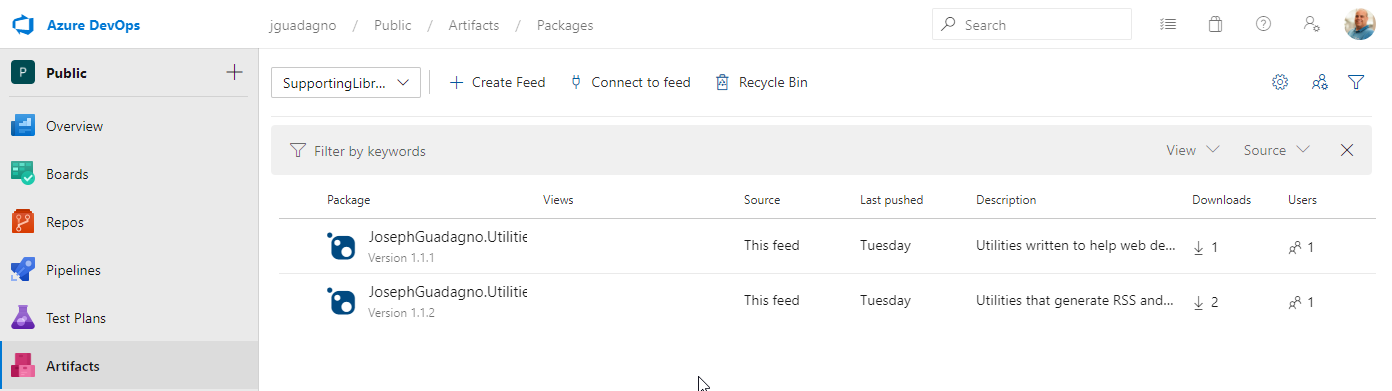
Now that we published the package, we can view it in our Artifacts
Click on ‘Artifacts’ and you will now see the AwesomeSample version 1.0.0-<builddate>.<buildNumber>-preview. The version number and name correlates to the values and settings in our csproj as we outlined in the Assembly Versioning part of this post.
Click on the artifact name and up will get instructions on how to add it to your .NET application via NeGet. If you click on the ‘Versions’ button on the toolbar you will see more details about it.
Creating a ‘Release’ Build
Some would say that the release builds should be part of workflow, and I agree. However, we are trying to this in ‘one’ blog posts.
- Click on the ‘Pipelines’ in Azure DevOps
- Click on ‘Awesome Sample’
- Click on ‘Run Pipeline’
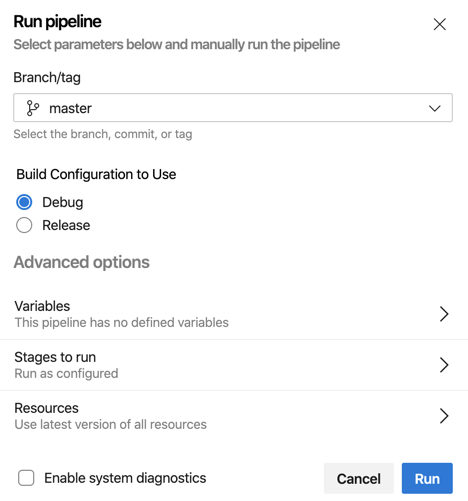
You’ll see the ‘Build Configuration to Use’ parameter that we created earlier.
- Chose ‘Release’
- Click ‘Run’
This will take your to the job details page. Assuming everything runs successfully, you will get a green checkmark and we can see the release build in the Artifacts.
You’ll notice that the ‘AwesomeSample’ it is now labeled Version 1.0.0. If you click on ‘AwesomeSample’, then versions, you’ll see 2 versions. Version 1.0.0 is the currently selected one.
Wrapping up
That’s it! I know that was a lot. But there was a lot of detail to get us up and running. If you don’t want to piece the whole post together, you can see the gist of azure-pipeline.yml at:
]]>


 This book is broken up into three parts.
In the first part, the author defines what software architecture is and what makes a good architecture.
The second part, the author walks you through the types of Architects and the skill sets needed.
The author wraps up the book with how a software engineer/developer can become an architect.
This book is broken up into three parts.
In the first part, the author defines what software architecture is and what makes a good architecture.
The second part, the author walks you through the types of Architects and the skill sets needed.
The author wraps up the book with how a software engineer/developer can become an architect.
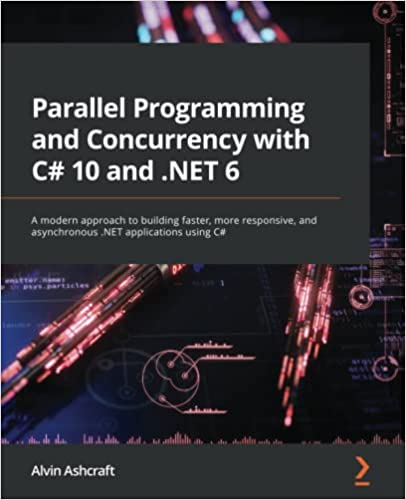 You may have wanted to dabble in Parallel Programing (async/await), the Task Parallel Library (TPL), or other ways to make your application more responsive and have been a little worried about the complexity. This book is for you. It’s a great introduction to the concepts and how to use them in your application. It’s also a great reference for when you need to look up how to do something specific.


 There is an expression in the US and part of the world that goes ‘9/11 Never Forget’. I will never forget 9/11! I remember virtually every detail of those days and the weeks that proceeded. From just after the first plane hit, until two or three weeks after the ‘event.’ Here is my tale. It started as any other ordinary day. I took a bus to commuter train (LIRR) to the NY City subway to get to work at Guardian Life Insurance. I always got in early, around 7:00 to beat the rush. I was in my cubicle probably checking email or coding when a few coworkers came and said, “Do you see the World Trade Center is on fire?” At the time, I worked in downtown Manhattan at 7 Hanover Sq which was about a half of a mile from The World Trade Center. I replied “No” and I followed the people to the other side of the building where I watched the North Tower, 1 World Trade Center, smoke from what we know now as the first plane to hit the building. We watched in awe as the building was smoking and papers were flying around like it was snow at Christmas.


![SNAGHTMLba8532e[5]](/assets/images/posts/SNAGHTMLba8532e.png "SNAGHTMLba8532e[5]")


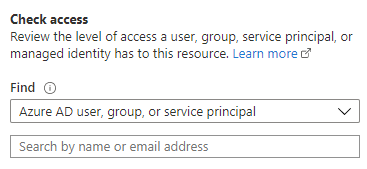
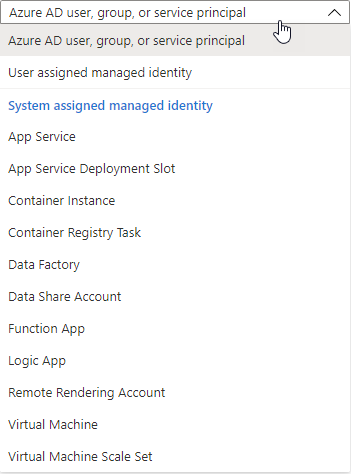
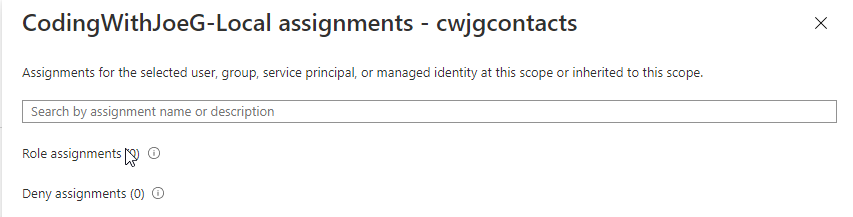
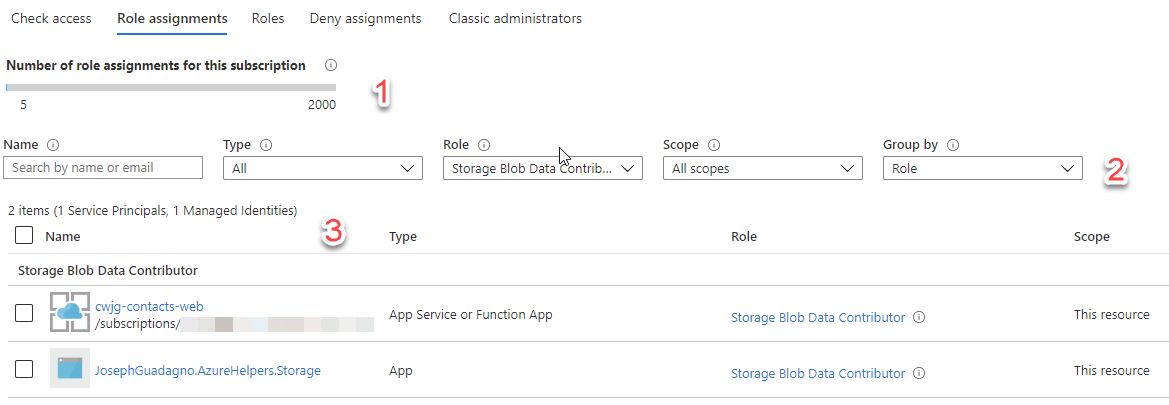
 One of the many features of