
Working with the LinkedIn API with C#
The last day few days, I have been experimenting with the LinkedIn API to send my blog posts, YouTube videos, and community updates automatically to my LinkedIn profile from my open-source project JosephGuadagnoNet.Broadcasting. It’s been quite a challenge to get it to work. I ran into authentication issues, permission issues, and serialization issues. So what did I decide to do? You guessed, solve the issues and blog about it so you don’t have to.
Getting Started
First things first, you need to have a LinkedIn account and LinkedIn company page to post shares, as they are called on LinkedIn. If you don’t have an account or a company page, you can create one at LinkedIn. Once you have an account, you will need to create an application in the LinkedIn Developer Portal.
Developer Portal
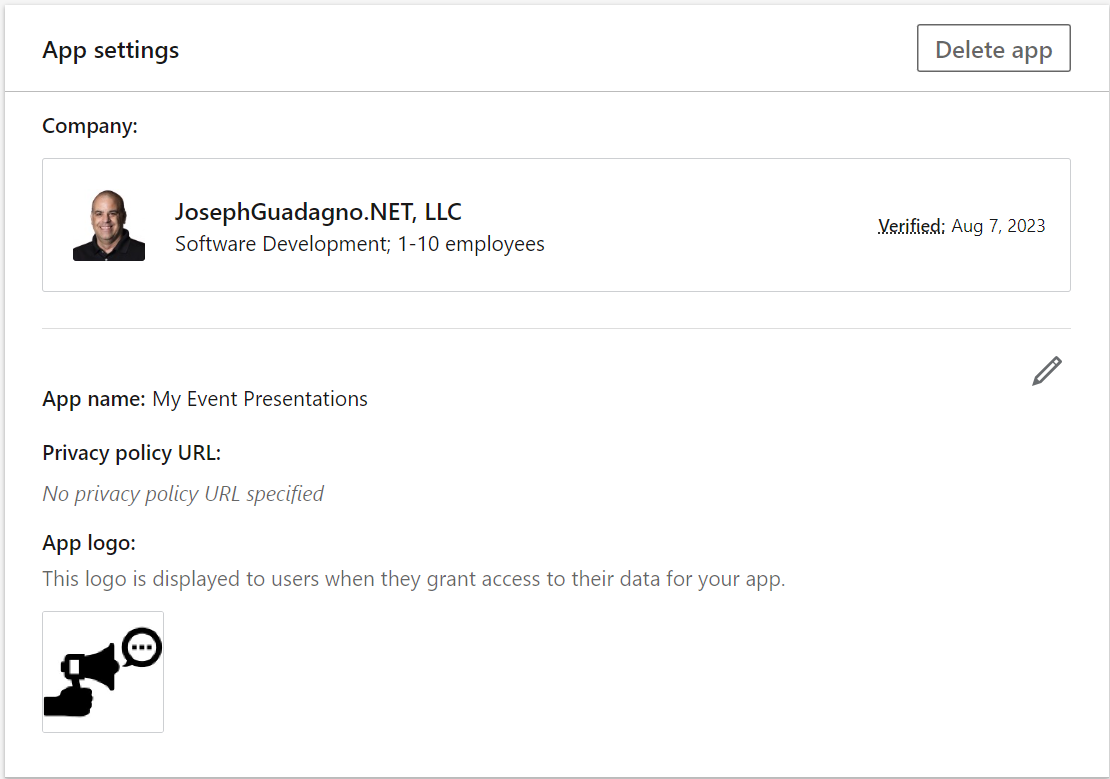
On the Developer Portal, you will need to create an application. You can do this by clicking on the Create App button in the center on of the page. You will need to fill out the form with the following information:
| Field | Description |
|---|---|
| App name * | The name of your application |
| LinkedIn Page * | This is the owner (company page) of the application |
| Privacy policy URL | The URL to your privacy policy |
| App logo * | The logo for your application |
| Legal agreement | Read and accept that API Terms of Use |
(*) Required
Once done, you should see a screen similar to the following:
Client ID and Client Secret
Once you have an application, you will need to get the clientid and clientsecret for the application. You will need these to authenticate with the LinkedIn API. If you are going to be posting on behalf of a user, you will need to get an OAuth token for the user. If you are going to be posting on behalf of a company, you will need to get an OAuth token for the company. I won’t be covering the organizational OAuth token in this post.
Navigate to the OAuth 2.0 Tools page to begin. You can also get there from you App Information page by clicking on Docs and tools, then OAuth Token Tools.
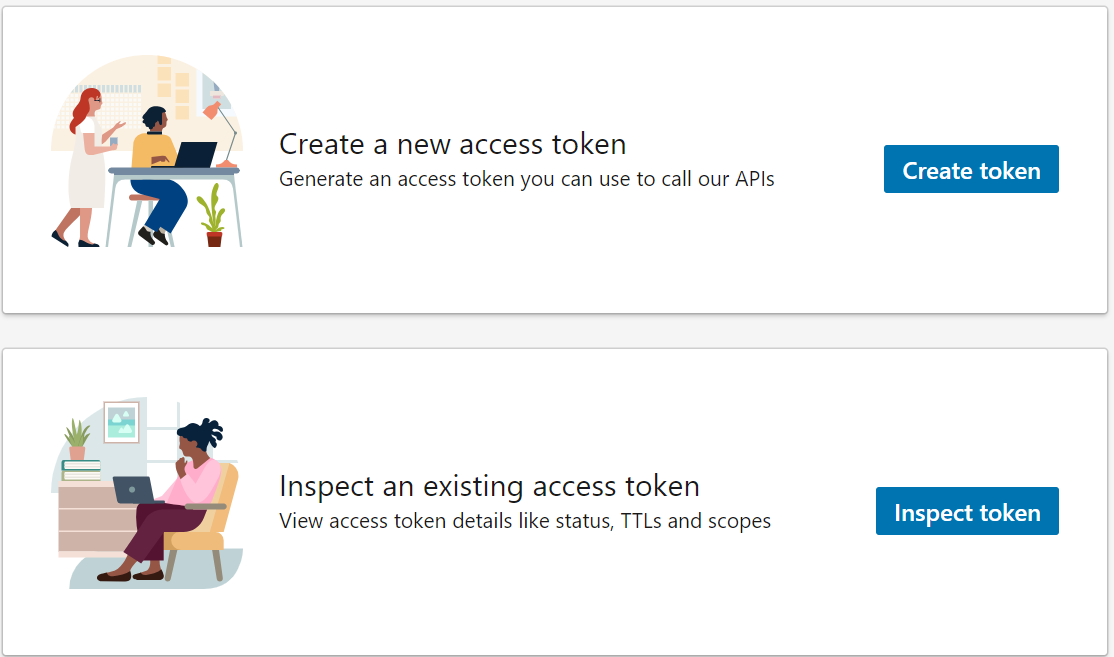
- Click on Create token
On the next page, you will need to select your application and either chose Member authorization code (3-legged) or Client credential (2-legged). I didn’t come up with the names. Basically, Member authorization is if you are going to be posting on behalf of the user, as I will in this post, and Client credential is if you are going to be building an application or interface where the user will be signing in and doing something with their data. For this post, I will be using Member authorization code (3-legged).
For more on the different types of OAuth 2.0 flows, see LinkedIn Authentication Overview.
You will need to select the scopes that you will need for your application. For this post, I will be using the following scopes:
-
r_liteprofile: Read basic profile information -
w_member_social: Post, comment and like posts on behalf of the user
Click Request access token to continue.
Once you do this, you will be redirected to sign-in to LinkedIn to grant the access. Enter your credentials and click Sign In.
Now, you will have a screen with the access token and details about the token. You will need this access token to make calls to the LinkedIn API. You can copy the token by clicking on the Copy access token button.
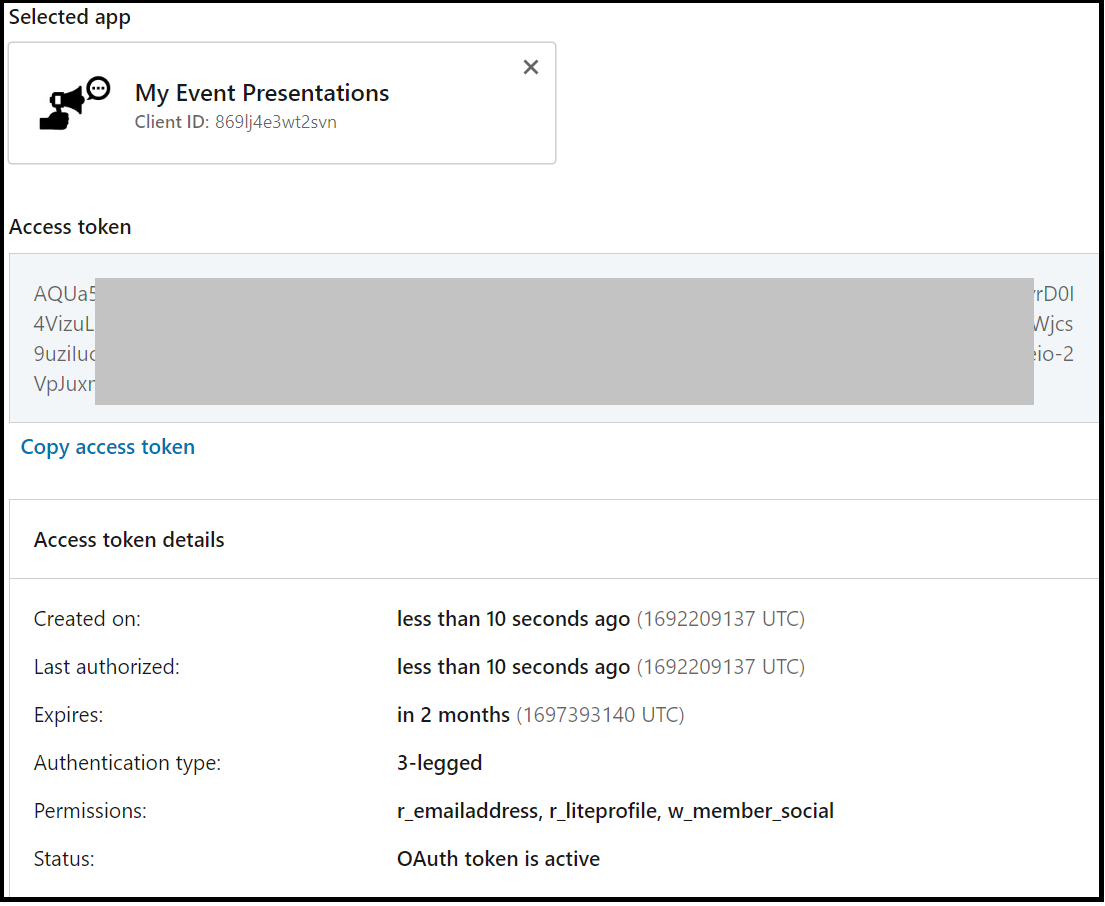
I strongly recommend that you save this access token somewhere secure like Azure Key Vault. If someone gets a hold of it, they can post on behalf of the user. If you do lose it, you can always revoke it and create a new one.
You’ll notice that the access token expires in approximately two months. You will need to refresh the token before it expires. You will need to do this before the token expires. Details on how to do this are in the LinkedIn Authentication Overview. I won’t be covering that in this post.
LinkedIn Manager
Now that we have the access token, we can start posting to LinkedIn. I created a class called LinkedInManager to handle all of the calls to the LinkedIn API. You check get the source in the LinkedIn API Manager GitHub Repository. I will be using the LinkedIn API to get the user’s LinkedIn ID and the Share on LinkedIn API to post the share.
Get User Info
All of the API calls to post a share on LinkedIn require the user’s LinkedIn ID. You can get this by making a call to the Profile API. You will need to make a GET call to the me endpoint, as shown below as an http request.
1
2

GET https://api.linkedin.com/v2/me
Authorization: Bearer {{my-access-token}}
In this http request, as well as the future requests in this posts, you will need to replace {{my-access-token}} with the access token you received from the OAuth 2.0 Tools page. There will likely be another variable in future https requests, {{my-person-id}}. This will be the LinkedIn ID you get from the me endpoint.
In the LinkedInManager class, I created a method called GetUser to make this call. The method is shown below.
1
2
3
4
5
6
7
8
9

 public async Task<LinkedInUser> GetMyLinkedInUserProfile(string accessToken)
{
    if (string.IsNullOrEmpty(accessToken))
    {
        throw new ArgumentNullException(nameof(accessToken));
    }

    return await ExecuteGetAsync<LinkedInUser>(LinkedInUserUrl, accessToken);
}
The ExecuteGetAsync method is a helper method that makes the call to the LinkedIn API. The method is shown below.
1
2
3
4
5
6
7
8
9
10
11
12
13
14
15
16
17
18
19
20
21
22
23
24
25
26
27

private async Task<T> ExecuteGetAsync<T>(string url, string accessToken)
{
    _httpClient.DefaultRequestHeaders.Accept.Add(new MediaTypeWithQualityHeaderValue("application/json"));
    _httpClient.DefaultRequestHeaders.Add ("Authorization", $"Bearer {accessToken}");
    var response = await _httpClient.GetAsync(url);
    if (response.StatusCode != HttpStatusCode.OK)
        throw new HttpRequestException(
            $"Invalid status code in the HttpResponseMessage: {response.StatusCode}.");

    // Parse the Results
    var content = await response.Content.ReadAsStringAsync();

    var options = new JsonSerializerOptions
    {
        PropertyNameCaseInsensitive = true,
    };

    var results = JsonSerializer.Deserialize<T>(content, options);

    if (results == null)
    {
        throw new HttpRequestException(
            $"Unable to deserialize the response from the HttpResponseMessage: {content}.");
    }

    return results;
}
You’ll notice that I am using the HttpClient class to make the call to the LinkedIn API. I am also using the System.Text.Json library to deserialize the response from the API call. You can use any library you want to make the call and deserialize the response.
On line 3 and 4, the required headers are set. The Accept header is set to application/json and the Authorization header is set to the access token.
Line 5 makes the call to the LinkedIn API. If the response is not OK, an exception is thrown.
Line 11 reads the response from the HTTP call.
Line 18 deserializes the response from the API call. If the response is null, an exception is thrown.
Upon success, the LinkedInUser object is returned. The LinkedInUser object is shown below.
1
2
3
4
5
6
7
8
9
10
11
12
13
14
15
16
17
18
19
20
21
22
23
24
25
26
27
28
29

public class LinkedInUser
{
    [JsonPropertyName("id")]
    public string Id { get; set; }

    [JsonPropertyName("profilePicture")]
    public ProfilePicture ProfilePicture { get; set; }

    [JsonPropertyName("vanityName")]
    public string VanityName { get; set; }

    [JsonPropertyName("localizedFirstName")]
    public string FirstName { get; set; }

    [JsonPropertyName("localizedLastName")]
    public string LastName { get; set; }

    [JsonPropertyName("localizedHeadline")]
    public string Headline { get; set; }

    [JsonPropertyName("firstName")]
    public LocalizedInformation LocalizedFirstName { get; set; }

    [JsonPropertyName("lastName")]
    public LocalizedInformation LocalizedLastName { get; set; }

    [JsonPropertyName("headline")]
    public LocalizedInformation LocalizedHeadline { get; set; }
}
Note: Not all of these fields will be filled. What is filled is based on the scope of for your OAuth token. The Id property is the only property that we use. Note, if you have the r_liteprofile scope, you will get all of the properties but VanityName.
The Id property of the LinkedInUser object, as well as other identifiers in the API, follows the Universal Resource Name URN internet standard. The format is urn:li:person:<person-id>, where <person-id> is the identifier for the person. For most calls, you will need the full URN. In the LinkedInManager class, you only need the <person-id> portion of the URN.
For more on the URNs and IDs in LinkedIn, see the LinkedIn URNs and IDs page.
Share on LinkedIn
The Share API on LinkedIn provides the different ways to create shares or posts on LinkedIn; plain text, text with a link, and text with an image. I will show you how to create each of these types of shares.
Post Plain Text
To post plain text, you will need to make a POST call to the ugcPosts endpoint. The call to the ugcPosts endpoint is shown below.
1
2
3
4
5
6
7
8
9
10
11
12
13
14
15
16
17
18
19

POST https://api.linkedin.com/v2/ugcPosts
Authorization: Bearer {{my-access-token}}
X-Restli-Protocol-Version: 2.0.0

{
  "author": "urn:li:person:{{my-person-id}}",
  "lifecycleState": "PUBLISHED",
  "specificContent": {
    "com.linkedin.ugc.ShareContent": {
      "shareCommentary": {
        "text": "Please ignore this post. This is a test post. It will be deleted shortly.}"
      },
      "shareMediaCategory": "NONE"
    }
  },
  "visibility": {
    "com.linkedin.ugc.MemberNetworkVisibility": "PUBLIC"
  }
}
A few things to note about this call. We introduced a new header X-Restli-Protocol-Version. This header is required for all POST calls. The value of the header is 2.0.0.
In the LinkedIn API Manager, as call is made to PostShareText. The method is shown below.
1
2
3
4
5
6
7
8
9
10
11
12
13
14
15
16
17
18
19
20
21
22
23
24
25
26
27

public async Task<string> PostShareText(string accessToken, string authorId, string postText)
{
    // Validation removed for brevity
    var shareRequest = new ShareRequest
    {
        Author = string.Format(LinkedInAuthorUrn, authorId),
        Visibility = new Visibility { VisibilityEnum = VisibilityEnum.Anyone },
        SpecificContent = new SpecificContent
        {
            ShareContent = new ShareContent
            {
                ShareCommentary = new TextProperties()
                {
                    Text = postText
                },
                ShareMediaCategoryEnum = ShareMediaCategoryEnum.None
            }
        }
    };

    var linkedInResponse = await CallPostShareUrl(accessToken, shareRequest);
    if (linkedInResponse is { IsSuccess: true, Id: not null })
    {
        return linkedInResponse.Id;
    }
    throw new HttpRequestException($"Failed to post status update to LinkedIn: LinkedIn Status Code: '{linkedInResponse.ServiceErrorCode}', LinkedIn Message: '{linkedInResponse.Message}'");
}
We start off by creating a ShareRequest object. Now, in my implementation I have made a view assumption like setting the Visibility to Anyone. You might want to change that in your implementation. Similar to the GetMyLinkedInProfile call, I use a helper method for all of the POST calls. This was helpful for a few reasons, the first, I was repeated code, but more importantly, the serialization and deserialization of the request and response for the LinkedIn API was very particular. The helper method is shown below.
1
2
3
4
5
6
7
8
9
10
11
12
13
14
15
16
17
18
19
20
21
22
23
24
25
26
27
28
29
30
31
32
33
34
35

private async Task<ShareResponse> CallPostShareUrl(string accessToken, ShareRequest shareRequest)
{
    // Validation removed for brevity

    HttpRequestMessage requestMessage = new HttpRequestMessage(HttpMethod.Post, LinkedInPostUrl);
    requestMessage.Headers.Add("Authorization", $"Bearer {accessToken}");
    requestMessage.Headers.Add ("X-Restli-Protocol-Version", "2.0.0");

    JsonSerializerOptions jsonSerializationOptions = new(JsonSerializerDefaults.Web)
    {
        WriteIndented = false,
        DefaultIgnoreCondition = JsonIgnoreCondition.WhenWritingNull,
    };
    var jsonRequest = JsonSerializer.Serialize(shareRequest, jsonSerializationOptions);
    var jsonContent = new StringContent(jsonRequest, null, "application/json");
    requestMessage.Content = jsonContent;

    var response = await _httpClient.SendAsync(requestMessage);

    var content = await response.Content.ReadAsStringAsync();
    var options = new JsonSerializerOptions
    {
        PropertyNameCaseInsensitive = true
    };
    var linkedInResponse = JsonSerializer.Deserialize<ShareResponse>(content, options);

    if (linkedInResponse == null)
    {
        // TODO: Custom Exception
        throw new HttpRequestException(
            $"Unable to deserialize the response from the HttpResponseMessage: {content}.");
    }

    return linkedInResponse;
}
Lines 5-7, I prepare the http call and headers.
Line 9 - 16, I send the JsonSerializationOptions. Take note of the DefaultIgnoreCondition = JsonIgnoreCondition.WhenWritingNull setting, without this calls to the LinkedIn API will fail with either a 400 or 422 error.
Line 18, I send the request.
Line 20 -25, I deserialize the response, and if successful, return the ShareResponse object.
The ShareResponse object, shown below, is used to deserialize the response from the LinkedIn API. Only the Id property is provided upon a successful call to the LinkedIn API. If the call fails, the Message, ServiceErrorCode, and Status properties will be populated.
1
2
3
4
5
6
7
8
9
10
11
12
13
14
15
16

public class ShareResponse
{
    [JsonPropertyName("message")]
    public string? Message { get; set; }

    [JsonPropertyName("serviceErrorCode")]
    public int? ServiceErrorCode { get; set; }

    [JsonPropertyName("status")]
    public int? Status { get; set; }

    [JsonPropertyName("id")]
    public string? Id { get; set; }

    public bool IsSuccess => !string.IsNullOrEmpty(Id);
}
You can do with the Id property as you like, this is LinkedIn’s unique identifier for the post.
Post Text with Link
The post text with link API is very similar to the post text API. The only difference is the addition of media object in the com.linkedin.ugc.ShareContent section of request. Here is the sample request.
1
2
3
4
5
6
7
8
9
10
11
12
13
14
15
16
17
18
19
20
21
22
23
24
25
26
27
28
29
30
31

POST https://api.linkedin.com/v2/ugcPosts
Authorization: Bearer {{my-access-token}}
X-Restli-Protocol-Version: 2.0.0

{
    "author": "urn:li:person:{{my-person-id}}",
    "lifecycleState": "PUBLISHED",
    "specificContent": {
        "com.linkedin.ugc.ShareContent": {
            "shareCommentary": {
                "text": "LinkedIn has an AI Assisted Editor for posting articles."
            },
            "shareMediaCategory": "ARTICLE",
            "media": [
                {
                    "status": "READY",
                    "description": {
                        "text": "This is the description of the media."
                    },
                    "originalUrl": "https://www.josephguadagno.net/",
                    "title": {
                        "text": "Joseph Guadagno Website"
                    }
                }
            ]
        }
    },
    "visibility": {
        "com.linkedin.ugc.MemberNetworkVisibility": "PUBLIC"
    }
}
In the LinkedIn API Manager, a call is made to the PostTextWithLink method. The code is shown below.
1
2
3
4
5
6
7
8
9
10
11
12
13
14
15
16
17
18
19
20
21
22
23
24
25
26
27
28
29
30
31
32
33
34
35
36
37
38
39

public async Task<string> PostShareTextAndLink(string accessToken, string authorId, string postText, string link, string? linkTitle = null, string? linkDescription = null)
{
    // Validation removed for brevity

    var shareRequest = new ShareRequest
    {
        Author = string.Format(LinkedInAuthorUrn, authorId),
        Visibility = new Visibility { VisibilityEnum = VisibilityEnum.Anyone },
        SpecificContent = new SpecificContent
        {
            ShareContent = new ShareContent
            {
                ShareCommentary = new TextProperties()
                {
                    Text = postText
                },
                ShareMediaCategoryEnum = ShareMediaCategoryEnum.Article
            }
        }
    };
    var media = new Media{OriginalUrl = link};
    if (!string.IsNullOrEmpty(linkDescription))
    {
        media.Description = new TextProperties {Text = linkDescription};
    }
    if (!string.IsNullOrEmpty(linkTitle))
    {
        media.Title = new TextProperties {Text = linkTitle};
    }
    shareRequest.SpecificContent.ShareContent.Media = new[] { media };

    var linkedInResponse = await CallPostShareUrl(accessToken, shareRequest);
    if (linkedInResponse is { IsSuccess: true, Id: not null })
    {
        return linkedInResponse.Id;
    }
    throw new HttpRequestException(BuildLinkedInResponseErrorMessage(linkedInResponse));

}
You’ll notice that most of the start of the code looks the same as the PostShareText method. However, on line 17 we see the ShareMediaCategoryEnum field to ShareMediaCategoryEnum.Article which creates a “Article”, a link with a posts.
On lines 21-30 we construct the Media object and add it to the ShareContent object.
Line 32, we call the CallPostShareUrl method and return the Id property if successful.
Post Text with Image
The post text with image API is very similar to the post text with link API. The only different is that we have to upload the image to LinkedIn. This is a three step process. Step one, is for us to notify LinkedIn that we want to add file. I know, it’s weird but I didn’t write the API, luckily, it’s all wrapped in the LinkedIn API Manager. Step two, is to upload the file to LinkedIn. Followed by step three, which is to post the share with the image.
Step One - Notify LinkedIn of the File
In order to upload an image to LinkedIn, we need to notify LinkedIn that we want to upload a file. This is done by calling the asset API and using the registerUpload method. Here is the sample request.
1
2
3
4
5
6
7
8
9
10
11
12
13
14
15
16
17
18

POST https://api.linkedin.com/v2/assets?action=registerUpload
Authorization: Bearer {{my-access-token}}
X-Restli-Protocol-Version: 2.0.0

{
    "registerUploadRequest": {
        "recipes": [
            "urn:li:digitalmediaRecipe:feedshare-image"
        ],
        "owner": "urn:li:person:{{my-person-id}}",
        "serviceRelationships": [
            {
                "relationshipType": "OWNER",
                "identifier": "urn:li:userGeneratedContent"
            }
        ]
    }
}
The only dynamic part of this request is the owner field. This is the LinkedIn URN of the person who is uploading the image. Upon success, you will receive a response back similar to this
1
2
3
4
5
6
7
8
9
10
11
12

{
    "value": {
        "uploadMechanism": {
            "com.linkedin.digitalmedia.uploading.MediaUploadHttpRequest": {
                "headers": {},
                "uploadUrl": "https://api.linkedin.com/mediaUpload/<LinkedInAssetId>/feedshare-uploadedImage/0?ca=vector_feedshare&cn=uploads&m=AQJbrN86Zm265gAAAWemyz2pxPSgONtBiZdchrgG872QltnfYjnMdb2j3A&app=1953784&sync=0&v=beta&ut=2H-IhpbfXrRow1"
            }
        },
        "mediaArtifact": "urn:li:digitalmediaMediaArtifact:(urn:li:digitalmediaAsset:<LinkedInAssetId>,urn:li:digitalmediaMediaArtifactClass:feedshare-uploadedImage)",
        "asset": "urn:li:digitalmediaAsset:<LinkedInAssetId>"
    }
}
<LinkedInAssetId> is a unique Asset Id that LinkedIn assigned. I replaced a real asset id in this response with <LinkedInAssetId> so no one deletes the object. ![]()
For the next step, we are going to need the uploadUrl from the response. We will use this to upload the image to LinkedIn. Will we also need the asset field for when we create the post on LinkedIn. Again, this is all wrapped up in the LinkedIn API Manager.
Step Two - Upload the Image
For this, I don’t have an http request to show you, if you want to play around with an http client you will need to use something like cUrl to upload the image. Sample cUrl command is shown below.
1

curl -i --upload-file {{path-to-image}} --header "Authorization: Bearer {{my-access-token}}" '{{uploadUrl}}'
Replace the following tokens
| Token | Value |
|---|---|
{{path-to-image}} |
The path to the image you want to upload |
{{my-access-token}} |
Your LinkedIn access token |
{{uploadUrl}} |
The uploadUrl from the response of the registerUpload API call |
Step Three - Post the Share
For the http request, it is almost the same as the post text and link. We only change the ShareMediaCategoryEnum to ShareMediaCategoryEnum.Image. Here is the sample request.
1
2
3
4
5
6
7
8
9
10
11
12
13
14
15
16
17
18
19
20
21
22
23
24
25
26
27
28
29
30
31
32

POST https://api.linkedin.com/v2/ugcPosts
Authorization: Bearer {{my-access-token}}
X-Restli-Protocol-Version: 2.0.0

{
    "author": "urn:li:person:{{my-person-id}}",
    "lifecycleState": "PUBLISHED",
    "specificContent": {
        "com.linkedin.ugc.ShareContent": {
            "shareCommentary": {
                "text": "LinkedIn has an AI Assisted Editor for posting articles."
            },
            "shareMediaCategory": "IMAGE",
            "media": [
                {
                    "status": "READY",
                    "description": {
                        "text": "LinkedIn has an AI Assisted Editor for posting articles."
                    },
                    "media": "urn:li:digitalmediaAsset:D5622AQHqpGB5YNqcvg",
                    "originalUrl": "https://www.josephguadagno.net/2023/08/08/linkedin-now-has-an-ai-assisted-editor-for-post",
                    "title": {
                        "text": "LinkedIn has an AI Assisted Editor for Post"
                    }
                }
            ]
        }
    },
    "visibility": {
        "com.linkedin.ugc.MemberNetworkVisibility": "PUBLIC"
    }
}
Mostly everything is the same as the previous call, however, here we set the media to the asset field we received when we made the upload request.
In the LinkedIn API Manager, the call looks like this.
1
2
3
4
5
6
7
8
9
10
11
12
13
14
15
16
17
18
19
20
21
22
23
24
25
26
27
28
29
30
31
32
33
34
35
36
37
38
39
40
41
42
43
44
45
46
47
48
49
50
51
52
53

public async Task<string> PostShareTextAndImage(string accessToken, string authorId, string postText, byte[] image, string? imageTitle = null, string? imageDescription = null)
{
    // Validation removed for brevity

    // Call the Register Image endpoint to get the Asset URN
    var uploadResponse = await GetUploadResponse(accessToken, authorId);

    // Upload the image
    var uploadUrl = uploadResponse.Value.UploadMechanism.MediaUploadHttpRequest.UploadUrl;
    var wasFileUploadSuccessful = await UploadImage(accessToken, uploadUrl, image);

    if (!wasFileUploadSuccessful)
    {
        throw new ApplicationException("Failed to upload image to LinkedIn");
    }

    // Send the image via PostShare
    var shareRequest = new ShareRequest
    {
        Author = string.Format(LinkedInAuthorUrn, authorId),
        Visibility = new Visibility { VisibilityEnum = VisibilityEnum.Anyone },
        SpecificContent = new SpecificContent
        {
            ShareContent = new ShareContent
            {
                ShareCommentary = new TextProperties()
                {
                    Text = postText
                },
                ShareMediaCategoryEnum = ShareMediaCategoryEnum.Image
            }
        }
    };

    var media = new Media{MediaUrn = uploadResponse.Value.Asset};

    if (!string.IsNullOrEmpty(imageDescription))
    {
        media.Description = new TextProperties {Text = imageDescription};
    }
    if (!string.IsNullOrEmpty(imageTitle))
    {
        media.Title = new TextProperties {Text = imageTitle};
    }
    shareRequest.SpecificContent.ShareContent.Media = new[] { media };

    var linkedInResponse = await CallPostShareUrl(accessToken, shareRequest);
    if (linkedInResponse is { IsSuccess: true, Id: not null })
    {
        return linkedInResponse.Id;
    }
    throw new HttpRequestException(BuildLinkedInResponseErrorMessage(linkedInResponse));
}
On line 6, the request is made to upload the file via the GetUploadResponse method, which returns a UploadRegistrationResponse upon success, otherwise it throws an exception.
On lines 9 and 10 we upload the file via the UploadImage method, which returns a true upon success, otherwise a failure.
The rest of code is the same as the previous example.
You can view this methods in the LinkedInApiManager.cs file.
Wrap Up
That was a lot to take in. We covered how to post text, links, and images to LinkedIn. We also covered how to get the access token. We also covered how to get the user’s profile information. I hope you found this useful as well as the break down of calls required to call the API.
If you have any questions, please feel free to reach out to me on Twitter, LinkedIn, or via the contact.
References
Share on
Twitter Facebook LinkedIn RedditLike what you read?
Please consider sponsoring this blog.

