
Debugging Azure Function Event Grid Triggers Locally with JetBrains Rider
If you’ve done much with Azure Functions and the Event Grid triggers, you’ve probably come across the post ‘Azure Function Event Grid Trigger Local Debugging’. Even searching for ‘Azure Function Event Grid Trigger’ on Bing and it’s the first result that comes up, at least for me. ![]() The post itself, at the time of me writing this, is almost two years old. While most of the post is still valid, some of Azure has changed, and the post is based on using Visual Studio. So this post is meant to be a modernized version of that post using JetBrains Rider.
The post itself, at the time of me writing this, is almost two years old. While most of the post is still valid, some of Azure has changed, and the post is based on using Visual Studio. So this post is meant to be a modernized version of that post using JetBrains Rider.
Before you get started
Here are a few things that you are going to need for this to work.
- You’ll need an existing function application.
- You’ll need an Azure subscription to create the EventGrid trigger
- You’ll need to create an account on ngrok and download ngrok.
- If you are using JetBrains Rider, you will need the ‘Azure Toolkit for Rider’ plugin. You can read this post to get started with Azure Functions and JetBrains Rider
Running ngrok
Ngrok provides a ‘pass-though’ or webhook from the Azure ecosystem to your local machine. Assuming you have installed ngrok, open up a terminal, command prompt, or Powershell and navigate to the directory that ngrok is installed in and execute the following command
1

.\ngrok http -host-header=localhost 7071
Note, the .\ is required for terminal and Powershell. The port number, 7071 in this example, is the port that you are ‘debugging’ your Azure function on. 7071 is the default port number. If you change it or run multiple functions, you are going to want to change the above command.
This will start ngrok with a screen similar to this.
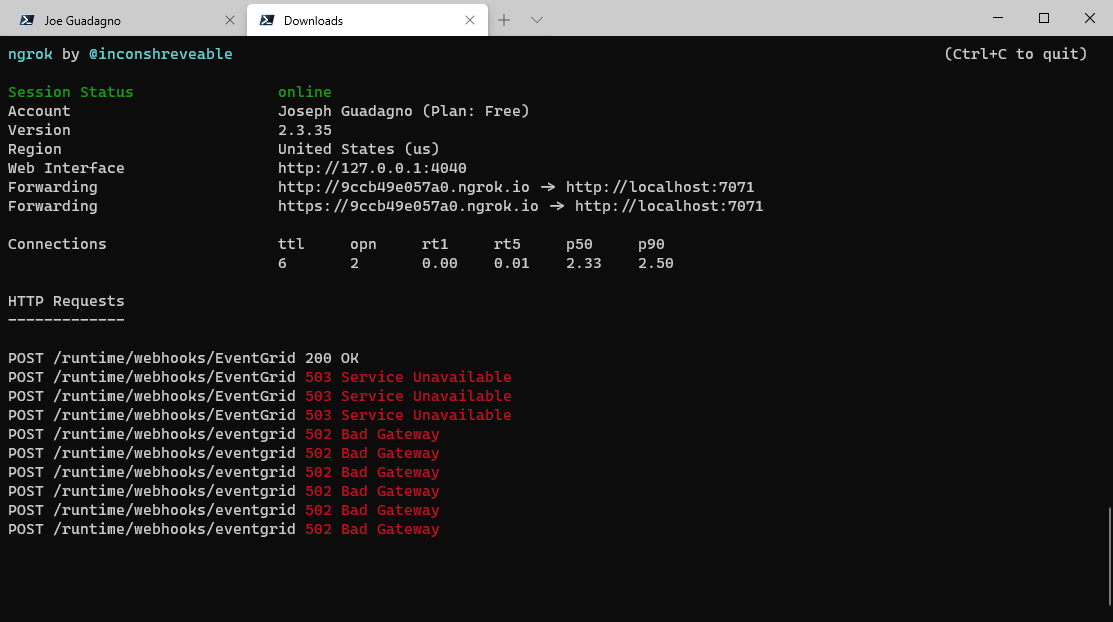
Once started, we are ready to head over to Azure and create the ‘hooks’.
Event Grid Subscription
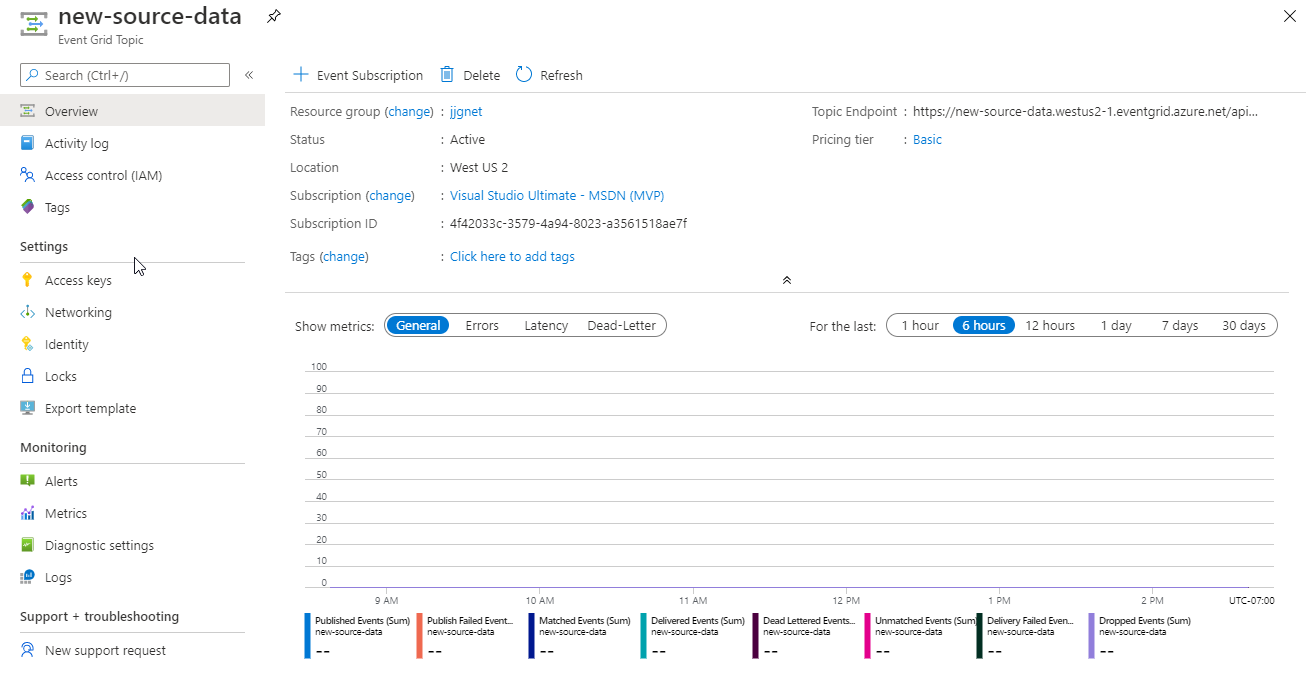
This post assumes that you have the Event Grid topic setup already, if not, you can read about topics here.
In the Azure portal, navigate to your topic. In this example we will use the topic of new-source-data. It should look similar to this.
- Click on
+ Event Subscription
That will take you to the ‘Create Event Subscription’ blade.
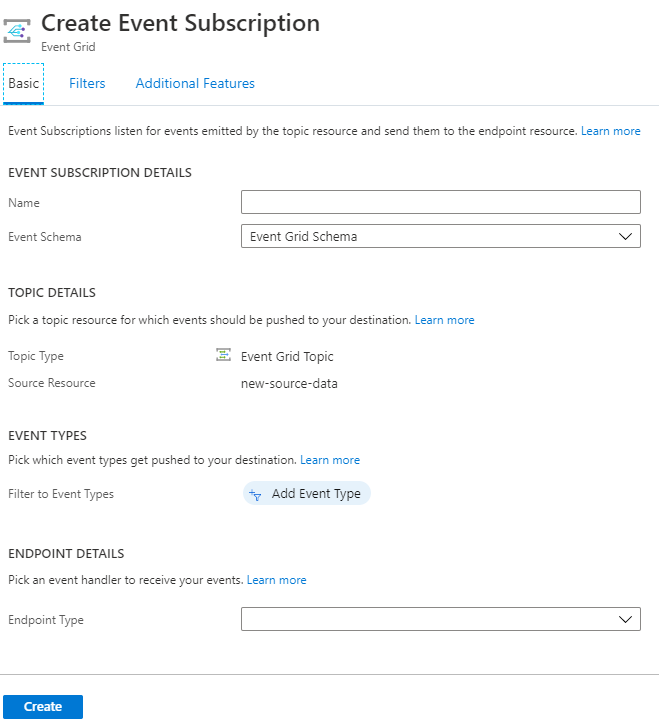
Enter the following
| Name | Value | Description |
| Name | function_name_webhook |
The name can be whatever you want, I base the name off of the function, so in this example new_source_data_webhook
|
| Event Schema | Event Grid Schema |
|
| End Point Type | Select Web Hook
|
This will enable the ‘Select an endpoint’ link |
- Clicking on the
Select an endpointlink will bring up theSelect Web Hookdialog. - Enter the name of the endpoint for the
Subscriber Endpoint. See the next section for the details behind theSubscriber Endpointname.
Subscriber Endpoint
This is where NGrok and Rider come in and the ordering of events matter.
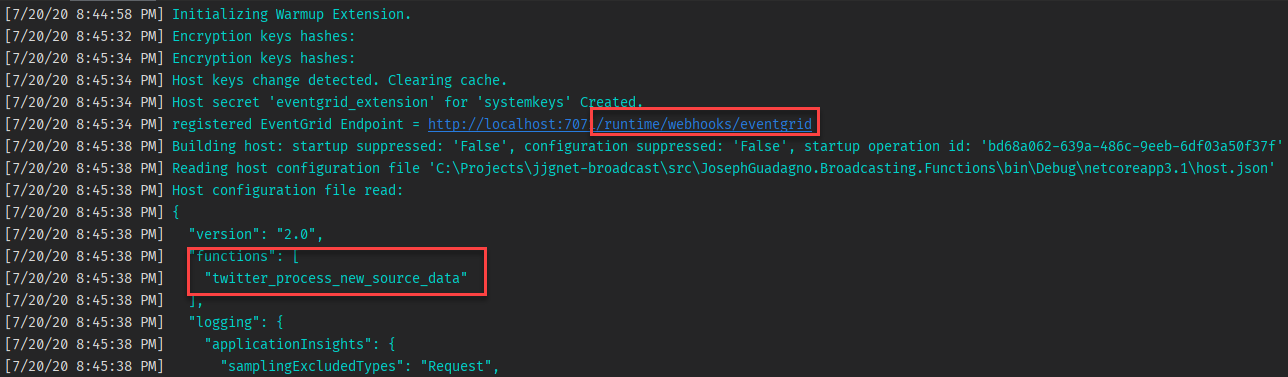
For this example, the full endpoint name would be https://9ccb49e057a0.ngrok.io/runtime/webhooks/EventGrid?functionName=twitter_process_new_source_data.
The endpoint name is made up of three parts. The first, the url from ngrok which is https://9ccb49e057a0.ngrok.io in the sample image above under forwarding. The second is the text /runtime/webhooks/EventGrid?functionName=. The last part is the name of the Azure function, twitter_process_new_source_data in this example.
Parts two and three can be retrieved from the Rider console once the function is started in Debug.
After the debugging session is started, you can enter the endpoint name in the Subscriber Endpoint field.
- Click
Confirm Selection - Click
Create
Once you click Create, Azure sends a test message to the endpoint. If everything was started and entered correctly you will see a message in ngrok console POST /runtime/webhooks.EventGrid 200 OK.
If something else is wrong, you may receive one of these two exceptions:
POST misconfigured url 502 Bad Gateway, this means that you entered something wrong with the Subscriber Endpoint.
POST /runtime/webhooks/EventGrid 503 Service Unavailable, this means you probably forgot to start debugging the function.
Wrap up
Assuming you have the configuration correct you are good to debug your Event Grid triggered function.
A couple of things to note.
- Once you close ngrok, you will need to delete the old subscription and create a new one since ngrok generates a new Url.
- The order in which you start things matters.
- In Azure, create the new Event Subscription
- Start ngrok locally
- Start debugging the Azure Function locally. This ensures that ngrok has somewhere to send the ‘hook’.
- Enter the
Subscriber Endpointin Azure -
Createthe subscription
If you followed the order, ngrok should get a test message and then you are ready to debug so start sending messages to the topic.
Enjoy!
Share on
Twitter Facebook LinkedIn RedditLike what you read?
Please consider sponsoring this blog.

