
Simplify Your .NET Development with Aspire
Aspire is a new tool that simplifies the development of .NET applications by managing dependencies and configurations, allowing developers to focus on building features rather than wrestling with setup and environment issues.
According to the official documentation, Aspire provides tools, templates, and packages to help you build observable, production-ready apps. Delivered through NuGet packages, Aspire simplifies common challenges in modern app development.
A few weeks ago, I was on AspiriFridays where Damian Edward, David Fowler, Maddy Montaquila and I were adding .NET Aspire to the JosephGuadagno.NET Broadcasting application. Let’s take a look at how Aspire can help you streamline your .NET development process.
Note: This blog post was updated on August 2nd to reflect Aspire version 9.4.0
Getting Started with Aspire
To get started with Aspire, you need a few prerequisites:
- .NET SDK (version 8.0 or later)
- An OCI compliant container runtime, such as:
- An IDE or code editor of your choice, such as:
- Visual Studio version 17.9 or later
- Visual Studio Code
- JetBrains Rider with the Aspire plugin
Note: Aspire also works with GitHub Codespaces or Dev Containers.
If you want to use the Aspire project templates, you can install them with the following command:
1
dotnet new install Aspire.ProjectTemplates --force
Note: These get updated frequently, so you may want to run this command periodically to ensure you have the latest templates.
I recommend installing the Aspire CLI tool, which provides a set of commands to help you manage your Aspire projects. You can install the CLI tool by running the following command:
1
dotnet tool install -g Aspire.Cli --prerelease
Now we are ready to Aspire-ify our project!
The Project
I have a sample project that I use for presentations and demos. It’s a simple ASP.NET Core web application that allows users to add, edit, delete, and list contacts. The project was designed to be a straightforward example of how to build a web application using .NET technologies, and it serves as a great starting point for learning .NET.
The project is built using .NET 9 and leverages various technologies such as:
- ASP.NET Core for the web application
- Entity Framework Core for data access
- An assortment of Azure cloud services
You can find the project contacts-noauth on GitHub. If you want to follow along, you can clone the repository and open it in your preferred IDE or code editor.
1
git clone https://github.com/jguadagno/contacts-noauth.git
Adding Aspire to the Project
Aspire project templates are designed to help you quickly set up a new project with the necessary dependencies and configurations for building .NET applications. They provide a starting point for your application, allowing you to focus on building features rather than wrestling with setup and environment issues. There are two projects that are created when you add Aspire to your solution:
- App Host: This project serves as the entry point for your Aspire application. It contains the
AppHost.csfile, which is where you configure your application and its services. - Service Defaults: This project sets up the default services for your Aspire application, such as telemetry, logging, health checks, and more. It contains the
Extensions.csfile that sets up these services.
Depending on the IDE you are using, you can add Aspire to your project in different ways. Here are the steps for Visual Studio, Visual Studio Code, and JetBrains Rider.
Visual Studio
Visual Studio provides a straightforward way to add Aspire to your project using the built-in project templates and in my opinion, is the easiest way to get started with Aspire.
In Visual Studio, in the Solution Explorer, right-click on the Contacts.Api project and select “Add” > “Aspire Orchestration Support”. This will open the “Add Aspire Orchestration Support” dialog.
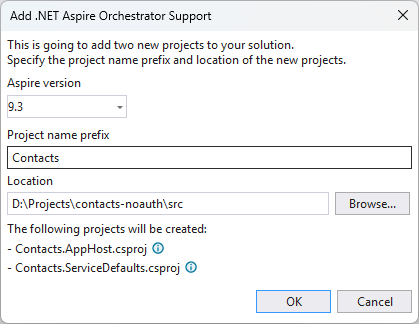
The defaults are fine, so you can click “Add” to create the Aspire project. This will create two new projects in your solution called Contacts.AppHost and Contacts.ServiceDefaults then add the necessary references to the Contacts.Api project.
Once the projects are created, you will see them in the Solution Explorer. The Contacts.AppHost project contains the AppHost.cs file, which is where you configure your application and its services. The Contacts.ServiceDefaults project contains the Extensions.cs file, which sets up the default services for your Aspire application. Visual Studio also adds two new run configurations to the solution, one for HTTP and one for HTTPS. You can use these configurations to run your Aspire application. In addition, Visual Studio will display the Aspire welcome page which provides an overview of the Aspire projects and how to use them.
Visual Studio Code
With the solution open in Visual Studio Code, you can add Aspire to the project by opening the terminal and running the following command:
1
dotnet new aspire-host -o Contacts.AppHost
Then add the app host project to the solution:
1
dotnet sln add .\Contacts.sln add .\Contacts.AppHost\Contacts.AppHost.csproj
Now, let’s add the Service Defaults project to the solution. In the terminal, run the following command:
1
dotnet new aspire-servicedefaults -o Contacts.ServiceDefaults
Then add the service defaults project to the solution:
1
dotnet sln add .\Contacts.sln add .\Contacts.ServiceDefaults\Contacts.ServiceDefaults.csproj
You’ll need to add the Contacts.ServiceDefaults project reference to both the Contacts.Api and the Contacts.WebUi projects. You can do this by running the following commands in the terminal:
1
2
dotnet add .\Contacts.Api\Contacts.Api.csproj reference .\Contacts.ServiceDefaults\Contacts.ServiceDefaults.csproj
dotnet add .\Contacts.WebUi\Contacts.WebUi.csproj reference .\Contacts.ServiceDefaults\Contacts.ServiceDefaults.csproj
Now we should have the Aspire projects added to the solution. You can verify this by opening the Solution Explorer in Visual Studio Code and checking that the Contacts.AppHost and Contacts.ServiceDefaults projects are listed. If so, we are ready to run the application.
JetBrains Rider
With the solution open in JetBrains Rider, you can add Aspire to the project by right-clicking on the solution in the Solution Explorer and selecting “Add” > “New Project…”. This will open the “New Project” dialog.
- Select Aspire from the project templates on the left side.
- Enter a name for the project, such as
Contacts.AppHost. - Select the type of
App Host. - Click “Create” to create the project.
This will create the first part of what “Aspirify” your project. You will see a new project in the Solution Explorer with the name you specified.
Now, we need to add the Service Default project to the solution.
Right-click on the solution in the Solution Explorer and select “Add” > “New Project…”. This will open the “New Project” dialog.
- Select Aspire from the project templates on the left side.
- Enter a name for the project, such as
Contacts.ServiceDefaults. - Select the type of
Service Defaults. - Click “Create” to create the project.
Now you will see a new project in the Solution Explorer with the name you specified. In that project, you will find a Extensions.cs file, which is where Aspire configures some of the default services.
You’ll also notice, that the Aspire templates added two new configuration files to the solution:
- Contacts.AppHost: http
- Contacts.AppHost: https
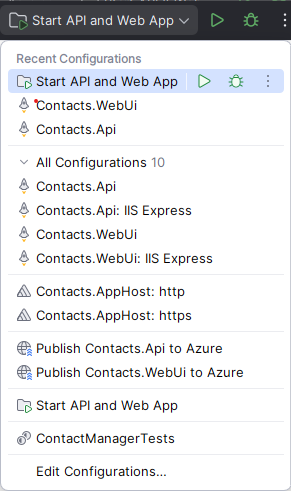
You’ll use one of these configurations to run your Aspire application. The http configuration is for running the application without HTTPS, while the https configuration is for running the application with HTTPS.
Adding Resources (Projects)
Now that we have the Aspire projects added to the solution, we can start adding the resources of our application. In this case, we will add support for loading the web application, API, and database components.
Note: The rest of this post will walk you through adding the components to the project. For this, it doesn’t matter which IDE you are using, as the steps are the same across Visual Studio, Visual Studio Code, and JetBrains Rider.
All of this is done by adding the components to the AppHost.cs file in the Contacts.AppHost project. You can think of this a sort of like a Startup.cs or Program.cs file in a traditional ASP.NET Core application. This is where compose the pieces of your application together and establish any dependencies between them.
Let’s get started by opening the AppHost.cs file in the Contacts.AppHost project.
Adding the Web Api Project
Depending on which IDE you are using, you will see a slightly different version of the AppHost.cs file. If you are using Visual Studio, and you added the Aspire projects using the “Add Aspire Orchestration Support” option, you will see a basic AppHost.cs file that looks like this:
1
2
3
4
5
var builder = DistributedApplication.CreateBuilder(args);

builder.AddProject<Projects.Contacts_Api>("contacts-api");

builder.Build().Run();
If you are using Visual Studio Code or JetBrains Rider, you will see a more generic AppHost.cs file that looks like this:
1
2
3
var builder = DistributedApplication.CreateBuilder(args);

builder.Build().Run();
This is the only difference between the two versions of the AppHost.cs file. The Visual Studio version has a line that adds the Contacts.Api project and reference to the application, while the Visual Studio Code and JetBrains Rider versions do not.
Let’s explain what happened here. The DistributedApplication.CreateBuilder(args), line 1, method creates a new DistributedApplicationBuilder instance, which is used to configure the application. The AddProject<Projects.Contacts_Api>("contacts-api") method, line 3, adds the Contacts.Api project to the application, with the name of contacts-api, allowing it to be run as part of the Aspire application. Then the builder.Build().Run() method, line 5, builds the application and runs it.
If you are using Visual Studio Code or JetBrains Rider, you will need to add the Contacts.Api project as a reference to the Contacts.Api project, then, add the project the Aspire app. You can do this by adding the following line to the AppHost.cs file:
1
builder.AddProject<Projects.Contacts_Api>("contacts-api");
Note: The name field, in this case, contacts-api, is used to identify the project in the Aspire application. You can use any name you like, but it is recommended to use a name that is descriptive and unique within your application.
At this point, you should have the Contacts.Api project added to the Aspirified application. You can verify this by running the application using the http or https run configuration in Visual Studio or Contacts.AppHost: http(s) in Rider.
Note: If you are running this sample project with aspire version 9.3.1-preview.1.25305.6, there is a bug that prevents the application from running. You can fix this by moving builder.AddServiceDefaults(); to just after the var builder = WebApplication.CreateBuilder(args); in the Contacts.Api Program.cs file, line 20. Then delete the builder.MapDefaultEndpoints(); in the Program.cs file, and add the following line just after the var app = builder.Build();, around line 28.
The try portion of the Program.cs file should look like this:
1
2
3
4
5
6
7
8
9
10
11
12
13
14
15
16
17
18
19
20
21
22
try
{
    var builder = WebApplication.CreateBuilder(args);
    builder.AddServiceDefaults();

    builder.Logging.ClearProviders();
    builder.Host.UseNLog();

    ConfigureServices(builder.Services);

    var app = builder.Build();

    app.MapDefaultEndpoints();

    if (builder.Environment.IsDevelopment())
    {
        app.UseDeveloperExceptionPage();
    }

    ConfigureMiddleware(app);
    app.Run();
}
As of the time of this post, it is an issue that I submitted to the Aspire team.
You should be able to run the application now, and the Aspire dashboard should be accessible at a URL like https://localhost:17004 or http://localhost:15122.
Note: The port numbers may vary depending on your configuration, so check the run configuration in Visual Studio or Rider to see the exact URL.
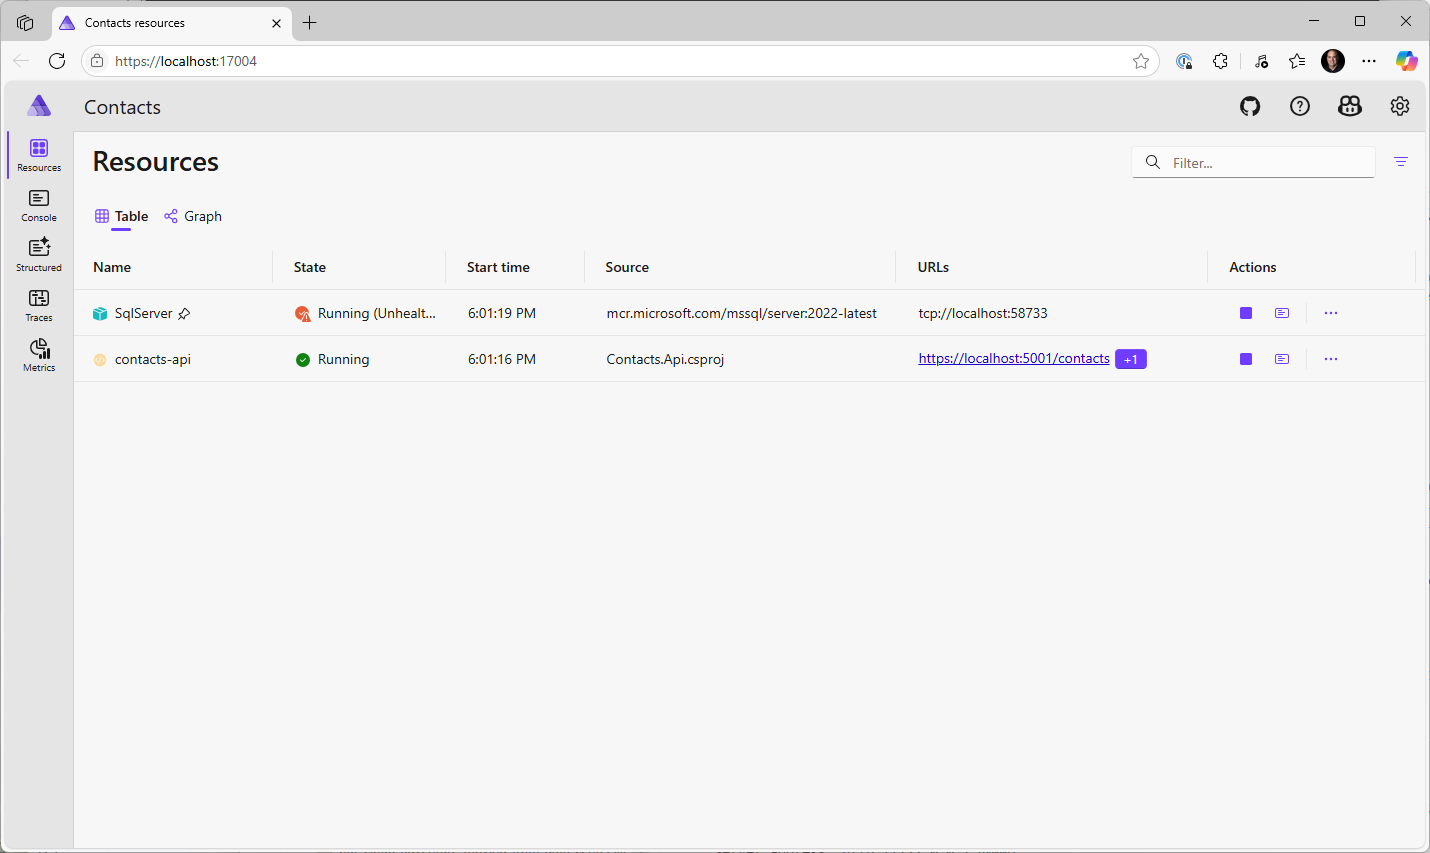
Upon a successful run, you should see the Aspire dashboard, which provides an overview of the application and its components. The dashboard will show the contacts-api project as a running service.
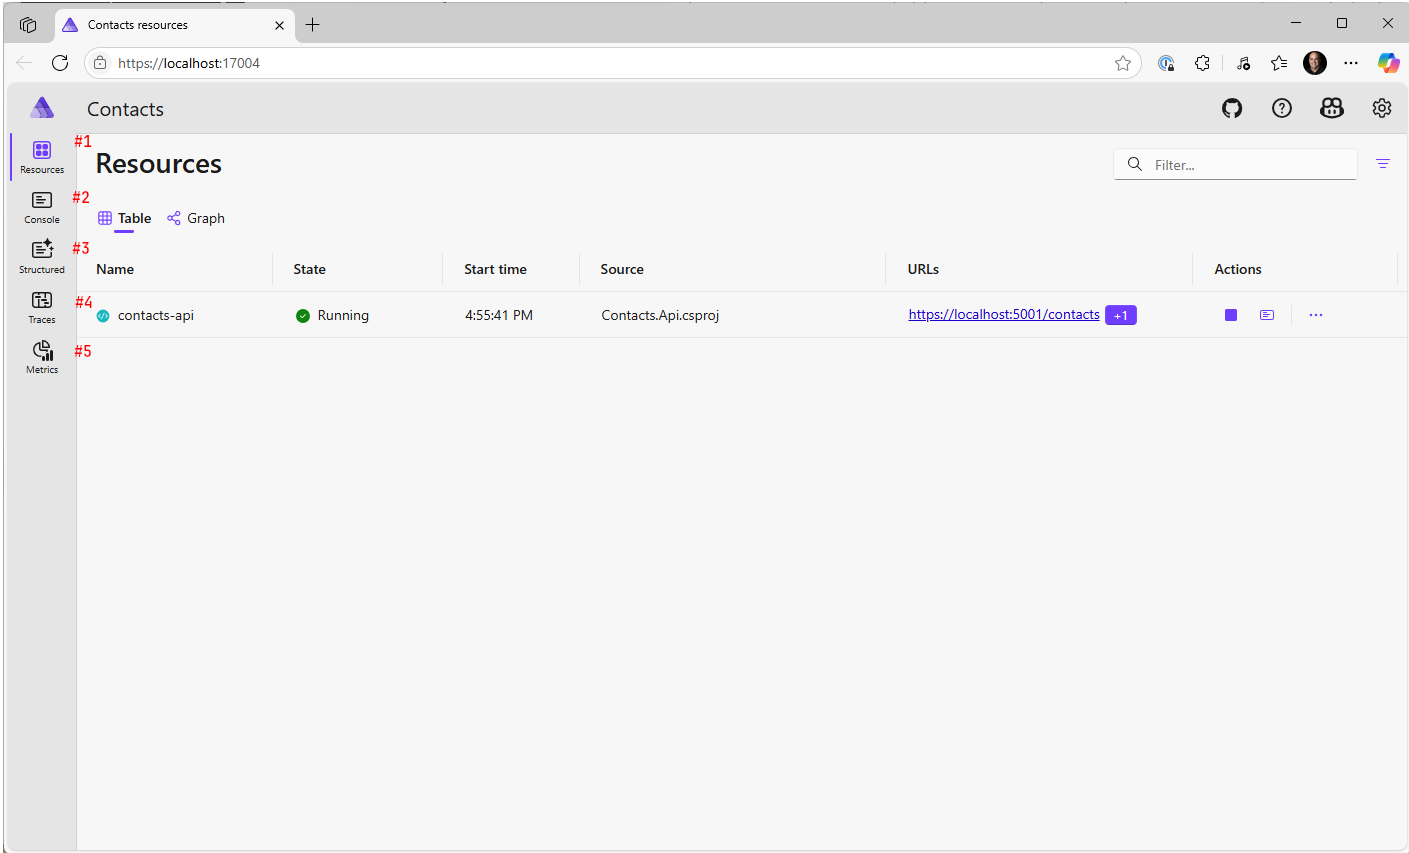
Dashboard Overview
The Aspire dashboard provides a comprehensive overview of your application, including:
- List of running services
- Console output from the application
- Structured logging information
- Tracing information
- Metrics and health checks
We’ll explore the dashboard in more detail in a future post, but for now, you can see that the contacts-api project is running and accessible. If you click on the URLs link in the dashboard, the Api will open in a new tab, and you can see the Swagger UI for the API.
Adding the Sql Server Project
Now that we have the Contacts.Api project added to the Aspire application, let’s “tell” Aspire about the SQL Server database that the API will use.
Back to the AppHost.cs file in the Contacts.AppHost project. We will add the following line to the builder after the AddProject line for the Contacts.Api project:
1
2
var sql = builder.AddSqlServer("SqlServer")
    .WithLifetime(ContainerLifetime.Persistent);
This line adds the SQL Server database to the Aspire application, with the name SqlServer. The WithLifetime(ContainerLifetime.Persistent) method specifies that the database should be persistent, meaning it will not recreate the database every time the application is run. This is useful for development and testing purposes, as it allows you to keep the data in the database between runs.
You may see the red squiggly line under the AddSqlServer method, indicating that the method is not recognized. This is because you need to add a reference to the Aspire.Hosting.SqlServer package in your project. You can do this by running the following command in the terminal:
1
dotnet add package Aspire.Hosting.SqlServer
Or add it through the NuGet Package Manager in Visual Studio or Rider.
Now, you should be able to run the application again, and the Aspire dashboard should show the SqlServer project as a running service. The first time you run the application, it will take a few moments build the container image for the SQL Server database, so be patient. Once the image is built, the application will start, and you should see the SqlServer project in the Aspire dashboard. However, we are not done yet. The database will be empty. So we are going to need to add a schema to it, and optionally, some seed data.
Run, the project again. Make sure you have Docker or Podman running, and the SQL Server container will be created.
Depending on how quick you are at the looking at the Aspire dashboard, you may see the SqlServer as unhealthy, that is because the container/server is still being built. Once the container is built, the SqlServer project will be marked as healthy and you can start using it.
If you are using Sqlite as your database, you can add the following line to the AppHost.cs file instead:
1
var sqlite = builder.AddSqlite("Sqlite");
This will require the CommunityToolkit.Aspire.Hosting.Sqlite package, which you can add by running the following command in the terminal:
1
dotnet add package CommunityToolkit.Aspire.Hosting.Sqlite
If you are using Sql Server, wait until the SqlServer project is marked as healthy in the Aspire dashboard before you continue. If you are using Sqlite, you can continue without waiting for the database to be created.
Stop the project if it is still running, and let’s add the database schema to the project.
Create the Database Schema
To create the database schema for this sample, we add some code to the AppHost.cs file in the Contacts.AppHost project that will run the database creation scripts that are part of this project.
Note: Having scripts to create the database schema not only is a best practice, but it also allows other developers to easily set up the database schema in their local development environment and not need a central “development” database server.
If you cloned this repository to follow along, you will find the database creation scripts in the db-scripts folder in the root of the project. There is a folder for each database type, such as sqlserver and sqlite. Each folder contains two files create-data.sql and create-tables.sql. The create-data.sql file contains the SQL commands to insert seed data into the database, while the create-tables.sql file contains the SQL commands to create the database schema. There is also an extra file for the SQL Server database called create-database-and-user.sql, which contains the SQL commands to create the database and user for the SQL Server database.
Back to the AppHost.cs file in the Contacts.AppHost project. We are going to need to create the database based on these scripts. We will add the following code to the AppHost.cs file, just after the var sql line for the database creation:
For SQL Server, add the following code:
1
2
3
4
5
6
7
8
9
10
var path = builder.AppHostDirectory;
var sqlText = string.Concat(
    File.ReadAllText(Path.Combine(path, @"..\..\db-scripts\sqlserver\create-database-and-user.sql")),
    " ",
    File.ReadAllText(Path.Combine(path, @"..\..\db-scripts\sqlserver\create-tables.sql")),
    " ",
    File.ReadAllText(Path.Combine(path, @"..\..\db-scripts\sqlserver\create-data.sql")));

var db = sql.AddDatabase("Contacts")
    .WithCreationScript(sqlText);
Note: For the SQL Server database, Aspire will report it unhealthy as the database is not created yet. Once the database is created, it will be marked as healthy.
Note: If you are using your own scripts, make sure that the scripts are in the correct order, and that each script ends with an new line/carriage return or an empty line. This is important as Aspire will execute the scripts in the order they are provided, and if there is no new line at the end of the script, it may not execute correctly.
For Sqlite, add the following code:
1
2
3
4
5
6
7
8
var path = builder.AppHostDirectory;
var sqlText = string.Concat(
    File.ReadAllText(Path.Combine(path, @"..\..\db-scripts\sqlite\create-tables.sql")),
    " ",
    File.ReadAllText(Path.Combine(path, @"..\..\db-scripts\sqlite\create-data.sql")));

var db = sql.AddDatabase("Contacts")
    .WithCreationScript(sqlText);
Now when you run the application, Aspire will execute the database creation scripts and create the database schema. You can verify that the database was created by checking the Aspire dashboard, where you should see the Contacts database listed under the SqlServer or Sqlite project, depending on which database you are using. At this point, you can even connect to the database using a database management tool to see the database schema and the seed data that was added.
Having the Contacts.Api Use the Aspire Managed Database
Now object/project creation matters. Since the Contacts.Api project depends on the database, we need to make sure that the Contacts.Api project is aware of the database that we just created. We can do this by adding a reference to the database in the AppHost.cs file. This is going to require us to move the AddProject line for the Contacts.Api project to just after the var db line, so that the database is created before the API project is added. The AppHost.cs file should look like this:
1
2
3
4
5
6
7
8
9
10
11
12
13
14
15
16
17
18
19
20
21
var builder = DistributedApplication.CreateBuilder(args);

// Comments out the following 2 lines if you are using Sqlite
var sql = builder.AddSqlServer("SqlServer")
    .WithLifetime(ContainerLifetime.Persistent);

// Uncomment out is using Sqlite
// var sql = builder.AddSqlite("Sqlite");

var path = builder.AppHostDirectory;
var sqlText = string.Concat(
    File.ReadAllText(Path.Combine(path, @"..\..\db-scripts\sqlserver\create-database-and-user.sql")),
    " ",
    File.ReadAllText(Path.Combine(path, @"..\..\db-scripts\sqlserver\create-tables.sql")),
    " ",
    File.ReadAllText(Path.Combine(path, @"..\..\db-scripts\sqlserver\create-data.sql")));

var db = sql.AddDatabase("Contacts")
    .WithCreationScript(sqlText);

builder.AddProject<Projects.Contacts_Api>("contacts-api");
Now we need to update the Contacts.Api configuration to use the Aspire managed database. This is done by chaining a call to the WithEnvironment method on the AddProject method for the Contacts.Api project. This will pass the database connection string to the API project, allowing it to connect to the database.
1
2
3
builder.AddProject<Projects.Contacts_Api>("contacts-api")
    .WithEnvironment("ConnectionStrings__ContactsDatabaseSqlServer", db)
    .WaitFor(db);
or for Sqlite:
1
2
3
builder.AddProject<Projects.Contacts_Api>("contacts-api")
    .WithEnvironment("ConnectionStrings__ContactsDatabaseSqlite", db)
    .WaitFor(db);
Note: Note the double underscore (__) in the environment variable name. This is a convention used by .NET to separate the sections of the configuration key. In this case, it separates the Settings section from the ContactsDatabaseSqlServer or ContactsDatabaseSqlite key. You can see the settings in the appsettings.json file in the Contacts.Api project, where the connection string is defined.
The WaitFor() command tells Aspire to wait for the database to be created before starting the Contacts.Api project. This is important because the API project needs to connect to the database, and if the database is not created yet, it will fail to start.
Run the application again, and you should see that the Contacts.Api project is now marked as healthy in the Aspire dashboard. You can also verify that the API is able to connect to the database by checking the logs in the Aspire dashboard.
Adding the Web App Project
Now that we have the Contacts.Api project added to the Aspire application, let’s add the Contacts.WebUi project. This project is a simple ASP.NET Core web application that allows users to interact with the API.
As you might be able to guess, we will add the Contacts.WebUi project to the AppHost.cs file in the Contacts.AppHost project.
Since the Web UI project depends on the API project, we need to make sure that the API project is created before the Web UI project, then we need to get a reference to it.
Go back to the AppHost.cs file in the Contacts.AppHost project, find the line that adds the Contacts.Api project.
1
2
builder.AddProject<Projects.Contacts_Api>("contacts-api")
    .WithEnvironment("ConnectionStrings__ContactsDatabaseSqlServer", db);
Change this line to add a variable named api to hold the reference to the API project:
1
2
var api = builder.AddProject<Projects.Contacts_Api>("contacts-api")
    .WithEnvironment("ConnectionStrings__ContactsDatabaseSqlServer", db);
Now, we can add the Contacts.WebUi project to the Aspire application. Add the following line after the Contacts.Api project line:
1
builder.AddProject<Projects.Contacts_WebUi>("contacts-web-ui");
However, we need to make sure that the Web UI project is aware of the API project, so we need to add a reference to the API project in the Contacts.WebUi project. We can do this by chaining a call to the WithEnvironment method on the AddProject method for the Contacts.WebUi project.
1
2
3
builder.AddProject<Projects.Contacts_WebUi>("contacts-web-ui")
    .WithReference(api)
    .WaitFor(api);
This makes sure that the ContactsApi project starts before the Contacts.WebUi project, and that the Web UI project is aware of the API project. The WithReference(api) method tells Aspire to pass the API project reference to the Web UI project, allowing it to connect to the API. The WaitFor(api) method tells Aspire to wait for the API project to be created before starting the Web UI project.
Now this Contacts.WebUi project requires a Url to the API’s that Contacts.Api has. There is a setting in the appsettings.json file in the Contacts.WebUi project that specifies the URL of the API. We can set this URL to the URL of the API project using a convention that Aspire provides. Open up the appsettings.Development.json file in the Contacts.WebUi project, and find the ApiRootUrl setting. Then update the value to https://contacts-api. The contacts-api should match whatever name you used when you added Contacts.Api project. The Aspire framework will automatically resolve this to the URL of the API project when the application is run.
Now, when you run the application, Aspire will start the Contacts.WebUi project and pass the URL of the API project to it. You can verify that the Web UI project is able to connect to the API clicking on the Contacts line in the Web Ui project.
However, you may notice that the Web UI project is not able to connect to the API project. This is because the Web UI project is trying to connect to the API project using the URL https://contacts-api, but the Contacts.WebUi project does not know how to “connect” to that end point because we did not wire up some of the Aspire configuration.
Open up the Contacts.WebUi project, and open the Program.cs file. Just after we create the builder variable, we need to add the following line:
1
builder.AddServiceDefaults();
Then after the var app = builder.Build() line and before the app.Run() line, we need to add the following line:
1
app.MapDefaultEndpoints();
The last step is to add a reference to the Contacts.ServiceDefaults project in the Contacts.WebUi project. You can do this by running the following command in the terminal:
1
dotnet add .\Contacts.WebUi\Contacts.WebUi.csproj reference .\Contacts.ServiceDefaults\Contacts.ServiceDefaults.csproj
or by adding the reference through the NuGet Package Manager in Visual Studio or Rider.
Note: If you are using Visual Studio, the AddServiceDefaults and MapDefaultEndpoints methods are added automatically when you add the Aspire projects to the solution. If you are using Visual Studio Code or JetBrains Rider, you need to add these lines manually.
Now, when you run the application again, the Web UI project should be able to connect to the API project, and you should be able to see the contacts in the Web UI.
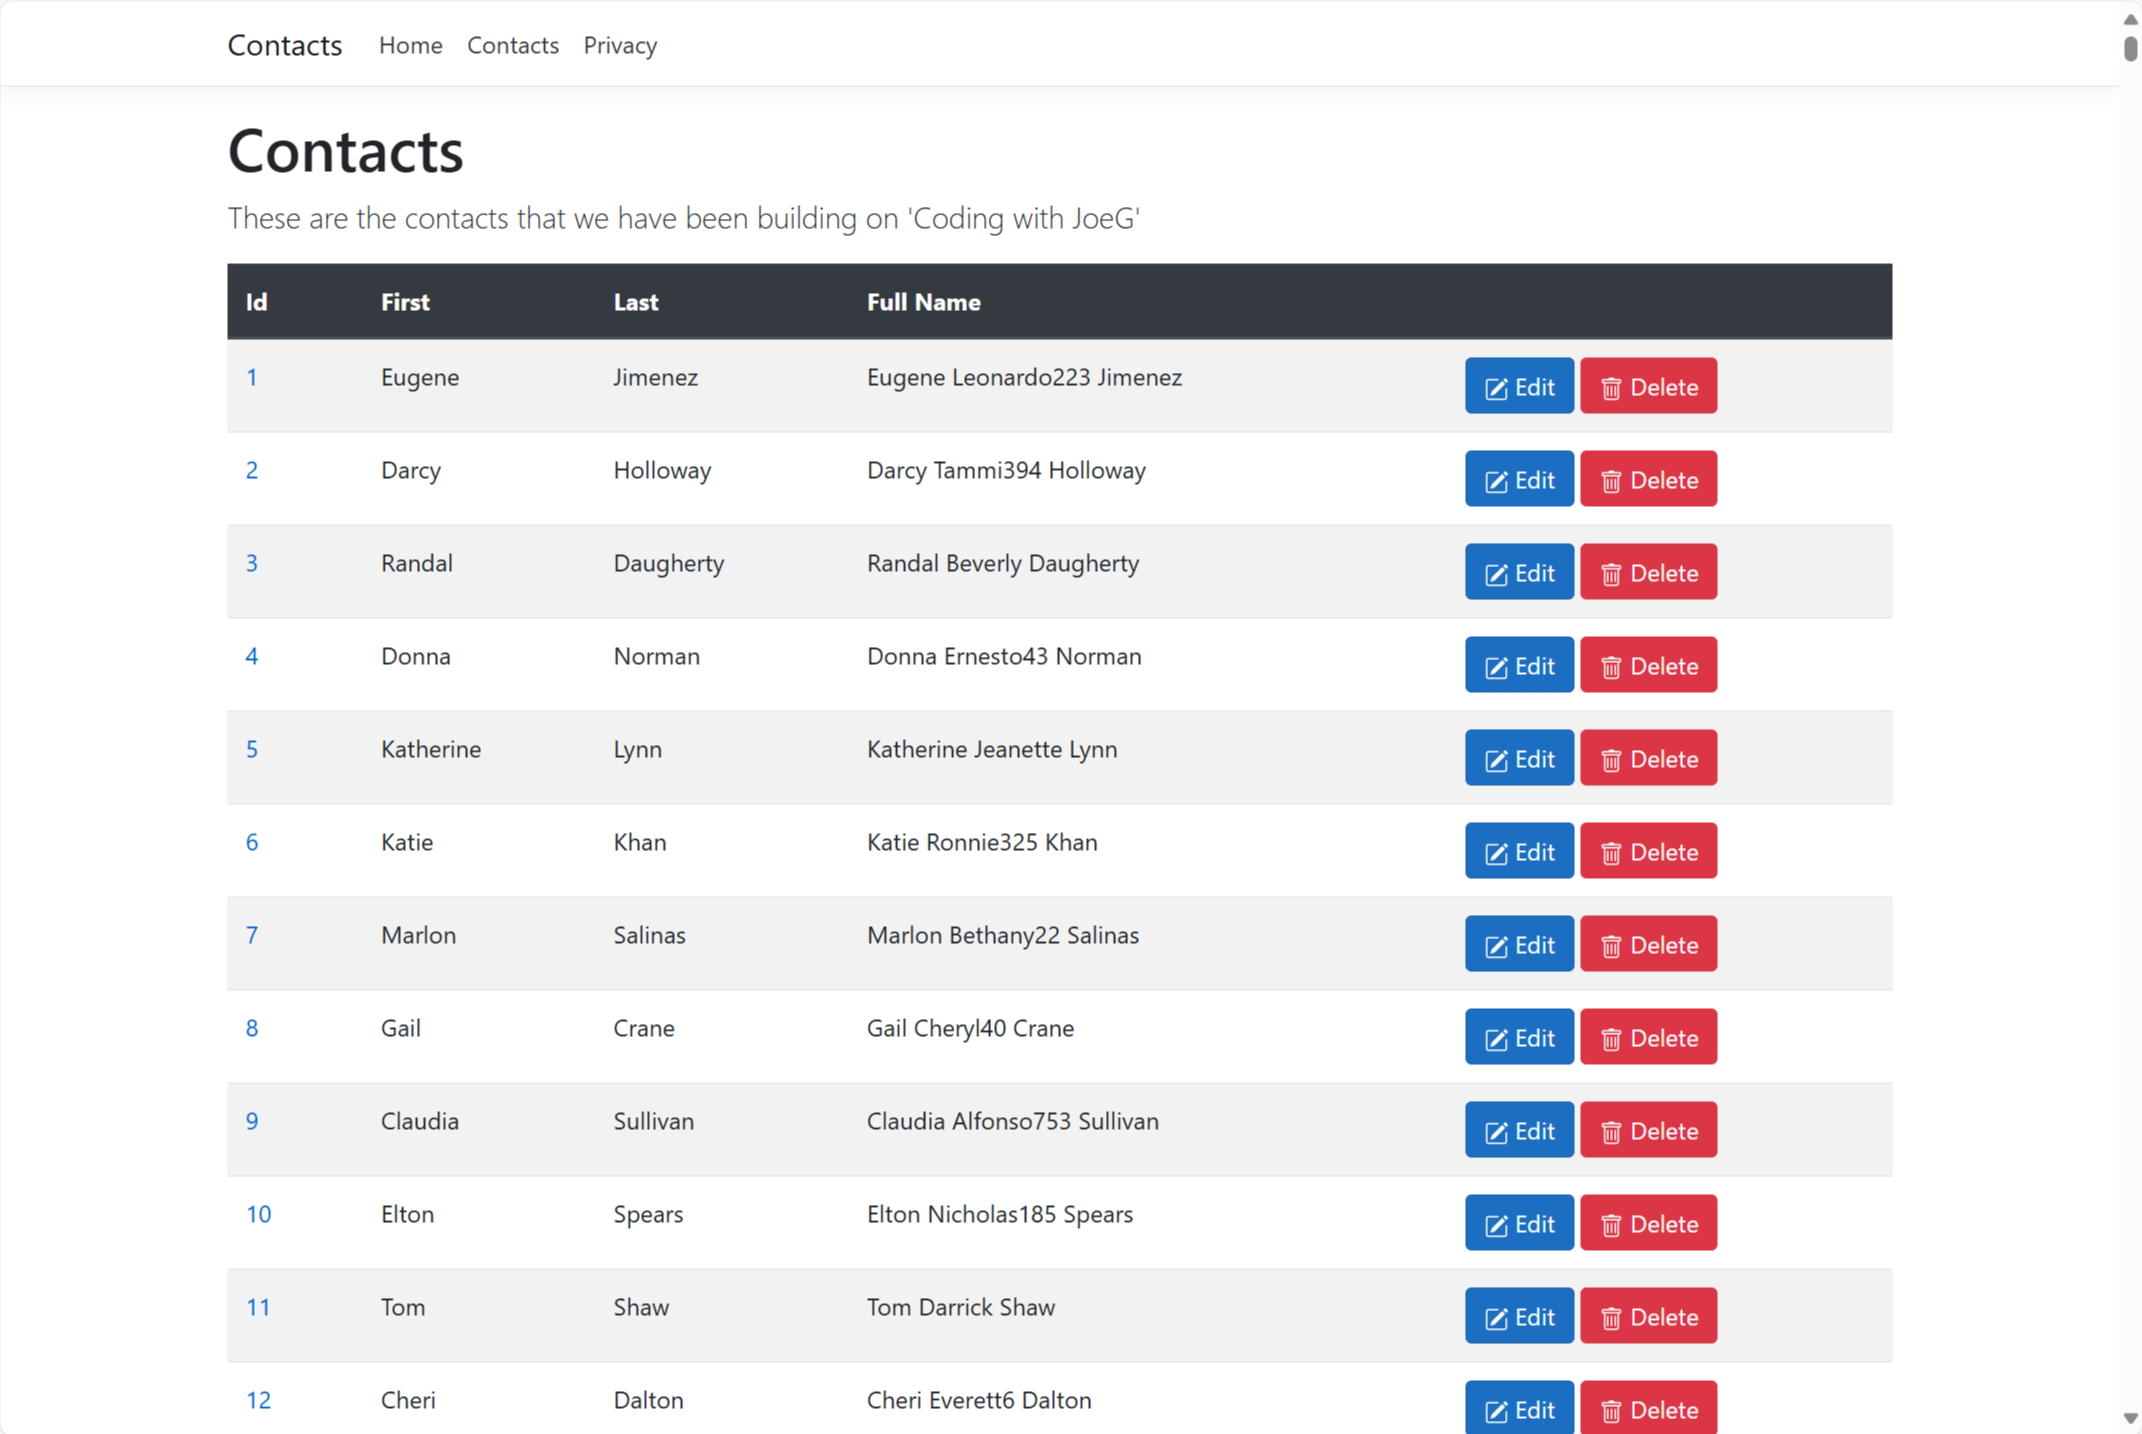
At this point, everything looks good, and the application is running as expected. You can add, edit, delete, and list contacts using the Web UI, and the API is able to connect to the database. However, we still have one more step to complete before we are done. We need to add support for storing contact images in Azure Blob storage.
Adding Blob Storage to the Application
The application requires Azure Blob storage to store uploaded contact images. The project Contacts.ImageManager is responsible for managing the images. It uses a library I wrote called JosephGuadagno.AzureHelpers.Storage to interact with Azure Blob storage. I know, an original name, right? This library provides a set of helper methods to make it easier to work with Azure Blob storage in .NET applications.
The project Contacts.WebUi uses the Contacts.ImageManager project to upload the contact images to Azure Blob storage. There are two blobs containers that are used in this project:
contact-images: This container is used to store the contact images.contact-images-thumbnails: This container is used to store the thumbnail images of the contact images.
For local development, we will use the Azurite emulator to simulate Azure Blob storage. Azurite is a lightweight server that simulates the Azure Blob storage service locally. It is useful for local development and testing purposes.
To add Azurite to the Aspire application, we will use the Aspire.Hosting.AzureStorage package to the Contacts.AppHost project. This package provides support for Azure Blob storage in Aspire applications. We are then going to need to update the application configuration to use the Aspire managed Azurite instance.
You can add the Aspire.Hosting.Azure.Storage package to the Contacts.AppHost project by running the following command in the terminal:
1
dotnet add package Aspire.Hosting.Azure.Storage
or by adding it through the NuGet Package Manager in Visual Studio or Rider.
Since the storage emulator is going to be used by the Contacts.WebUi project, we need to add the reference to the storage component to Aspire before we add the Contacts.WebUi project. Open the AppHost.cs file in the Contacts.AppHost project, and add the following line after the var db line:
1
2
3
4
5
var blobStorage = builder.AddAzureStorage("AzureStorage")
    .RunAsEmulator(azurite =>
    {
        azurite.WithLifetime(ContainerLifetime.Persistent);
    });
This line adds the Azure Blob storage component to the Aspire application, with the name AzureStorage. The RunAsEmulator() method specifies that the Azurite emulator should be used instead of a real Azure Blob storage account. Just as we did with the SQL Server database, we are using the WithLifetime(ContainerLifetime.Persistent) method to specify that the Azurite emulator should be persistent, meaning it will not be recreated every time the application is run. This is helpful for development and testing purposes, as it allows you to keep the data in the Azurite emulator between runs.
1
2
3
4
5
var blobStorage = builder.AddAzureStorage("AzureStorage")
    .RunAsEmulator(azurite =>
    {
        azurite.WithLifetime(ContainerLifetime.Persistent);
    });
Next, we need to create the blob containers that will be used by the application. We can do this by calling the AddBlobContainer("contact-images") and AddBlobContainer("contact-images-thumbnails") methods on the blobStorage variable. Add the following line to the AppHost.cs file after the AddBlobs("cwjgcontacts") line:
1
2
var imageContainer = blobStorage.AddBlobContainer("contact-images");
var thumbnailContainer = blobStorage.AddBlobContainer("contact-images-thumbnails");
Now, we need to update builder.AddProject<Projects.Contacts_WebUi>("contacts-web-ui") to pass the Azure Blob storage connection string to the Contacts.WebUi project. We can do this by chaining a call to the WithEnvironment method on the AddProject method for the Contacts.WebUi project.
1
2
3
4
5
6
builder.AddProject<Projects.Contacts_WebUi>("contacts-web-ui")
    .WithReference(api)
    .WaitFor(api)
    .WaitFor(blobStorage)
    .WithEnvironment("Settings__ContactBlobStorageAccount", imageContainer)
    .WithEnvironment("Settings__ContactThumbnailBlobStorageAccountName", thumbnailContainer);
Now, we need to make a few tweaks to the Contacts.WebUi project to make be able to programmatically set the ContactImageUrl setting in the application. For some reason, the service discovery feature of Aspire does not wire up blob storage URLs automatically, so we need to do it manually.
Open the Program.cs file in the Contacts.WebUi project, and add the following line just after the configuration.Bind("Settings", settings); line in the ConfigureServices method:
1
2
3
4
5
    if (environment.IsDevelopment())
    {
        var endpoint = settings.ContactBlobStorageAccount.Split(';').First(x => x.StartsWith("BlobEndpoint"));
        settings.ContactImageUrl =  endpoint.Split('=')[1].TrimEnd('/') + "/";
    }
This code checks if the application is running in development mode, and if so, it sets the ContactImageUrl setting to the Blob storage endpoint URL by parsing the connection string.
Another thing that we need to do, for this application to work, is to programmatically set the blob container public access level to PublicAccessType.Blob. Replace the services.TryAddScoped<IImageStore> line with the following code:
1
2
3
4
5
6
7
8
9
10
11
12
13
14
services.TryAddScoped<IImageStore>(_ =>
{
    if (environment.IsDevelopment())
    {
        var blob = new Blobs(settings.ContactBlobStorageAccount, settings.ContactImageContainerName);
        blob.BlobContainerClient.SetAccessPolicy(PublicAccessType.Blob);

        return new ImageStore(blob);
    }

    return new ImageStore(
        new Blobs(settings.ContactBlobStorageAccountName, null, settings.ContactImageContainerName));

});
Note: I’ll create two issues to get this added to the Aspire.Hosting.Azure.Storage package, so that we don’t have to do this manually in the future.
This code checks if the application is running in development mode, and if so, it sets the public access level of the blob container to PublicAccessType.Blob. This allows the images to be publicly accessible, which is necessary for the Web UI to display the images.
Now, you can upload an image for a contact, the image will be uploaded to the Azure Blob storage emulator, and the Web UI will display the image. If you have the Azure Storage Explorer installed, you can connect to the Azurite emulator and see the images that were uploaded.
Wrap Up
Wow! That was a lot of work, but we have successfully added Aspire to the Contacts application and configured it to use SQL Server, Azure Blob storage, and the Web UI. We also created the database schema and seed data for the application, and we were able to run the application with all the components working together. Now, you can focus on building features for the application without worrying about the underlying infrastructure and configuration.
In a “real world” application, it shouldn’t take you this long to get started with Aspire. The goal of this post was to walk you through setting up and application to show you how to get started with Aspire, and how to add the necessary components to your application.
If you want follow along with me learning Aspire, you can watch the AspiriFridays episode where we added Aspire to the JosephGuadagno.NET Broadcasting application. You can also check out the official documentation for more information on how to get started with Aspire.
References
Share on
Bluesky Facebook LinkedIn Reddit XLike what you read?
Please consider sponsoring this blog.

