
Protecting an ASP.NET Core Web API with Microsoft Identity Platform
Microsoft Identity Web is a library which contains a set of reusable classes used in conjunction with ASP.NET Core for integrating with the Microsoft identity platform (formerly Azure AD v2.0 endpoint) and AAD B2C.
This library is for specific usage with:
- Web applications, which sign in users and, optionally, call web APIs
- Protected web APIs, which optionally call protected downstream web APIs
Note! This post was written based on a preview version of the Microsoft Identity Web library, version 0.1.4-preview. It has been updated to version 0.2.0-preview. Your experience may vary!
Prerequisites
- An Azure account with an active subscription. Create an account for free.
- An Azure AD tenant.
- An ASP.NET Core Web Api. If you need one, you can start with the Contacts application at this commit.
Getting Started with Microsoft Identity Platform
The code for this is ridiculously simple, as that was the intention. However, if you are starting without the infrastructure, like I was, there are a couple of things to do.
Creating the Azure Active Directory (AAD) Tenant
First, log into the Azure Portal.
- Click on ‘Create a resource’
- In the search box, type
Azure Active Directoryand select it - Click on ‘Create’
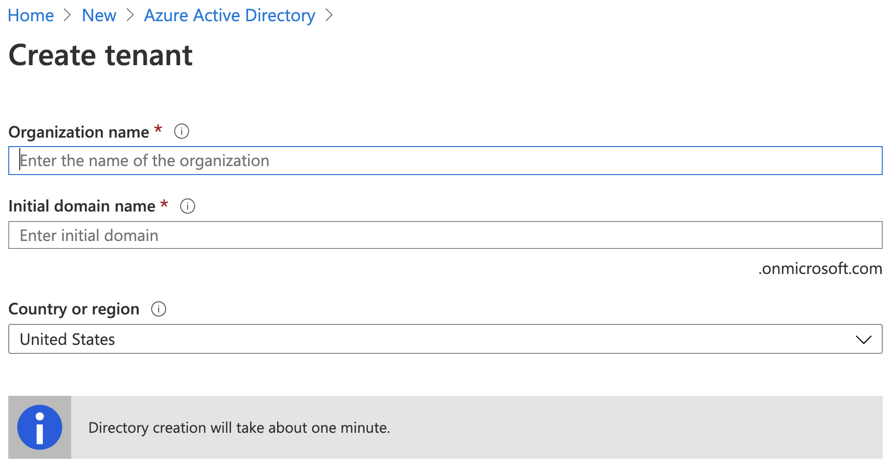
Enter an Organization name. The organization name is required and should be something that relates to your organization.
Next, enter the initial domain name. This domain name is a subdomain of onmicrosoft.com. You can add a custom domain like josephguadagno.net later on in the process. We won’t be doing that as part of this post.
Select your country and click ‘Create’. Once the directory is created, you will see a message similar to this.

Registering Applications with the Directory
Now that we have an Azure Active Directory (AAD) tenant created, we will have to have register at least two applications within the portal, an application that represents the API we are protecting, and an application that will represent the client. The reason I said at least two is because you should create one client for each client you will consume/call your API. An example of a client could be a Windows desktop application, developer application (Visual Studio, Postman, etc.), or other Apis. In this post, we are only going to create on the client to connect to our API.
Register the Api Application
This application is used by your ASP.NET Core Web API to check the client’s authentication.
Back in the Azure portal for your tenant, click on ‘App Registration’, and then click on ‘+ New Registration’
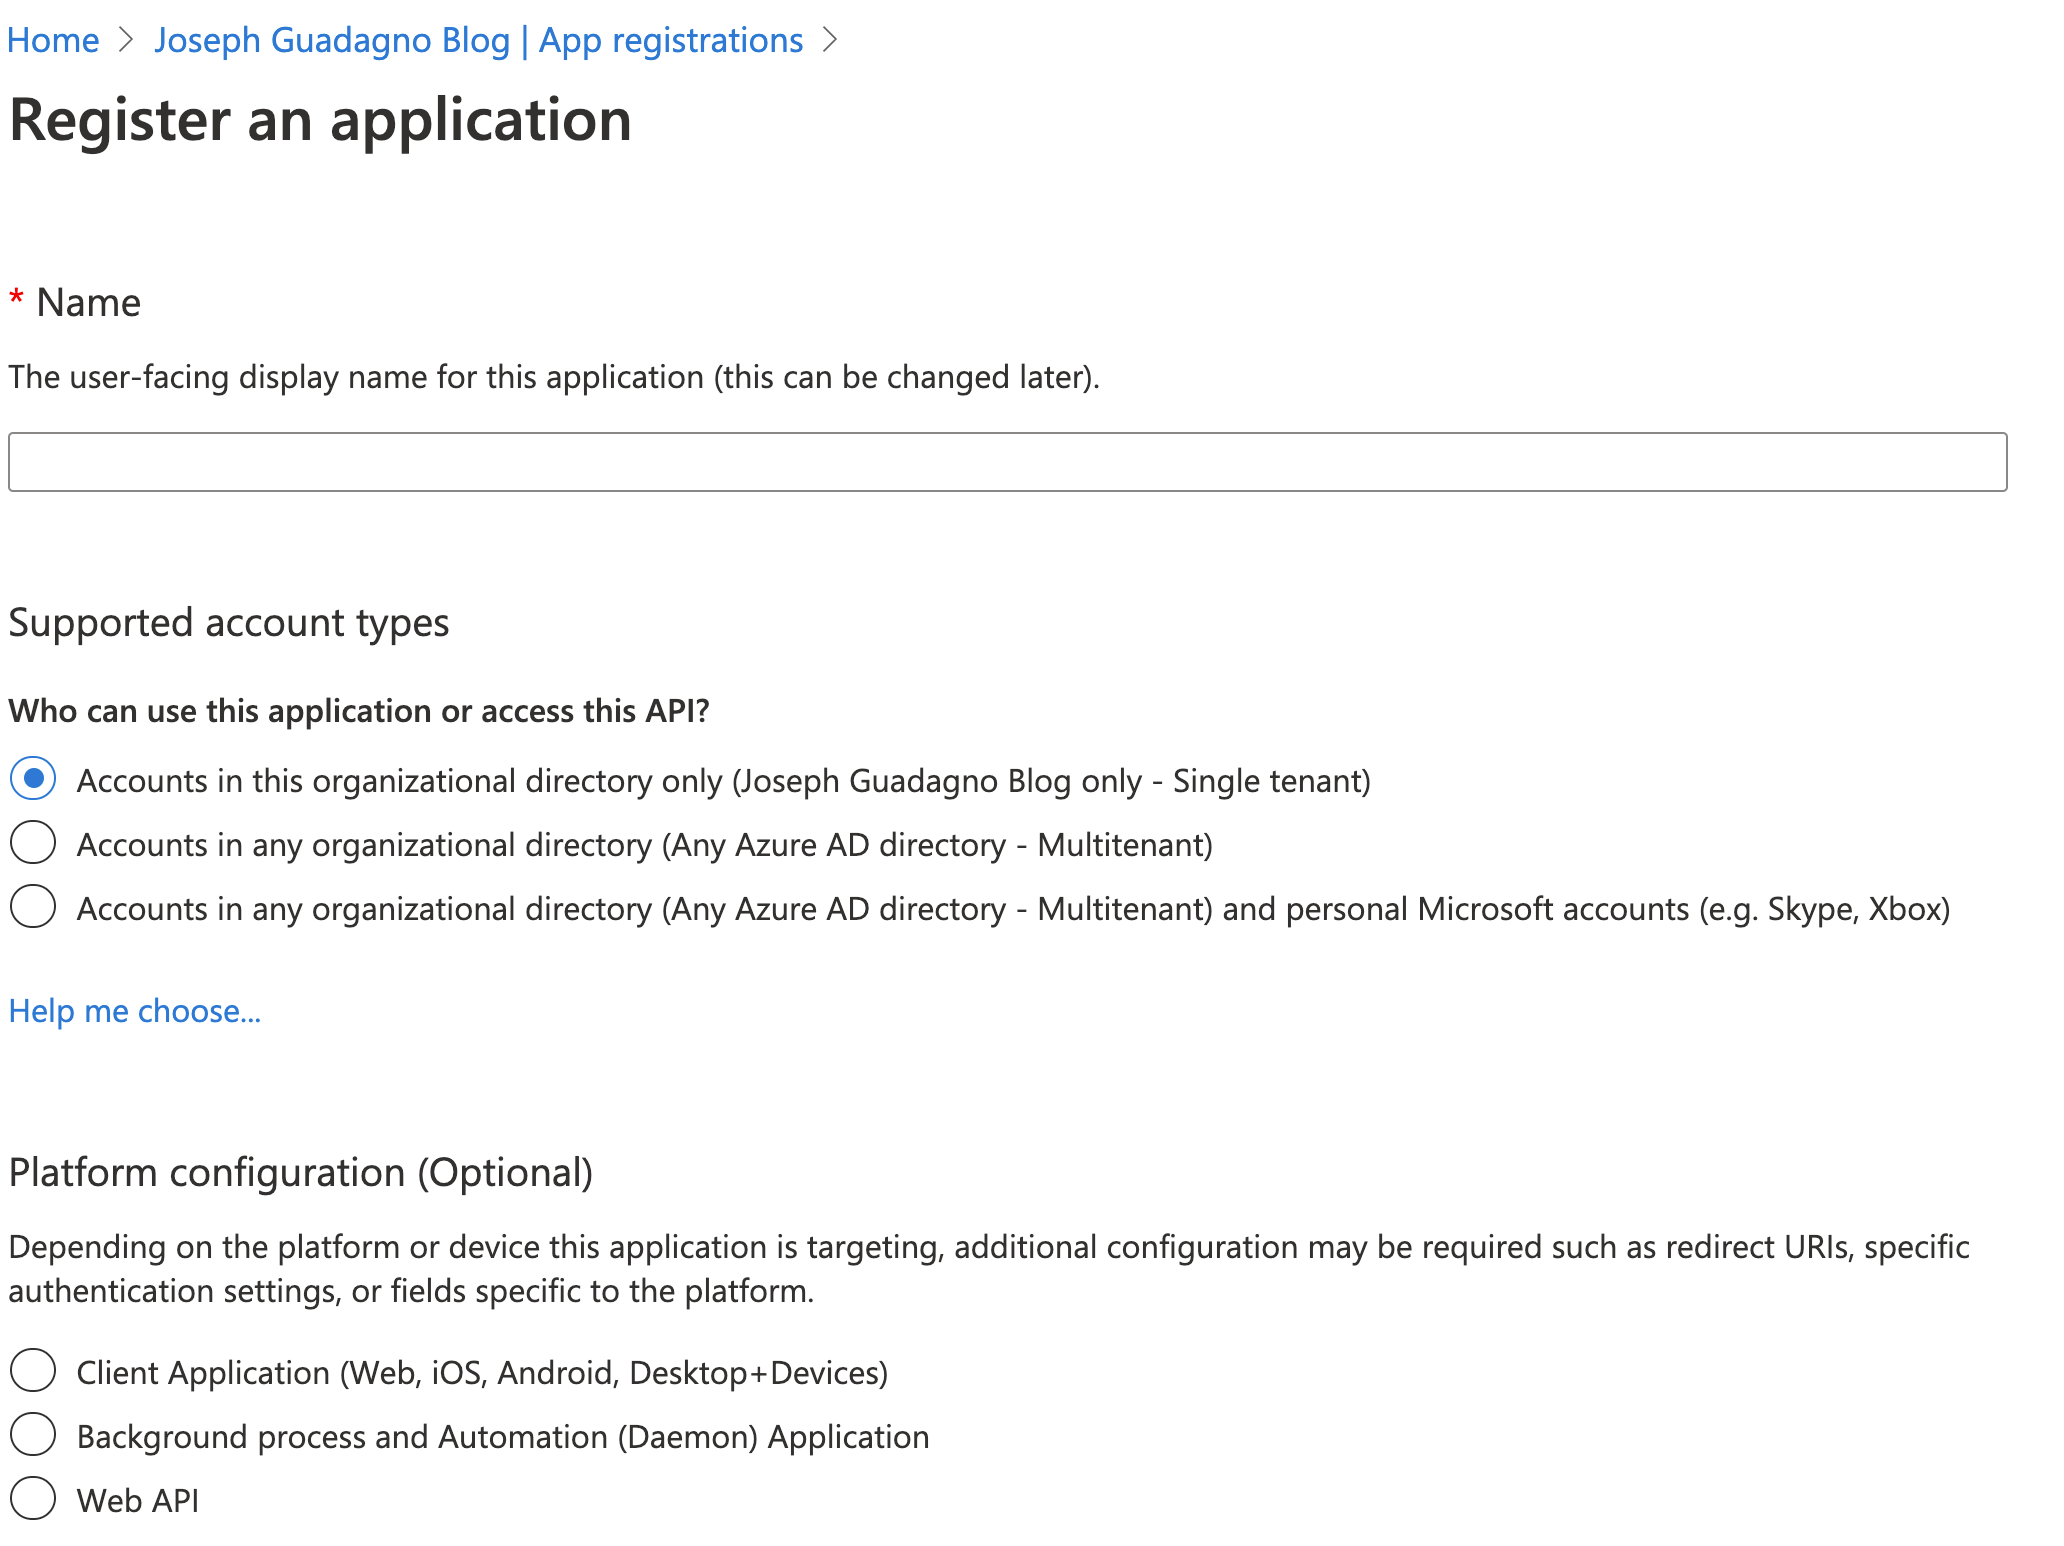
- Enter a name, I typically choose the name of the application and ‘Api’. Example:
Contacts Api - Choose who can access your application. For this post I am choosing the option that allows anyone that has a Azure AD Account or consumers account (Xbox, Skype, etc) access to the Api. That is
Accounts in any organizational directory (Any Azure AD directory - Multitenant) and personal Microsoft accounts (e.g. Skype, Xbox) - Platform configuration, choose
Web API - Click ‘Register’
Once the application is registered you will be brought to the API permissions page. At this point, you can delete the default ‘Microsoft Graph’ permissions by clicking on the three dots. We will not be using them.
Register the Client Application
Go back to your tenant. You should be able to click on the name of the tenant towards the top of the page. Click on ‘App Registrations’ and then click on ‘+ New Registration’
| Name | Value | Description |
| Name | Postman Client |
This is the name of this client. It should be something that is clear for you. You may be adding more than one |
| Supported account types | Accounts in any organizational directory (Any Azure AD directory - Multitenant) and personal Microsoft accounts (e.g. Skype, Xbox) | For more details on account types please visit Register a new application using the Azure portal |
| Platform configuration | Client Application (Web, iOS, Android, Desktop+Devices) |
- Click ‘Register’
Because we chose, Client Application, for the platform configuration, we are directed to the ‘Authentication’ blade after the creation of the application.
- Click ‘+ Add a platform’
For this post, we are going to be using Postman for validating our Api authentication so I am choosing ‘Web’.
- Click ‘Web’
For the Redirect URIs enter https://www.postman.com/oauth2/callback. Note, none of the other options are required.
- Click ‘Configure’
Applications are registered! Next step, create the scopes.
Creating Scopes
Scope is a mechanism in OAuth 2.0 to limit an application’s access to a user’s account. An application can request one or more scopes, this information is then presented to the user in the consent screen, and the access token issued to the application will be limited to the scopes granted.
For this sample, we will create one scope to use and enable in our application.
In the Azure portal, go to the API application registration and click on ‘Expose an API’. You’ll see something similar to this.
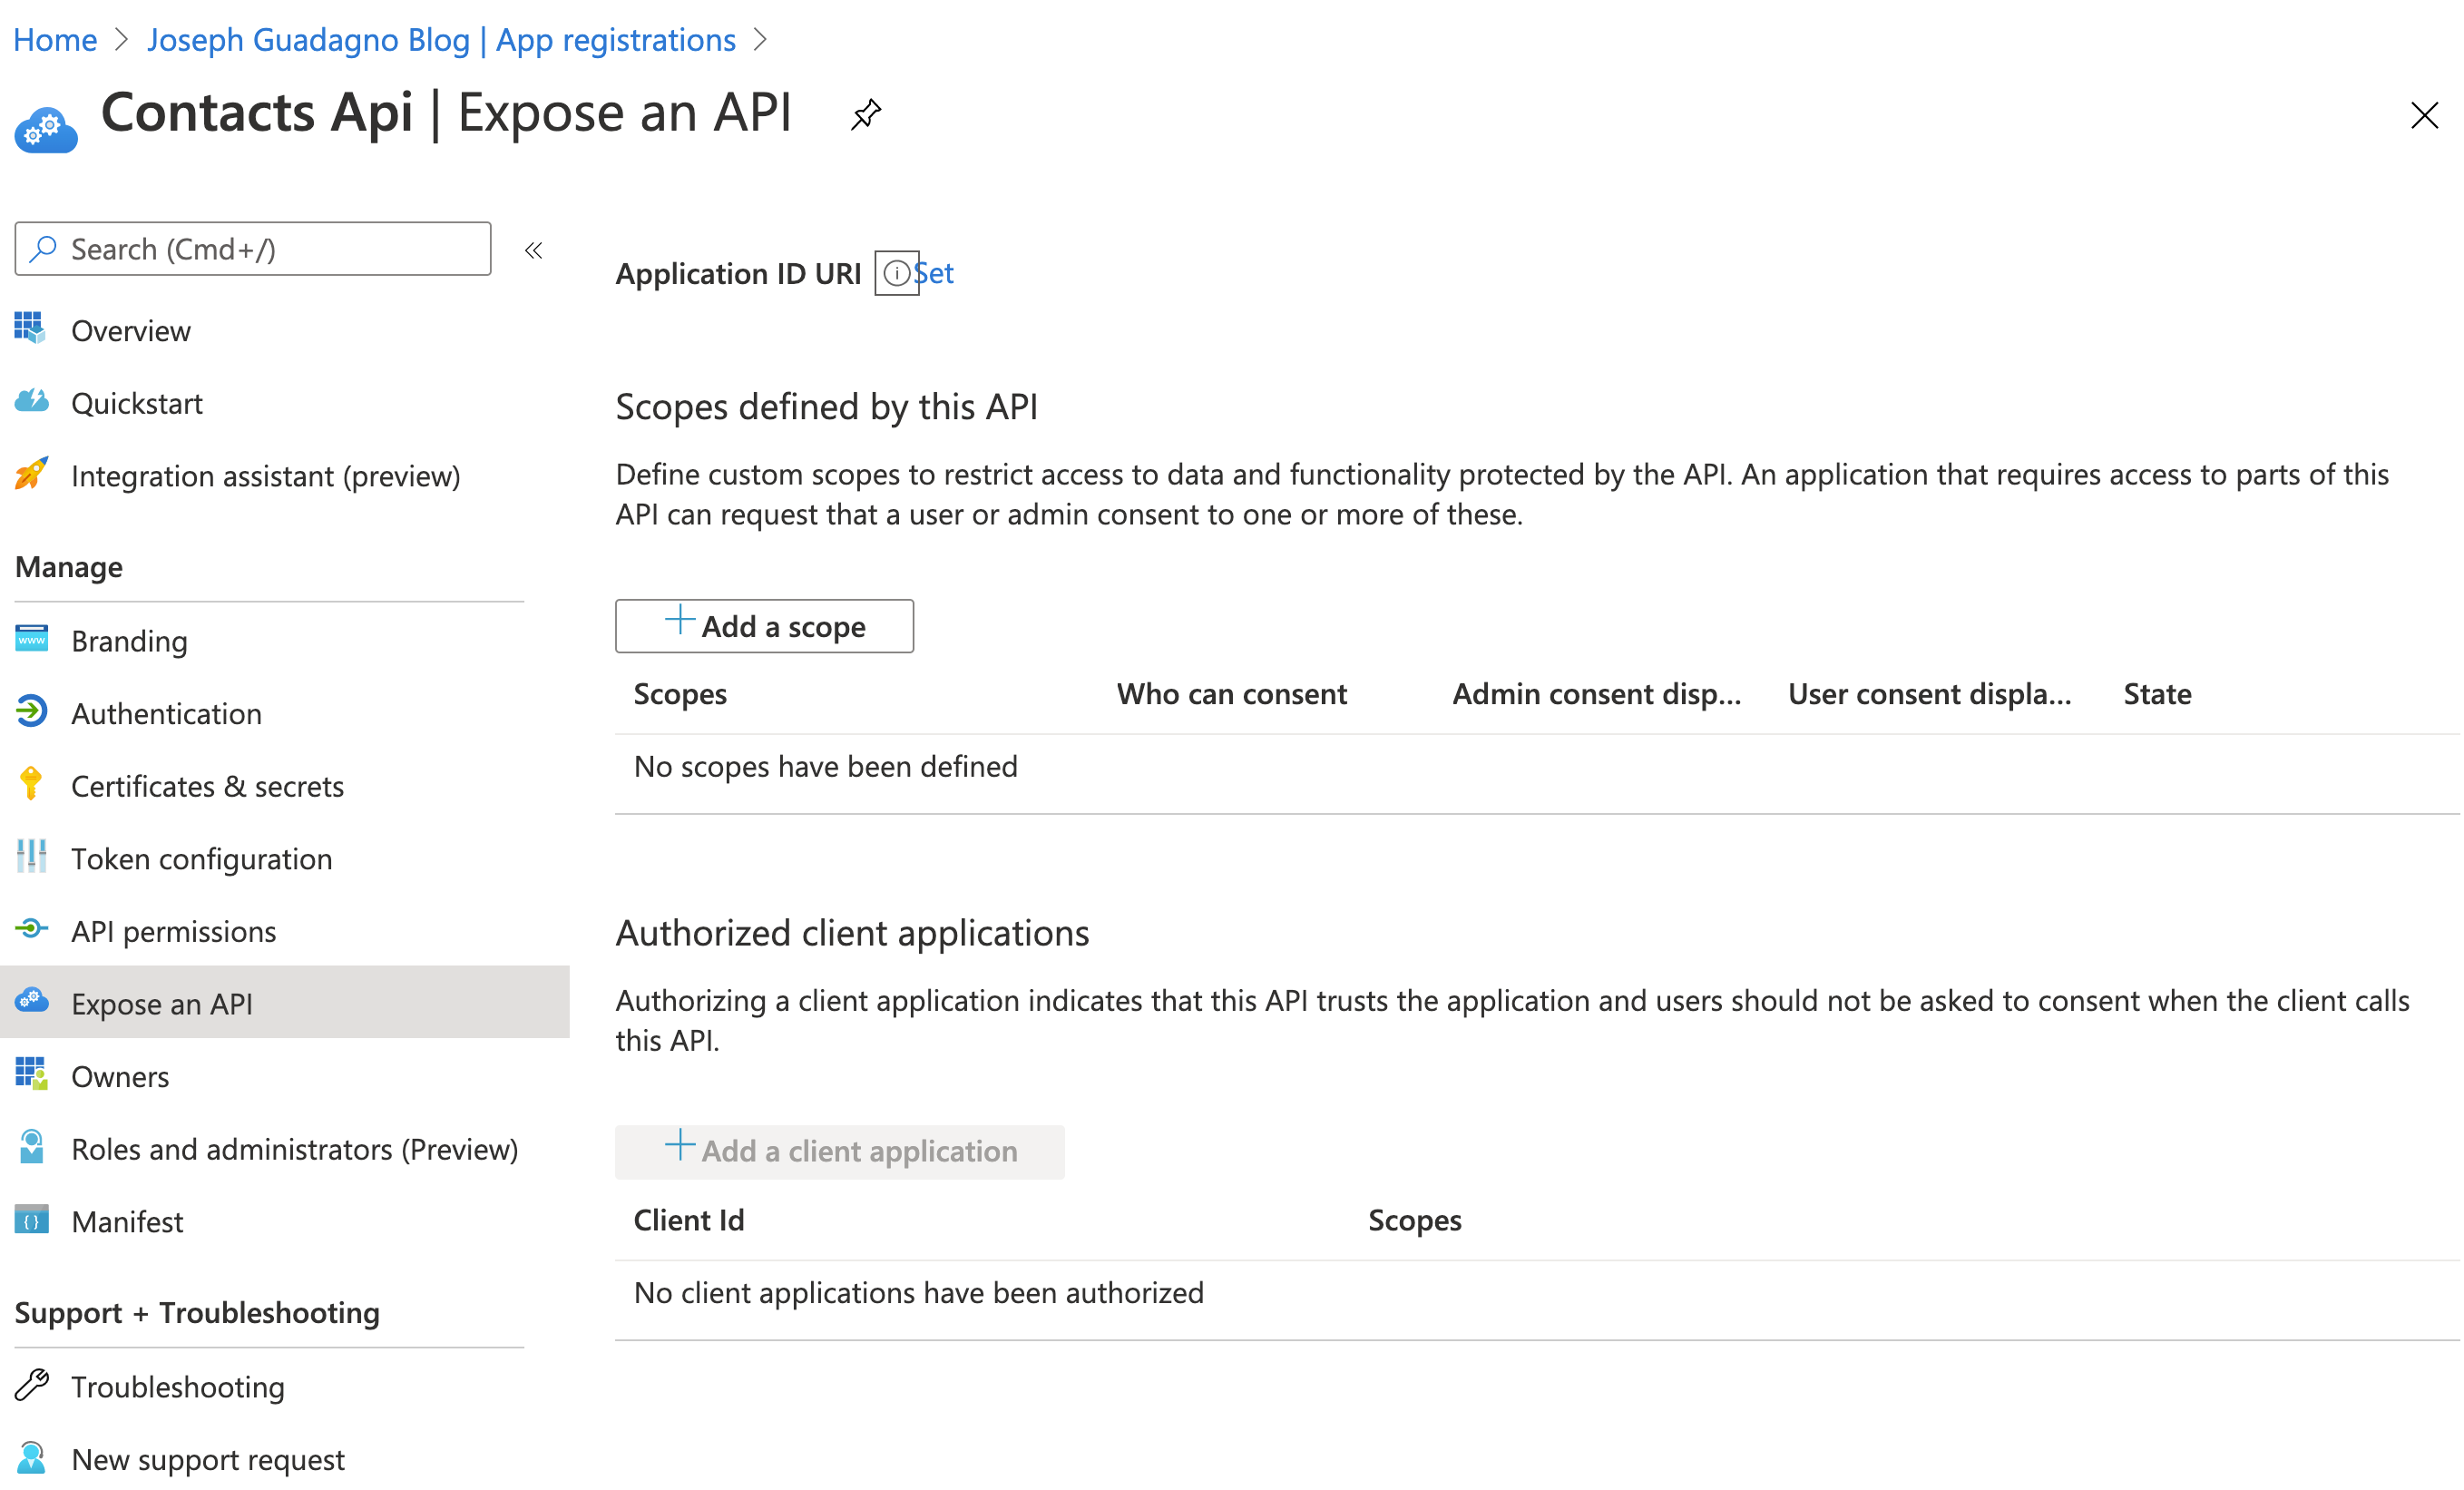
Where you see the ‘Application ID URI’, click ‘Set’. You’ll something like api://747cc384-f337-4138-a25b-6b38664404a5. This is used as the base of your scopes, the Guid is automatically generated. Click ‘Save’. Copy this somewhere, we’ll need it later.
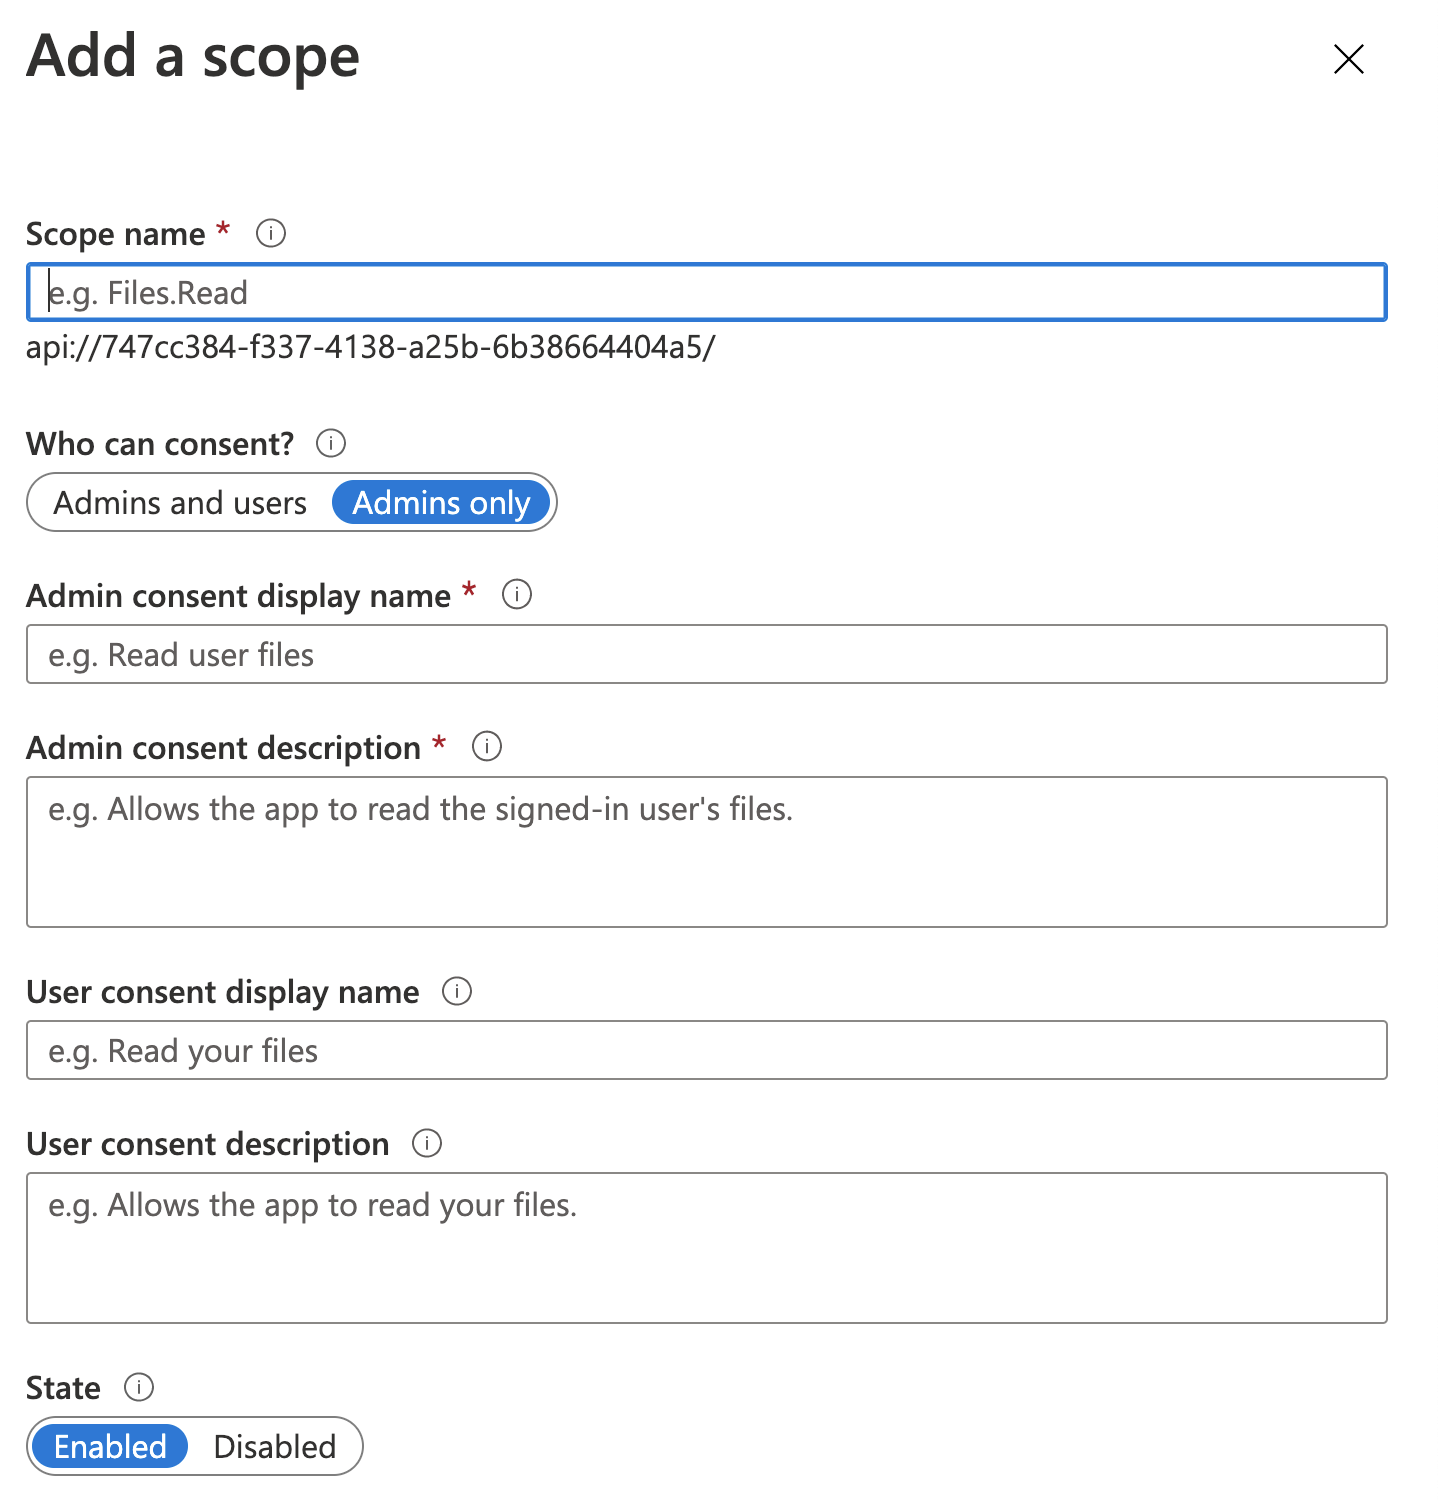
Next, we’ll add one or more scopes. You’ll want one scope defined for every permission you want. If you think of it from an operating systems file stand point, one permission to read, one to write, one to delete, etc. Click on ‘+ Add a scope’.
| Name | Value | Description |
| Scope Name | Contact.View |
This is the name of the scope that you will see in the application code |
| Who can consent? | Admins and Users |
Who do you want to offer the scope to? |
| Admin consent display name | View Contacts |
This is what the scope will be called in the consent screen when admins consent to this scope. |
| Admin consent description | View all of the contacts and their details |
This is a detailed description of the scope that is displayed when tenant admins expand a scope on the consent screen. |
| User consent display name | View Contacts |
This is what the scope will be called in the consent screen when users consent to this scope. |
| User consent description | View all of the contacts and their details |
This is a detailed description of the scope that is displayed when tenant users expand a scope on the consent screen. |
| State | Enabled |
You’ll notice, beneath the text box for the scope name it is creating and id something like this: api://747cc384-f337-4138-a25b-6b38664404a5/Contact.View. This is a concatenation of your Application Id Uri and the scope name.
- Click ‘Add Scope’
You would repeat these steps for each scope you want in your application
Enabling Scopes for Client Application
Now that we have a scope, we need to give our client application the permissions to use that scope.
Go to the App Registration for the Client application in the Azure portal and click on ‘API Permissions’.
- Click on ‘+ Add a permission’

- Click on ‘My APIs’
- Select your Api:
Contacts Api - Select
Delegated permissions - Expand the ‘Contact’ list and select
Contact.View - Click ‘Add Permissions’
Getting Clients Ids and Secrets
We are going to need a few more things from the Azure portal for the ASP.NET Core Web API so let’s get them while we are here.
Client App Registration
In the Client App Registration, ‘Postman Client’, click on ‘Certificates & secrets’.
- Click ‘+ New client secret’
| Name | Value | Description |
| Description | Client Secret |
A description for the secret |
| Expires | Never |
This is up to you for this post I chose ‘Never’ but I am deleting the app shortly |
- Click ‘Add’
Note! Copy this secret somewhere safe! You cannot retrieve it one you leave this blade! You will have to recreate it if you do not save it.
- Click on ‘Overview’ in the menu, and copy the ‘Application (client) ID’
Api Application Registration
In the App Registration for the API Application, click on ‘Overview’ and copy
- ‘Application (client) ID’
- ‘Directory (tenant) ID’
Click on ‘Endpoints’ and copy
- OAuth 2.0 authorization endpoint (v2)
- OAuth 2.0 token endpoint (v2)
That should be it for the portal. On to the application.
ASP.NET Core Web API application
You’ll need to make 5 changes to your ASP.NET Core Web API. First step is to install the Microsoft Identity Webpackage in your API package.
1

Install-Package Microsoft.Identity.Web -Version 0.2.0-preview
Note The version number might be different.
Now in your appsettings.json you will need to add the AzureAd section
1
2
3
4
5
6

"AzureAd": {
    "Instance": "https://login.microsoftonline.com/",
    "Domain": "replace with your domain. The domain of the AAD tenant",
    "ClientId": "replace with your Api Application client id",
    "TenantId": "common"
  }
You need specify the TenantId only if you want to accept access tokens from a single tenant (line-of-business app). Otherwise, you can leave them set to common.
This can be:
- A GUID (Tenant ID = Directory ID)
- ‘common’ (any organization and personal accounts)
- ‘organizations’ (any organization)
- ‘consumers’ (Microsoft personal accounts)
Now in your Startup.cs file, you are going to need to enable the Microsoft Identity Platform. In the ConfigureServices method, add as one of the first lines in the method
1

services.AddMicrosoftWebApiAuthentication(Configuration);
This enables the platform.
Next, in the Configure method, add the following.
1
2

app.UseAuthentication();
app.UseAuthorization();
Now we need to add the Authorize attribute to any controllers that we want to protect. In our sample application, we open the ContactsController and add to the top the Authorize attribute. It should look something like this.
1
2
3
4
5
6
7

/// <summary>
/// The contacts endpoints provide the functionality to maintain our contacts.
/// </summary>
[ApiController]
[Authorize]
[Route("[controller]")]
public class ContactsController: Controller
Finally, we need to add the following code to any methods that we want to check permissions for.
1

HttpContext.VerifyUserHasAnyAcceptedScope("Contact.View");
I added this to the GetContacts methods.
1
2
3
4
5

public List<Domain.Models.Contact> GetContacts()
{
    HttpContext.VerifyUserHasAnyAcceptedScope("Contact.View");
    return _contactManager.GetContacts();
}
Note, if you do not provide other scopes or don’t add this scope to any other methods, they will no longer be accessible.
Configure Postman
If you don’t have Postman, you get download it here. We are using Postman to validate the authentication and authorization of the application.
Add a new request in Postman to get the contacts which will call the \Contacts end point.
- Click the ‘+’ button on the tabs
- Select ‘Get’, if it is not already selected
- Enter the Uri of
https://localhost:5001/Contactsor whatever Uri you are testing - Click on ‘Authorization’
- For Type, select ‘OAuth 2.0’
- Click ‘Get New Access Token’
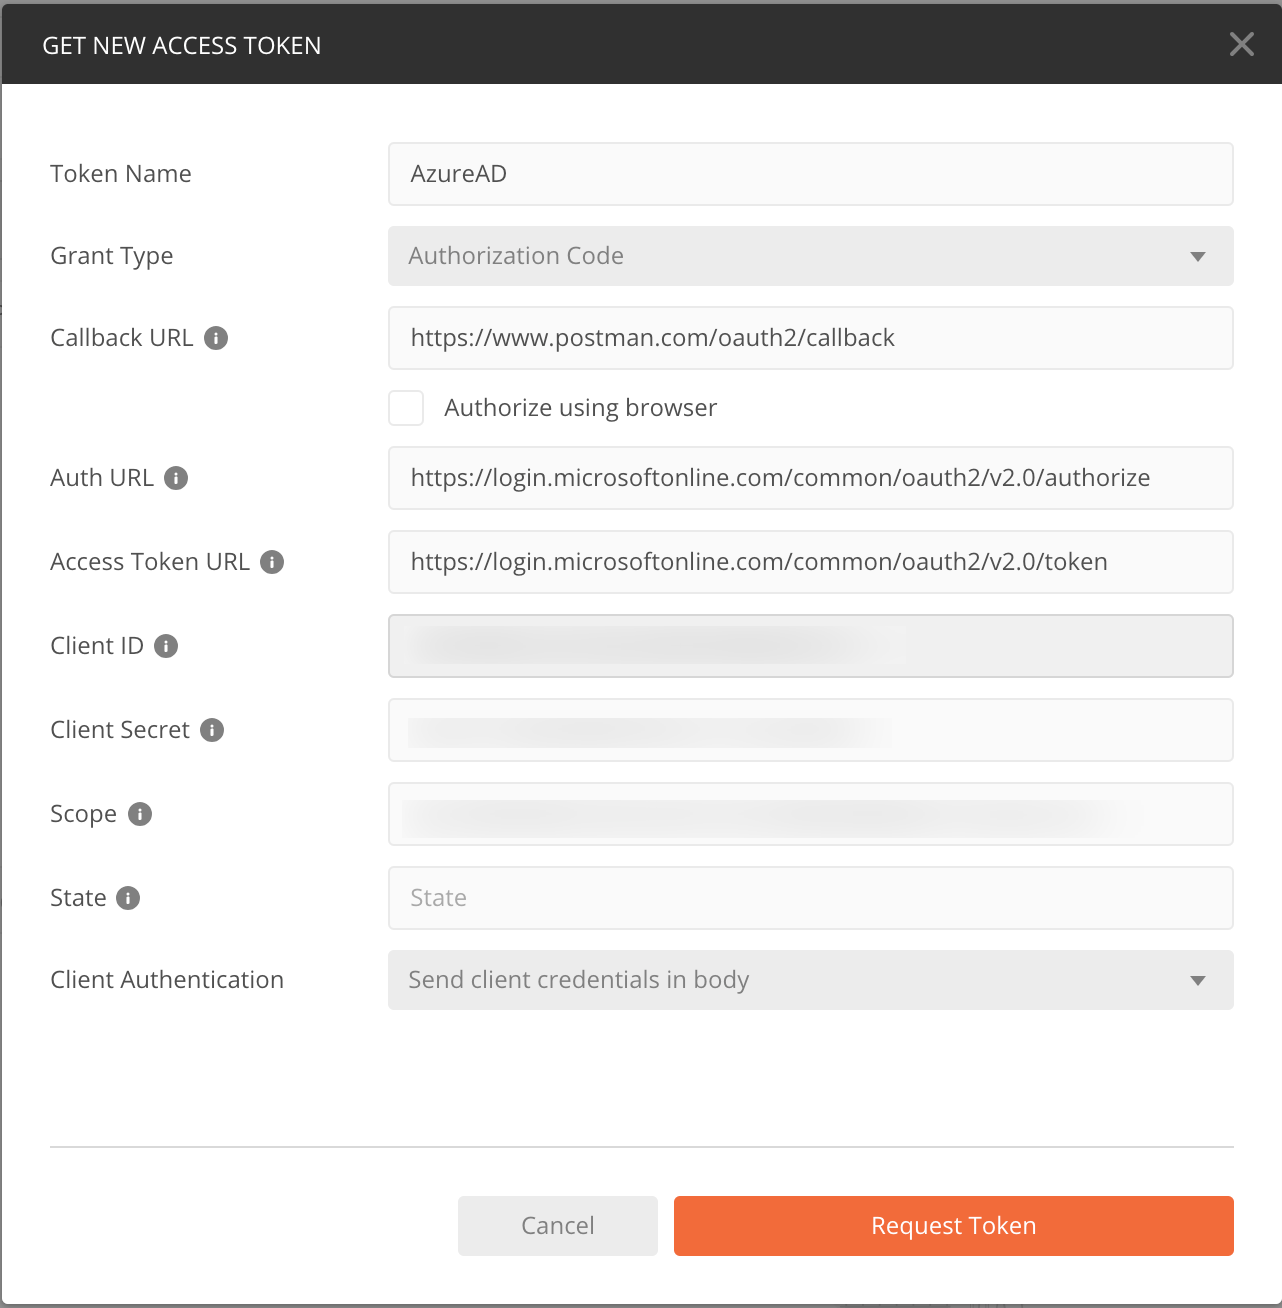
| Name | Value | Description |
| Token Name | AzureAD |
Any name you want |
| Grant Type | Authorization Code |
|
| Callback URL | https://www.postman.com/oauth2/callback |
This is the value you entered when you registered the client in the Azure portal |
| Auth URL | https://login.microsoftonline.com/common/oauth2/v2.0/authorize |
You can get this from the ‘End Points’ blade in your Client Registration |
| Access Token URL | https://login.microsoftonline.com/common/oauth2/v2.0/token |
You can get this from the ‘End Points’ blade in your Client Registration |
| Client ID | clientId |
the client id for your client app in the Azure portal |
| Client Secret | client secret |
The client secret you created in the Azure portal |
| Scope | api://747cc384-f337-4138-a25b-6b38664404a5/Contact.View |
The scope(s) you want a token for |
| State | leave blank | |
| Client Authentication | This setting doesn’t matter for this scenario |
- Click ‘Request Token’
After authenticating with your Microsoft or Domain account, you will be presented with a Permissions screen similar to this.
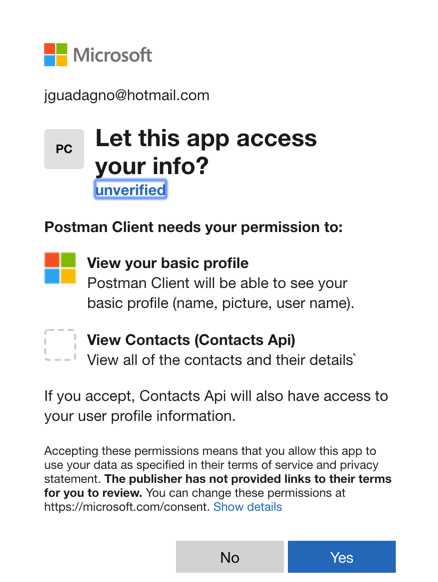
After you click ‘Yes’ you will be presented with the ‘Manage Access Tokens’ screen in Postman. Click ‘Use Token’. If you are curious what is in that token, visit jwt.ms and paste the contents of that token into the textbox.
At this point you should be able to click on ‘Send’.
Try it out
Make sure the API is running. Once you visit an endpoint you will get an HTTP status code of 401 - Unauthorized.
- Click ‘Send’ in Postman
If everything was setup correctly, you should see the contacts.
1
2
3
4
5
6
7
8
9
10
11
12
13
14
15

[
    {
        "contactId": 1,
        "firstName": "Joseph",
        "middleName": "James",
        "lastName": "Guadagno",
        "emailAddress": "jguadagno@hotmail.com",
        "birthday": "1900-05-31T00:00:00",
        "anniversary": "1996-10-26T10:00:00",
        "imageUrl": null,
        "addresses": [],
        "phones": [],
        "fullName": "Joseph James Guadagno"
    }
]
Troubleshooting
401
Good luck!
If you get a ‘error_description’ with it like Bearer error="invalid_token", error_description="The audience '*some guid*' is invalid". This means you have the wrong client id in your appsettings.json.
If you don’t get an ‘error_description’ with it, that generally means something is wrong with the application registration. Go over the steps above.
500 Internal Error
You should get an error message with this. The most likely cause is that the name of the scope you have in the c# code does not exists in the token.
Wrap up
This is a rather long post. The good thing about using the Microsoft Identity Platform is once you set up the App Registrations in the Azure portal and do it correctly ![]() , the rest is easy.
, the rest is easy.
After the team at Microsoft watched me struggle through it, they said they would make it easier and probably even have some Powershell scripts for the initial setup.
Other Resources
If you are interesting in learning how to build an ASP.NET Core Web API, you can start with the Contacts example application. Or you can read along with instructions at this blog post: Building an ASP.NET Web API With ASP.NET Core.
Share on
Bluesky Facebook LinkedIn Reddit XLike what you read?
Please consider sponsoring this blog.

