
Creating a Search Suggestion widget using Azure Maps Search Service and KendoUI Autocomplete.
When using Google or Bing Maps to lookup an address or point of interest, both display address suggestions in a user-friendly way. In the example below, I type “Time Square”, and Bing suggests a few addresses/places.
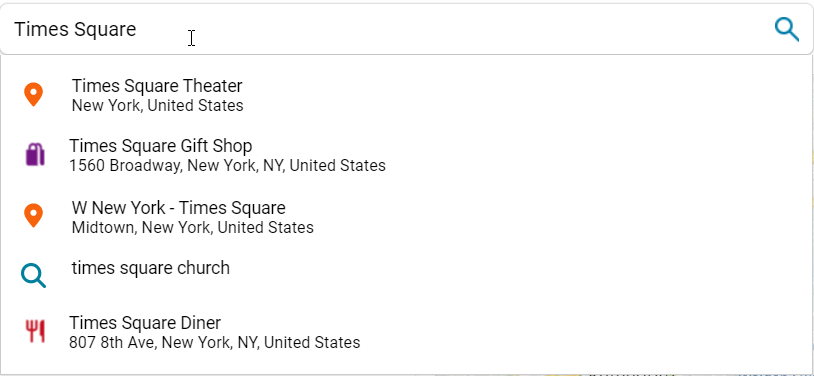
In this post, I’ll walk you through how you can implement the same functionality using HTML, JavaScript, Azure Map Search service, and Telerik Kendo UI Autocomplete control. You’ll be able to download the completed code at the end of the post.
If you want to watch me do this “live” instead, check out the video.
Software Versions
This post was written for the following software and versions listed below.
- Kendo UI - version 2021.1.224
- Azure Map Search service - version 1.0
Getting Started
The post assumes you already have an Azure Maps account with a corresponding Primary Key and/or Client Id. If you don’t have a key, you can obtain one here. In addition to an Azure Maps account, you need to have a licensed copy of the Telerik Kendo UI suite.
If you are ready, open up your IDE of choice, Visual Studio, Visual Studio Code, JetBrains Rider, or just plan Notepad/TextEdit to get started.
HTML
Start with the HTML file. Create a file and name it autocomplete.html. Create the standard <HTML>, <HEAD>, and <BODY> tags.
In the <HEAD> section, we are going to need to register the stylesheets and Javascript files for both the Kendo UI libraries and the Azure Maps.
1
2
3
4
5
6
7
<link rel="stylesheet" href="https://kendo.cdn.telerik.com/2021.1.224/styles/kendo.common.min.css" />
<link rel="stylesheet" href="https://kendo.cdn.telerik.com/2021.1.224/styles/kendo.office365.min.css" />
<link rel="stylesheet" href="https://kendo.cdn.telerik.com/2021.1.224/styles/kendo.office365.mobile.min.css" />
<link rel="stylesheet" href="https://atlas.microsoft.com/sdk/javascript/mapcontrol/2/atlas.min.css" type="text/css">
<script src="https://kendo.cdn.telerik.com/2021.1.224/js/jquery.min.js"></script>
<script src="https://kendo.cdn.telerik.com/2021.1.224/js/kendo.all.min.js"></script>
<script src="https://atlas.microsoft.com/sdk/javascript/mapcontrol/2/atlas.min.js"></script>
NOTE: The version number for the Kendo UI library at the time of this post was 2021.1.224, you may have a different version, but that should be fine.
You’ll then need to add the references to our script files.
1
2
<script src="azurekey.js"></script>
<script src="autocomplete.js"></script>
Now in the <BODY> tag, add our components, a <input> and a <div>
1
2
3
<input type="text" id="queryText" style="width: 100%;" />
<p></p>
<div id="mapControl" style="position: relative;width:100%;min-width:290px;height:500px;"></div>
Feel free to style this however you want; I did it this way to help accent stuff in the UI. The critical part of the HTML is having an <input> with the name of querytext and a div with the id of mapcontrol.
The completed HTML file should look something like this.
1
2
3
4
5
6
7
8
9
10
11
12
13
14
15
16
17
18
19
20
<html>
    <head>
        <title>Autocomplete Demo</title>
        <link rel="stylesheet" href="https://kendo.cdn.telerik.com/2021.1.224/styles/kendo.common.min.css" />
        <link rel="stylesheet" href="https://kendo.cdn.telerik.com/2021.1.224/styles/kendo.office365.min.css" />
        <link rel="stylesheet" href="https://kendo.cdn.telerik.com/2021.1.224/styles/kendo.office365.mobile.min.css" />
        <link rel="stylesheet" href="https://atlas.microsoft.com/sdk/javascript/mapcontrol/2/atlas.min.css" type="text/css">
        <script src="https://kendo.cdn.telerik.com/2021.1.224/js/jquery.min.js"></script>
        <script src="https://kendo.cdn.telerik.com/2021.1.224/js/kendo.all.min.js"></script>
        <script src="https://atlas.microsoft.com/sdk/javascript/mapcontrol/2/atlas.min.js"></script>

        <script src="azurekey.js"></script>
        <script src="autocomplete.js"></script>
    </head>
    <body>
        <input type="text" id="queryText" style="width: 100%;" />
        <p></p>
        <div id="mapControl" style="position: relative;width:100%;min-width:290px;height:500px;"></div>
    </body>
</html>
The Javascript
Now let’s focus on the Javascript file. You’ll need to create two files, azurekey.js and autocomplete.js. You don’t need to create an azurekey.js if you don’t want to, but since this has a key, I exclude it from source control.
AzureKey.js
This file has one line in it which sets up a variable named azurekey used throughout autocomplete.js for our Azure Maps integration. The contents of the file should be.
1
const azureKey = "replace me";
Replace the replace me with your Azure Maps Client Id or Primary Key.
Autocomplete.js
We are going to have a few variables and two functions in the files. Let’s start with some of the variables.
1
2
3
4
5
let map;
let azureSearchDataSource;
let azureMapDataSource;
const mapCenter = [-73.985130, 40.758896]
const defaultZoom = 15;
| Variable Name | Type | Purpose |
|---|---|---|
map |
The Azure Map map | Display the map control |
azureSearchDataSource |
Kendo UI DataSource | Used to call the Azure Map Search service from the Kendo UI Autocomplete control |
azureMapDataSource |
Azure Maps DataSource | Used to draw the pushpins on the layers of the map |
mapCenter |
Array of numbers | Used to center the map and provide hints of where to search. The first number is the longitude and the second is the latitude. In this example, -73.985130, 40.758896 is Time Square, Manhattan, NY |
defaultZoom |
A number or string | Used to tell the map control at what level do we want the map control to zoom in |
Once the variables are there, we create a function, initializeMap, which looks like this.
1
2
3
4
5
6
7
8
9
10
11
12
13
14
15
16
17
function initializeMap() {
    map = new atlas.Map('mapControl', {
        center: mapCenter,
        zoom: defaultZoom,
        authOptions: {
            authType: "subscriptionKey",
            subscriptionKey: azureKey
        }
    });

    map.events.add('ready', function () {
        azureMapDataSource = new atlas.source.DataSource();
        map.sources.add(azureMapDataSource);
        map.layers.add(new atlas.layer.SymbolLayer(azureMapDataSource));
        azureMapDataSource.add(new atlas.data.Point(mapCenter));
    })
}
In lines 1-9, we initialize the map control.
Line 2 is the name of the div you want the map to be rendered in. You’ll notice that this name matches the div we created on the HTML page.
Line 3 and 4 use the variables we created in the previous step to center the map and set the zoom level.
Lines 5 - 7, we create the map authentication. For more details on the map’s customization, check out the Azure Map documentation on creating a map.
In lines 11 - 16, we attach a ready event to map control, which instructs the Azure Maps controls to execute the code when the map is ready, meaning displayed.
Lines 12 - 15, we add a data source to the map, which has a Symbol Layer in it. This is done so we can draw a pushpin on the center of the map.
We’re almost there!
The next step is to initialize the map on the page when the document is ready. To do that, let’s attach to the ready event with jquery.
1
2
3
$(() => {
    initializeMap();
});
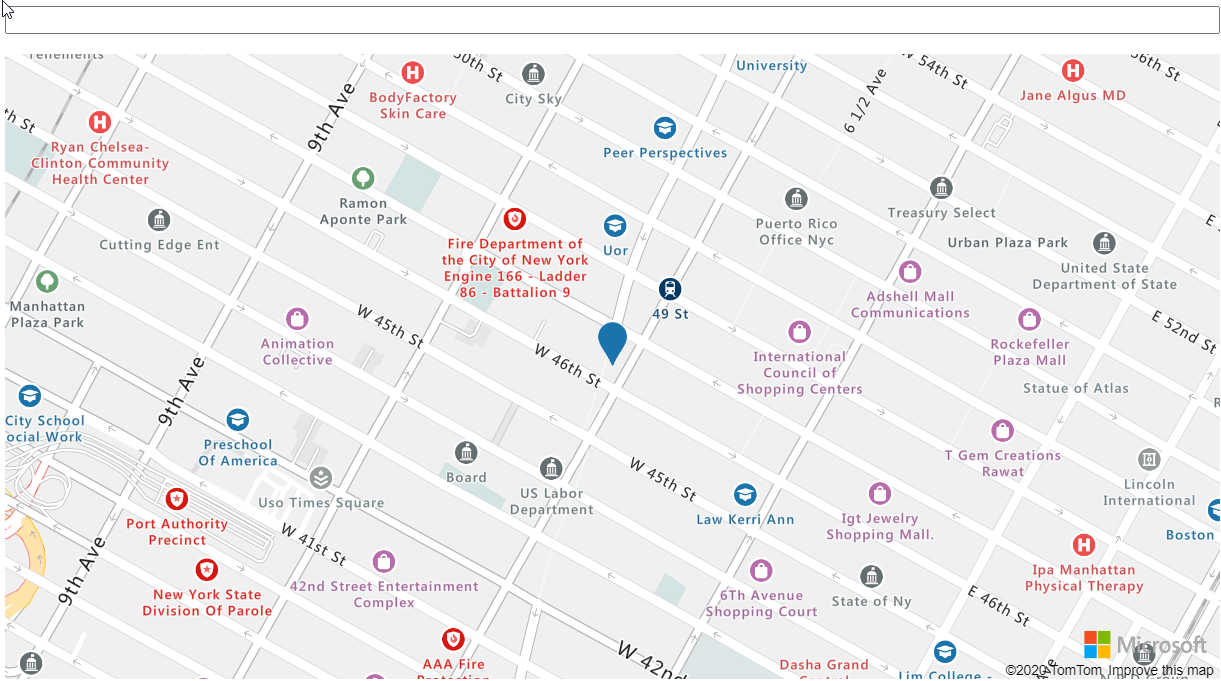
At this point, if you save the 3 pages and open up autocomplete.html in a browser, you should see something like this.
Assembling the Autocomplete Control
Before we assemble the components to enable the address and point of interest suggestions, let’s take a quick look at the Azure Maps Search service API.
The Azure Maps Search service request
The calls to the API are done via an HTTP GET with query parameters. The breakdown of the parameters is as follows.
URL Root
| Name | Value | Comments |
|---|---|---|
| Domain | https://atlas.microsoft.com |
|
| Endpoint | /search/poi/ |
The search for Points of Interests endpoint |
| Return Type | json |
Desired format of the response. Value can be either json or xml. |
Parameters
| Parameter Name | Example Value | Comments |
| typeahead | true |
Boolean. If the typeahead flag is set, the query will be interpreted as a partial input and the search will enter predictive mode |
| api-version | 1 |
Version number of Azure Maps API. Current version is 1.0 |
| view | Auto |
The View parameter specifies which set of geopolitically disputed content is returned via Azure Maps services, including borders and labels displayed on the map. |
| language | en-US |
Language in which search results should be returned. |
| countrySet | US |
Comma separated string of country codes |
| subscription-key | your subscription key | |
| lon | -73.98513 |
The longitude of the center of the search area |
| lat | 40.758896 |
The latitude of the center of the search area |
| query | macy |
The address/place you are searching for |
Sample search query
https://atlas.microsoft.com/search/poi/json?typeahead=true&api-version=1&view=Auto&language=en-US&countrySet=US&subscription-key=replace-me&lon=-73.985130&lat=40.758896&query=macy
For more details on the search parameters available, please look at the Get Search POI documentation.
The Azure Maps Search service response
Assuming the request is correct, the service responds with JSON data. The response has two properties summary and results. The summary section is just that, a summary of the requests and the results defined as a SearchPoiSummary. The results is an array of SearchPoiResult items.
1
2
3
4
5
6
7
8
9
10
11
12
13
14
15
16
17
18
19
20
21
22
23
24
25
26
27
28
29
30
31
32
33
34
35
36
37
38
39
40
41
42
43
44
45
46
47
48
49
50
51
52
53
54
55
56
57
58
59
60
61
62
63
64
65
66
67
68
69
70
71
72
73
74
75
76
77
78
79
80
81
82
83
84
85
86
87
88
89
90
91
92
93
94
{
  "summary": {
    "query": "macy",
    "queryType": "NON_NEAR",
    "queryTime": 51,
    "numResults": 10,
    "offset": 0,
    "totalResults": 960,
    "fuzzyLevel": 1,
    "geoBias": {
      "lat": 40.758896,
      "lon": -73.98513
    }
  },
  "results": [
    {
      "type": "POI",
      "id": "g6JpZK84NDAzNjkwMTA3NzI0NjOhY6NVU0GhdqdVbmlmaWVk",
      "score": 2.5242369175,
      "dist": 973.6298458107448,
      "info": "search:ta:840369010772463-US",
      "poi": {
        "name": "Macy's Department Store",
        "phone": "+1 212-695-4400",
        "categorySet": [
          {
            "id": 7376
          }
        ],
        "url": "www.macys.com",
        "categories": [
          "important tourist attraction"
        ],
        "classifications": [
          {
            "code": "IMPORTANT_TOURIST_ATTRACTION",
            "names": [
              {
                "nameLocale": "en-US",
                "name": "important tourist attraction"
              }
            ]
          }
        ]
      },
      "address": {
        "streetNumber": "151",
        "streetName": "W 34Th St",
        "municipalitySubdivision": "Manhattan",
        "municipality": "New York",
        "countrySecondarySubdivision": "New York",
        "countrySubdivision": "NY",
        "countrySubdivisionName": "New York",
        "postalCode": "10001",
        "extendedPostalCode": "10001-2101",
        "countryCode": "US",
        "country": "United States",
        "countryCodeISO3": "USA",
        "freeformAddress": "151 W 34Th St, New York, NY 10001",
        "localName": "New York"
      },
      "position": {
        "lat": 40.75042,
        "lon": -73.98803
      },
      "viewport": {
        "topLeftPoint": {
          "lat": 40.75231,
          "lon": -73.99052
        },
        "btmRightPoint": {
          "lat": 40.74853,
          "lon": -73.98554
        }
      },
      "entryPoints": [
        {
          "type": "main",
          "position": {
            "lat": 40.75092,
            "lon": -73.99043
          }
        },
        {
          "type": "main",
          "position": {
            "lat": 40.75046,
            "lon": -73.98934
          }
        }
      ]
    }
  ]
}
While there is a lot of data that we can use, we will only use the address.freeformAddress, poi, poi.name, and position properties.
Kendo UI
Now let’s turn the querytext input control into a jquery Kendo UI Autocomplete widget. Let’s go back to the autocomplete.js file and before the initializeMap(); statement and after the $(() ==> { statement place the following code.
1
2
3
4
5
6
$('#queryText').kendoAutoComplete({
    minLength: 3,
    placeholder: "Select a venue",
    dataValueField: "id",
    dataTextField: "poi.name"
});
This turns the input control into an Autocomplete widget.
Line 2 tells the widget to start the lookup only when there is a minimum of 3 characters entered.
Line 3 is the text that gets displayed when there is no input to prompt the user what you are looking for.
Line 4 is the field to use as the value for selected. The value is helpful for lookups and storage later.
Line 5 is the text field to display in the control once an item is selected.
For additional configuration items for the Autocomplete widget, check out the documentation.
DataSource
Now that widget is created, we need to create a data source to connect the Autocomplete widget with the Azure Maps Search service. This is where the shared utility of the DataSource comes in. I’m not going to go into great detail of the utility because their documentation is great.
Let’s go and create the DataSource. Just before the $('#queryText').kendoAutoComplete({ code we are going to create and config the DataSource utility.
1
azureSearchDataSource = new kendo.data.DataSource({});
This initializes the DataSource utility. Now, let’s config it.
In between the curly braces {}, we are going to add the serverFiltering property and set it to true. This is very important. Setting the serverFiltering to true instructs the DataSource that it needs to get the data from the server by making another call any time the search (or input changes). Otherwise, the control will filter with a locally cache version of the data set. In this case, we don’t want to use a locally cache copy because the data will most likely not match.
Next, we have to set the transport property. The transport is used to interact with the data source, in our case, the Azure Maps Search service. We are going to want to configure the read property of the transport object. Since the DataSource utility supports CRUD operations, the transport object supports read, write, update, and delete.
Our transport section looks like this.
1
2
3
4
5
6
7
8
9
10
11
12
13
14
15
16
transport: {
  read: {
    url: "https://atlas.microsoft.com/search/poi/json?typeahead=true&api-version=1&view=Auto&language=en-US&countrySet=US&subscription-key=" + azureKey,
    type: "get",
    dataType: "json",
    data: function() {
        var center = map.getCamera().center;
        var searchTerm = $("#queryText").data("kendoAutoComplete").value();
        return {
            lon: center[0],
            lat: center[1],
            query: searchTerm
        }
    }
  }
}
The url property sets the URL for the read property. In our case, we populated most of the fields. Any dynamic fields are handled with data property. The type and dataType properties do not need to be set; they are the default. It is set here for clarity. As I alluded to, the data property returns a JSON object which the DataSource utility stringify and appends to the URL. In the code above, on line 7, we create a variable called center, which asks the Azure Maps map control for the center of the map in case the user moved it. Line 8, we extract the value of the queryText control to get the search term. Lines 9 - 12, we return an object that looks like this
1
2
3
4
5
{
  "lon": -73.98516,
  "lat": 40.758896,
  "query": "macy"
}
This then gets stringified to &lon=-73.98516&lat=40.758896&query=macy.
Since the Azure Map Search service does not return an array of results, we have to tell the DataSource what the schema of the data is. Let’s add a schema property to the DataSource that looks like this.
1
2
3
4
5
6
7
8
9
schema: {
    type: "json",
    data: function(response) {
        return response.results;
    },
    model: {
        id: "id"
    }
}
Line 2 tells the DataSource to expect json data.
For line 3, we create a function for the data property. This property identifies what the DataSource should consider the result. Since the Azure Maps Search service returns it as a property of the response, we return response.results from the function.
In lines 6-8, we define the model. The model is essential if you are doing CRUD operations, and the structure of the data for editors is essential. For our use case, we just need to identify the id to the id of the result item.
Now, you can go back to the initialization of the AutoComplete widget and assign set the property dataSource to azureSearchDataSource.
Template
Now that we know the data structure returned let’s display some additional data in the search suggestion. For this example, I would like to display the name of the suggestion, the poi.name, and the address address.freeformAddress. Fortunately, the Autocomplete widget, and many other widgets in the suite, provide a templating engine to help change the look. We are going to use the template property.
Explaining everything possible is well beyond this blog post, so I’ll cover some of our use. Somewhere in the body of the autocomplete.html page, create a template like this.
1
2
3
4
5
6
7
<script id="autoCompleteItemTemplate" type="x-kendo-template">
  # var suggestionLabel = address.freeformAddress; #
  # if (poi && poi.name) { #
  #   suggestionLabel = poi.name + ' - (' + suggestionLabel + ')'; #
  # } #
  <span>#:suggestionLabel#</span>
</script>
In line 1, we set the id of the script block to autoCompleteItemTemplate. This allows us to reference it from the AutoComplete control. We also set the type of the script to x-kendo-template. This helps with Intellisense.
In lines 2-6, we run some logic to create display text. Line 2 creates a variable named suggestionLabel and sets it to the address.freeformAddress property. Intellisense does not help a lot here, so watch your spelling. On line 3 we check to see if the property poi and poi.name are present, if they are person, on line 4 we set the suggestionLabel variable equal to poi.name + - ( + suggestionLabel + ).
Line 6 writes out a span element with the value of the suggestionLabel variable.
Based on the sample results above, we would get
1
<span>Macy's Department Store - (151 W 34Th St, New York, NY 10001)</span>
They are written to the browser for this result item.
Now add the template property to the queryText initialization.
1
template: $('#autoCompleteItemTemplate').html()
Save the HTML and Javascript files.
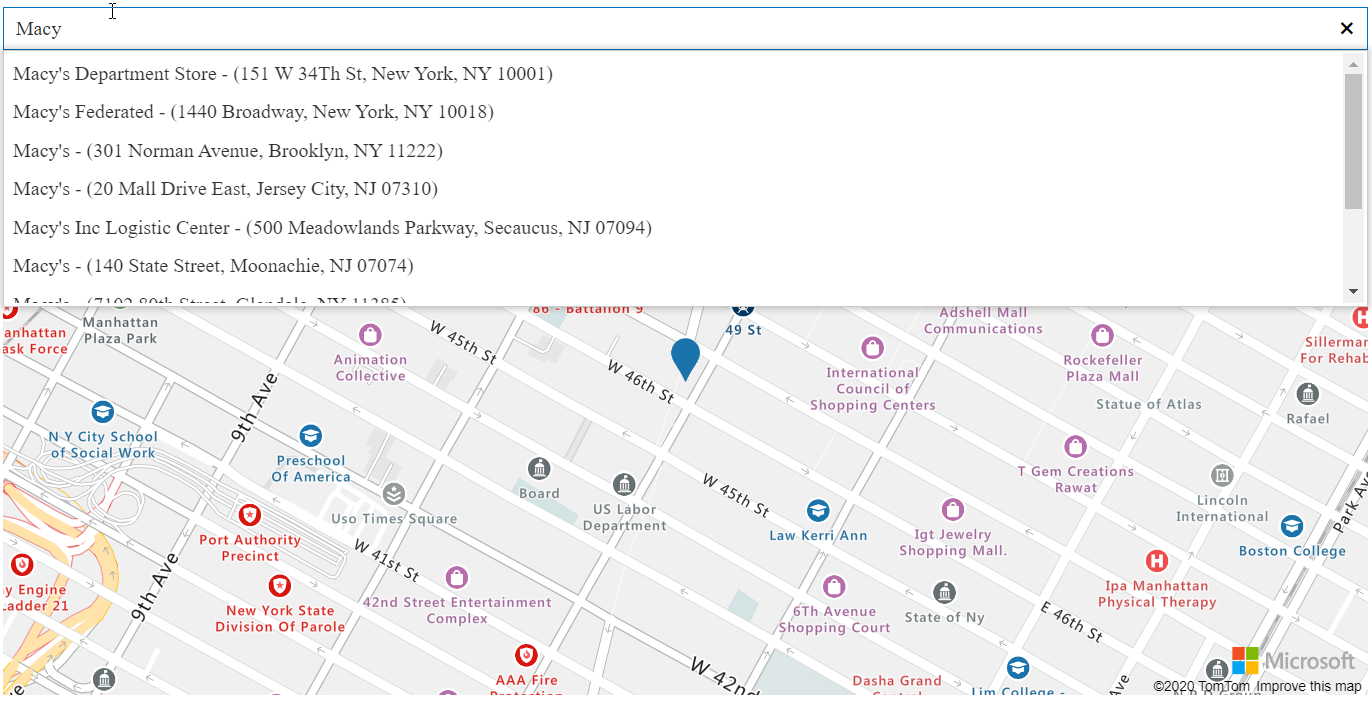
Working sample
If all is correct, when you refresh the page and type Macy in the text box, you should see something like this.
Creating a Map Pin
Now that we have the search suggestions displayed let’s center the map and add a pushpin with the search suggestion location.
Add the select function to the queryText element
1
2
3
4
5
6
7
8
9
select: function (e) {
    var item = e.dataItem;
    console.log(item.poi.name);

    map.setCamera({
        center: [item.position.lon, item.position.lat],
        zoom: defaultZoom});
    azureMapDataSource.add(new atlas.data.Point([item.position.lon, item.position.lat]));
}
The Autocomplete widget passes an object to the function that is triggering the event. In the select event, we need the dataItem property, a copy of the result above.
Line 2, we set a variable named item to the dataItem of the element.
Lines 5-7, we re-center the map to the new coordinates. We use the position property to center the camera.
Line 8 draws a push pin at the coordinates of the selected item.
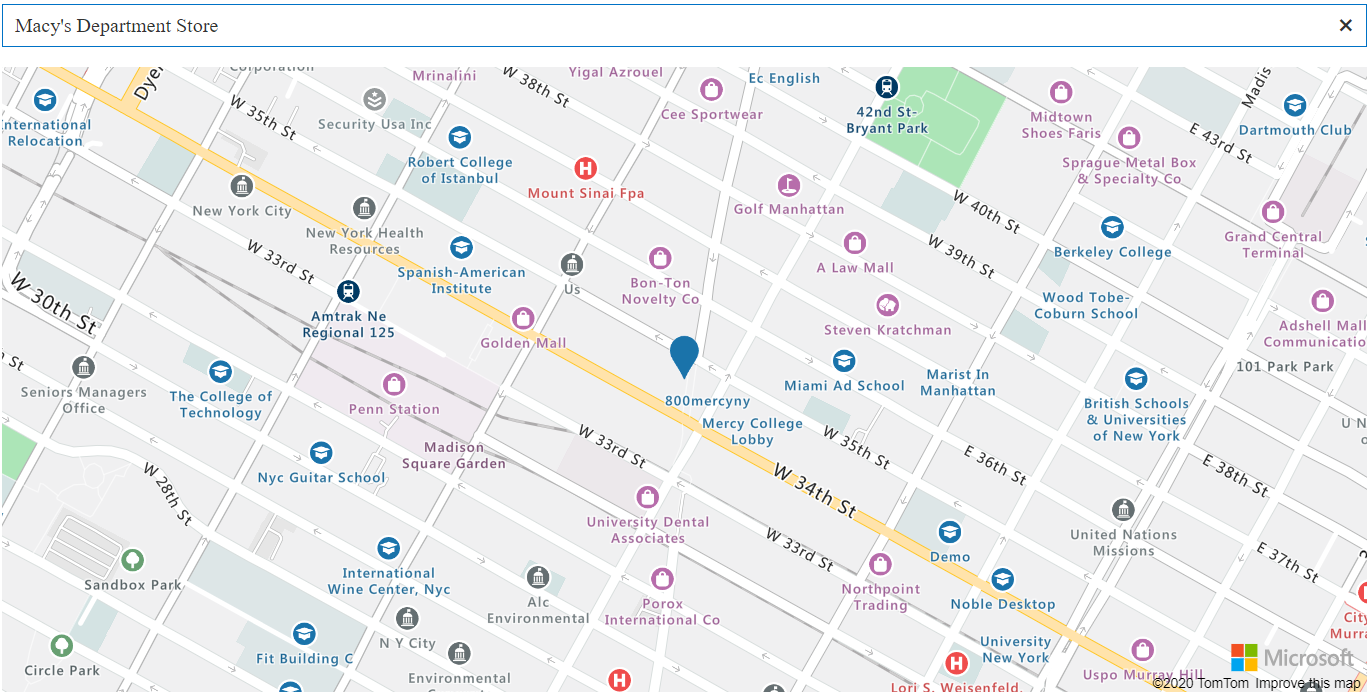
Save the files, refresh the browser, type Macy, and select “Macy’s Department Store”. If successful, the browser looks similar to this.
Wrap Up
In about 100 lines of our code, we were able to use the Kendo UI Autocomplete control and the Azure Maps Search service to build an address/point of interest search component.
Completed Code
The completed code for this post, less the azurekey.js file, can be found at https://github.com/jguadagno/kendo-autocomplete-azure-maps-search
Video
You can watch one of the sessions of `Coding with JoeG’ where I demonstrated this.
References
Share on
Bluesky Facebook LinkedIn Reddit XLike what you read?
Please consider sponsoring this blog.

