
Testing Web APIs or Services with JetBrains Rider
For the last week or so I’ve been working on modernizing the Desert Code Camp site which meant that I am basically rewriting it. ![]() Part of the rewrite is to make all of the user facing functionality, adding/viewing sessions, viewing the schedule, etc., available from an API and not code behind. I spent the last week or so designing and implementing the API in ASP.NET Core 6. The technology used in building the API does not matter for this post but the example repository is in ASP.NET Core. While testing the application, I started to heavily use the HTTP Client feature of JetBrains Rider. The HTTP Client is a bundled plugin, which is enabled by default, which allows you to emulate calls to a web service or web API. It works very much like Postman, but in the IDE and included.
Part of the rewrite is to make all of the user facing functionality, adding/viewing sessions, viewing the schedule, etc., available from an API and not code behind. I spent the last week or so designing and implementing the API in ASP.NET Core 6. The technology used in building the API does not matter for this post but the example repository is in ASP.NET Core. While testing the application, I started to heavily use the HTTP Client feature of JetBrains Rider. The HTTP Client is a bundled plugin, which is enabled by default, which allows you to emulate calls to a web service or web API. It works very much like Postman, but in the IDE and included.
The HTTP Client supports GET, POST, and most HTTP verbs. It even has support for converting cURL commands.
Getting Started
I’ll be using the API that can be found GitHub at https://github.com/jguadagno/Contacts for the examples.
If you don’t have the plugin enabled, enable it. ![]() You can enable it by going into the Settings or Preferences in Rider and selecting
You can enable it by going into the Settings or Preferences in Rider and selecting Plugins. You can also get there from Navigate then Search Everything… or CTRL+T and type Plugins. Once the plugin is enabled you can add an HTTP request file to your solution or as a scratch file. I tend to add them as part of the solution so any one working on the solution can use them. Scratch files, for me, are more of a temporary file that I use for ‘one off’ requests.
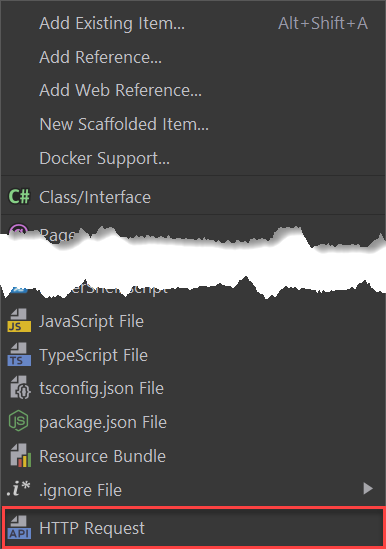
In the Solution Explorer for Rider in one of the projects, you can right click and choose Add… then HTTP Request.
This will add a new, blank, editor window for you to add the HTTP calls that you wish to make.
HTTP Request Editor
The HTTP Request editor has a separate set of commands available to it.

- Run all requests in file will execute every requests in this file.
- Add request gives you a menu of starter requests.
- Add environment file allows you to add either public or secret files to hold variables like URLs, user ids, passwords, etc. More on that later.
- Convert… provides an interface for converting from cURL commands to HTTP Requests and a few others.
- Open log opens the HTTP request log.
- Examples contains a few starter examples to learn how to use the tool.
Requests
The HTTP request can contain a few “arguments”
- Method
- Request-URI
- HTTP-Version (optional)
- Header-field and Header-value pairs
- Request-Body (optional)
A request would look something like this.
1
2
3
4

Method Request-URI HTTP-Version
Header-field: Header-value

Request-Body
Sample GET Request
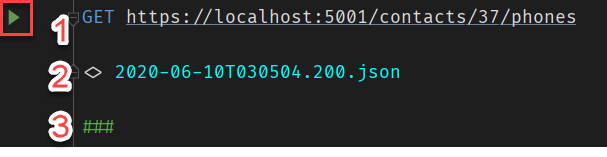
In this sample request, you will see Rider adds a play button (highlighted with the red triangle).
The request itself, line 1, is a GET request. Where you specify the verb and the URI to call.
Line 2 is a log file that was generated. You can click on the file name to see the results. If you execute the request multiple times, you will see one file for each request. Rider even provides you with the ability to compare the responses. This is helpful for testing.
Line 3 is important! The ### indicates that this ends the request.
Sample POST Request
Since a Post request generally has data that goes along with it, the HTTP Request supports that. Simply add the Content-Type and body in the lines after the verb url line.
1
2
3
4
5
6
7
8
9
10
11
12
13
14
15

POST https://localhost:5001/contacts
Content-Type: application/json

{
  "FirstName": "Joe",
  "LastName" : "Guadagno",
  "MiddleName" : "James",
  "EmailAddress" : "jguadagno@hotmail.com",
  "Phones": [
    {
      "phonenumber": "8675309",
      "extension": ""
    }
  ]
}
Running HTTP Requests
If the HTTP Request file has focus in the IDE, you can click on Run all requests in file, or the ‘play’ icon next to the verb. If you are going to execute the requests multiple times, as I do when building APIs, you should create a Run Configuration for them. Just be sure that your API is up and running before you make the HTTP request against it. You can create a Compound Run Configuration to start your API project and then run the HTTP requests. Just note, at the time I wrote this post, only Run is supported and not Debug.
Environment Files
Environment files allow you to define variables that are specific to your environment in your project. Think of it like the appSettings.json in .NET but all in one file.
An example http-client.env.json file could look like this.
1
2
3
4
5
6
7
8
9
10
11

{
  "dev": {
    "urlRoot": "https://localhost:5001/"
  },
  "uat":{
  "urlRoot": "https://uat.mydomain.com/"
  },
  "prod":{
    "urlRoot": "https://mydomain.com/"
  }
}
Each root object property becomes an ‘environment’ that you can select to run your HTTP requests in. In this example, you can select one of the three environments, dev, uat, or prod, when you run these request. Now the variable urlRoot, can used now in all your requests and will be replaced with the value for the environment selected.
In the HTTP request file, change this
1

GET https://localhost:5001/contacts/37/phones
to this
1

GET /contacts/37/phones
and if you select uat, the HTTP request that gets run is.
1

GET https://uat.mydomain.com/contacts/37/phones
This allows you to control the url, and other variables without having to edit the file. Win!
Rider supports two types of environment files, regular and private.
Regular Environment File
Choosing a Regular file will create the http-client.env.json file. This file can contain common variables such as host name, port, or query parameters, and is meant to be distributed together with your project.
Private Environment Files
Choosing Private will create the http-client.private.env.json file. This file might include passwords, tokens, certificates, and other sensitive information. It is added to the list of source code system ignored files by default. NOTE: The values of variables that are specified in the http-client.private.env.json file override the values in the regular environment file.
There is a lot more to environment files and variables. You can read more here.
More Samples
You can find more samples in the Contacts-Sample-Requests.http sample HTTP request file that I used for the Contacts sample application and API.
Wrap Up
This was a quick introduction to using the HTTP Client in JetBrains Rider to help testing an API or web service. It’s helped me a lot. Hopefully it will be equally as helpful to you!
References
Share on
Bluesky Facebook LinkedIn Reddit XLike what you read?
Please consider sponsoring this blog.

