
Connecting to a Protected API with Microsoft Identity Platform
In a previous post, I demonstrated how you can protect an ASP.NET Core Web API using the Microsoft Identity Platform. In this post, we are going to look at what you need to do to have an ASP.NET Core MVC application interact with the same protected API. It’s really easy, once you figure it out! ![]()
Note! This post was written based on a preview version of the Microsoft Identity Web library, version 0.1.5-preview. It has been updated to version 0.2.0-preview of the library. Your experience may vary!
Note! This post assumes that you already have a tenant setup in Azure Active Directory with scopes, similar to the previous post
Add a New Scope To Your API Application In Azure
For the new client application, the ASP.NET Core Web application, we will use user impersonation where the Web Application will call the Web API on behalf of the signed-in user. To do this, we need to add a new scope to our API application in Azure.
Navigate to your Azure Active Directory Tenant, click on ‘App Registrations’, and select your API application. In the App Registration for your API, click on ‘Expose an API.’
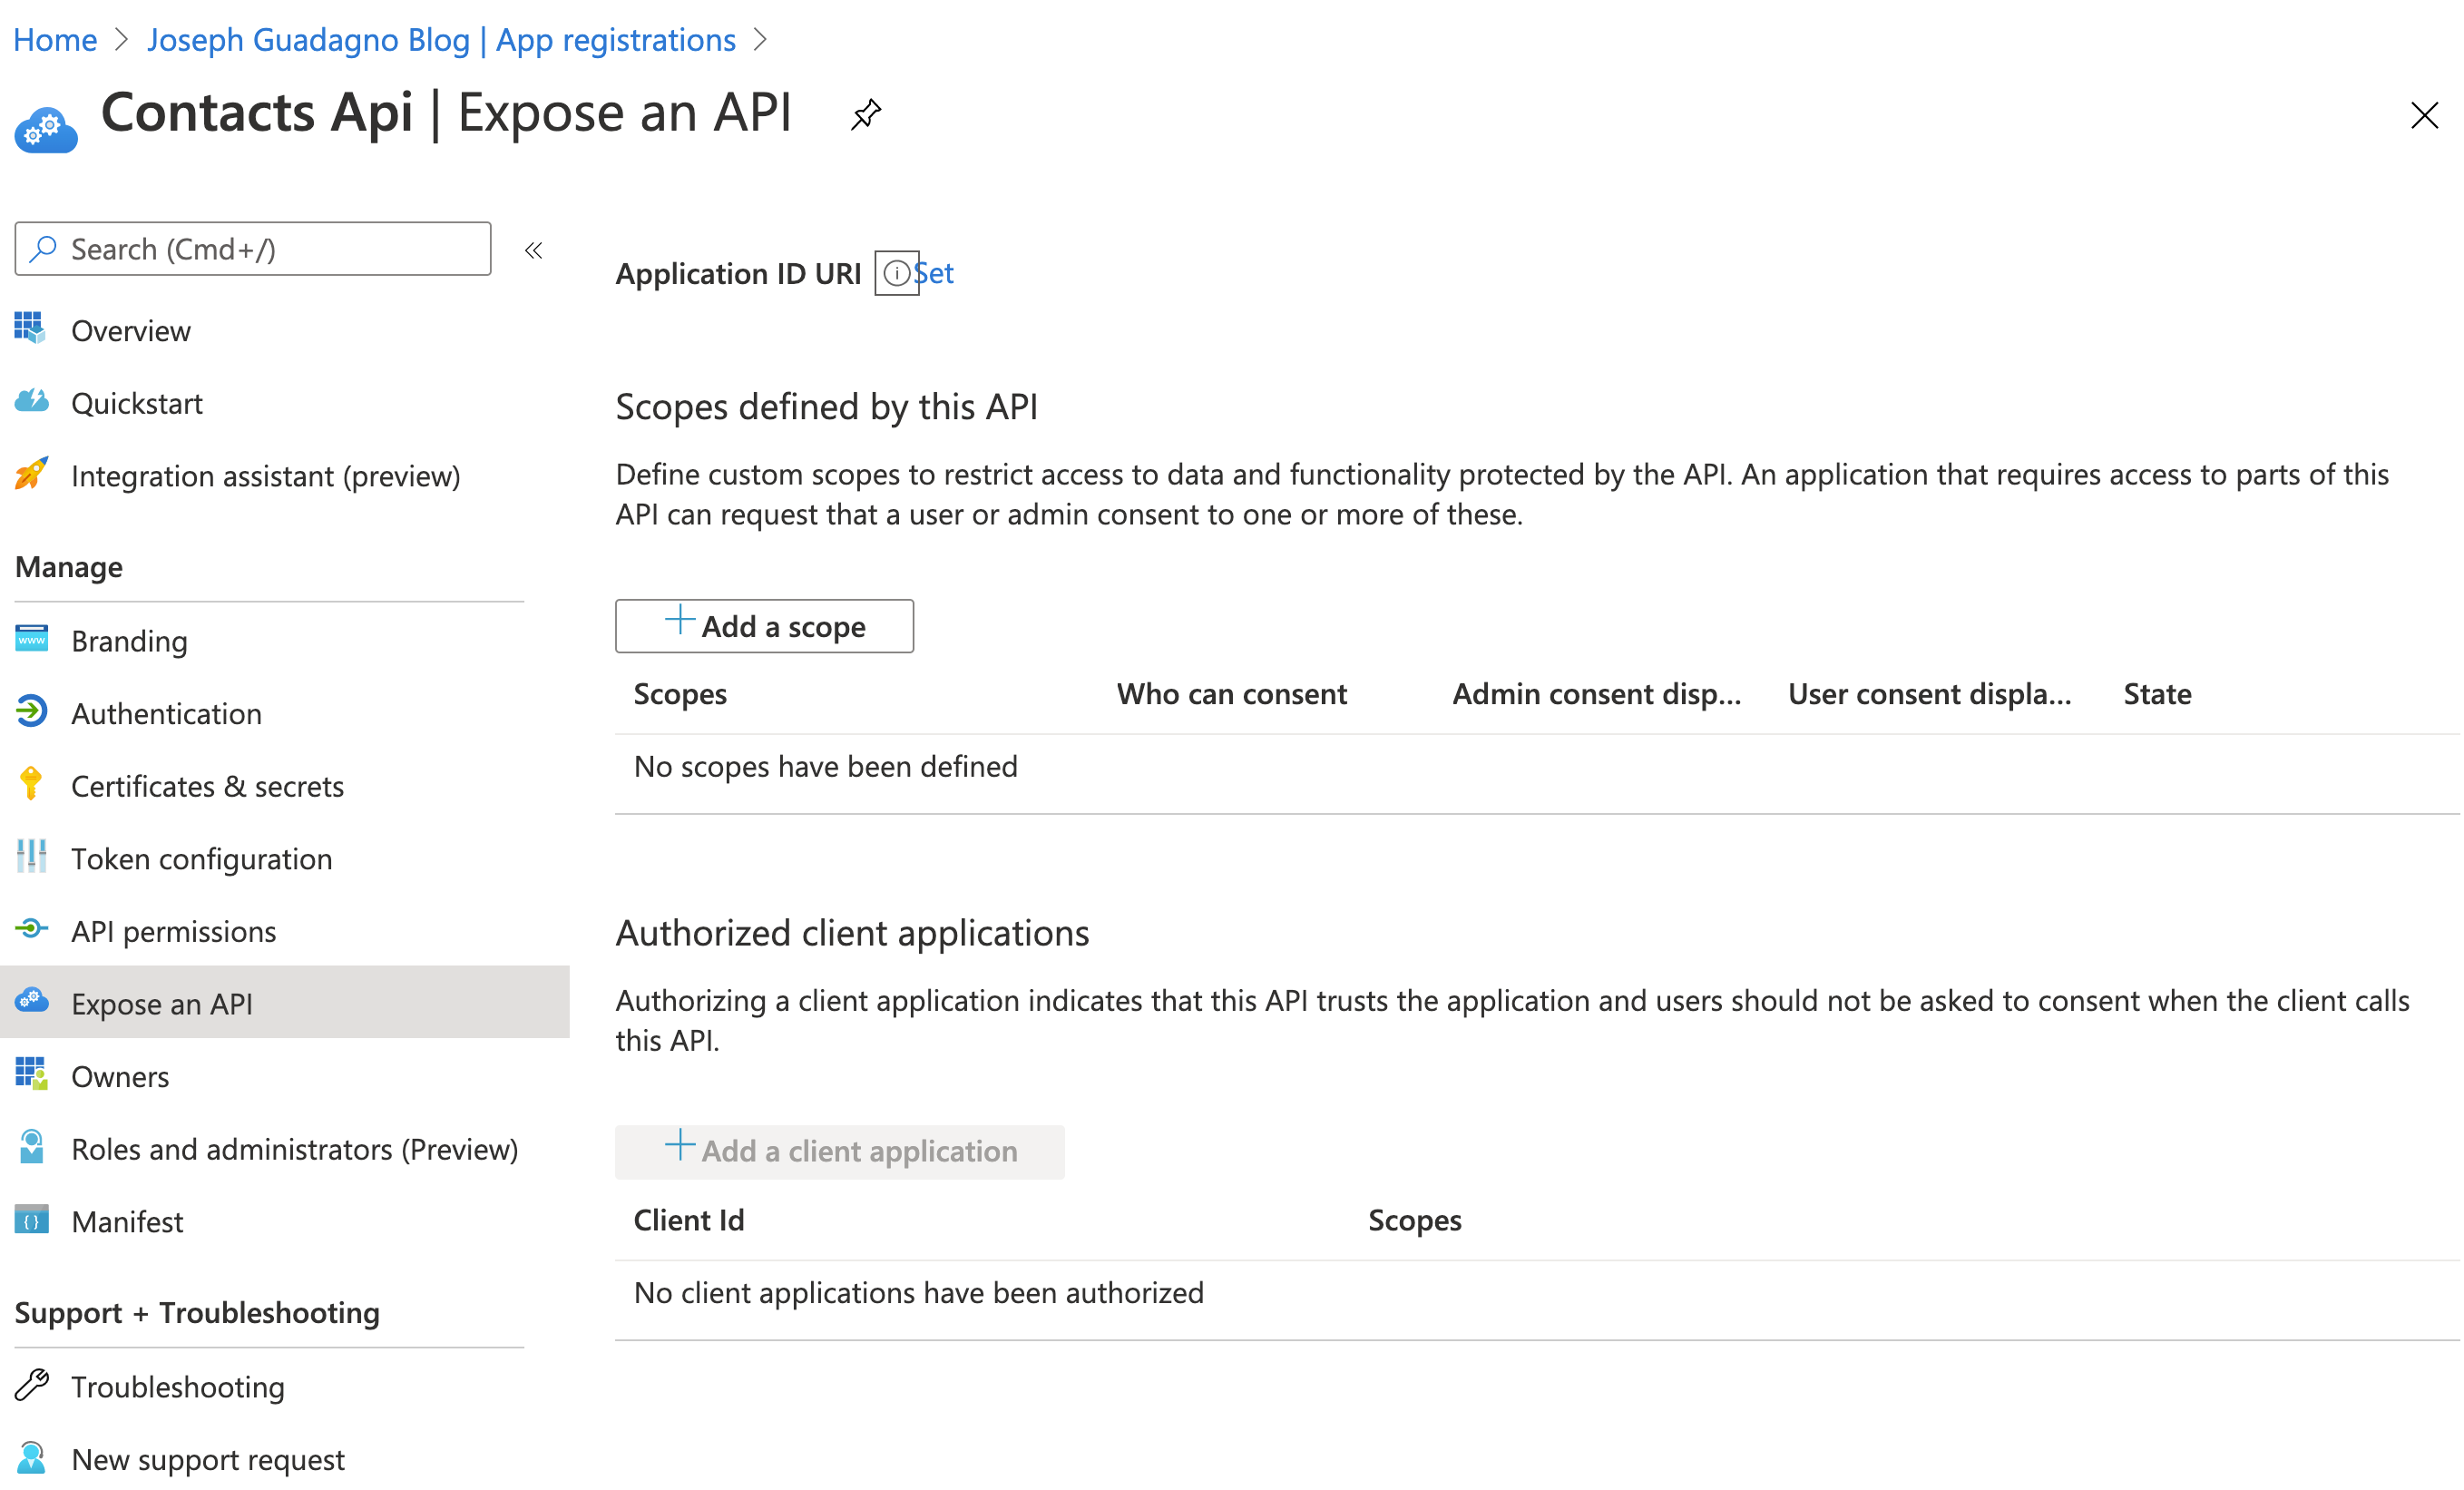
Click on ‘+ Add a scope’
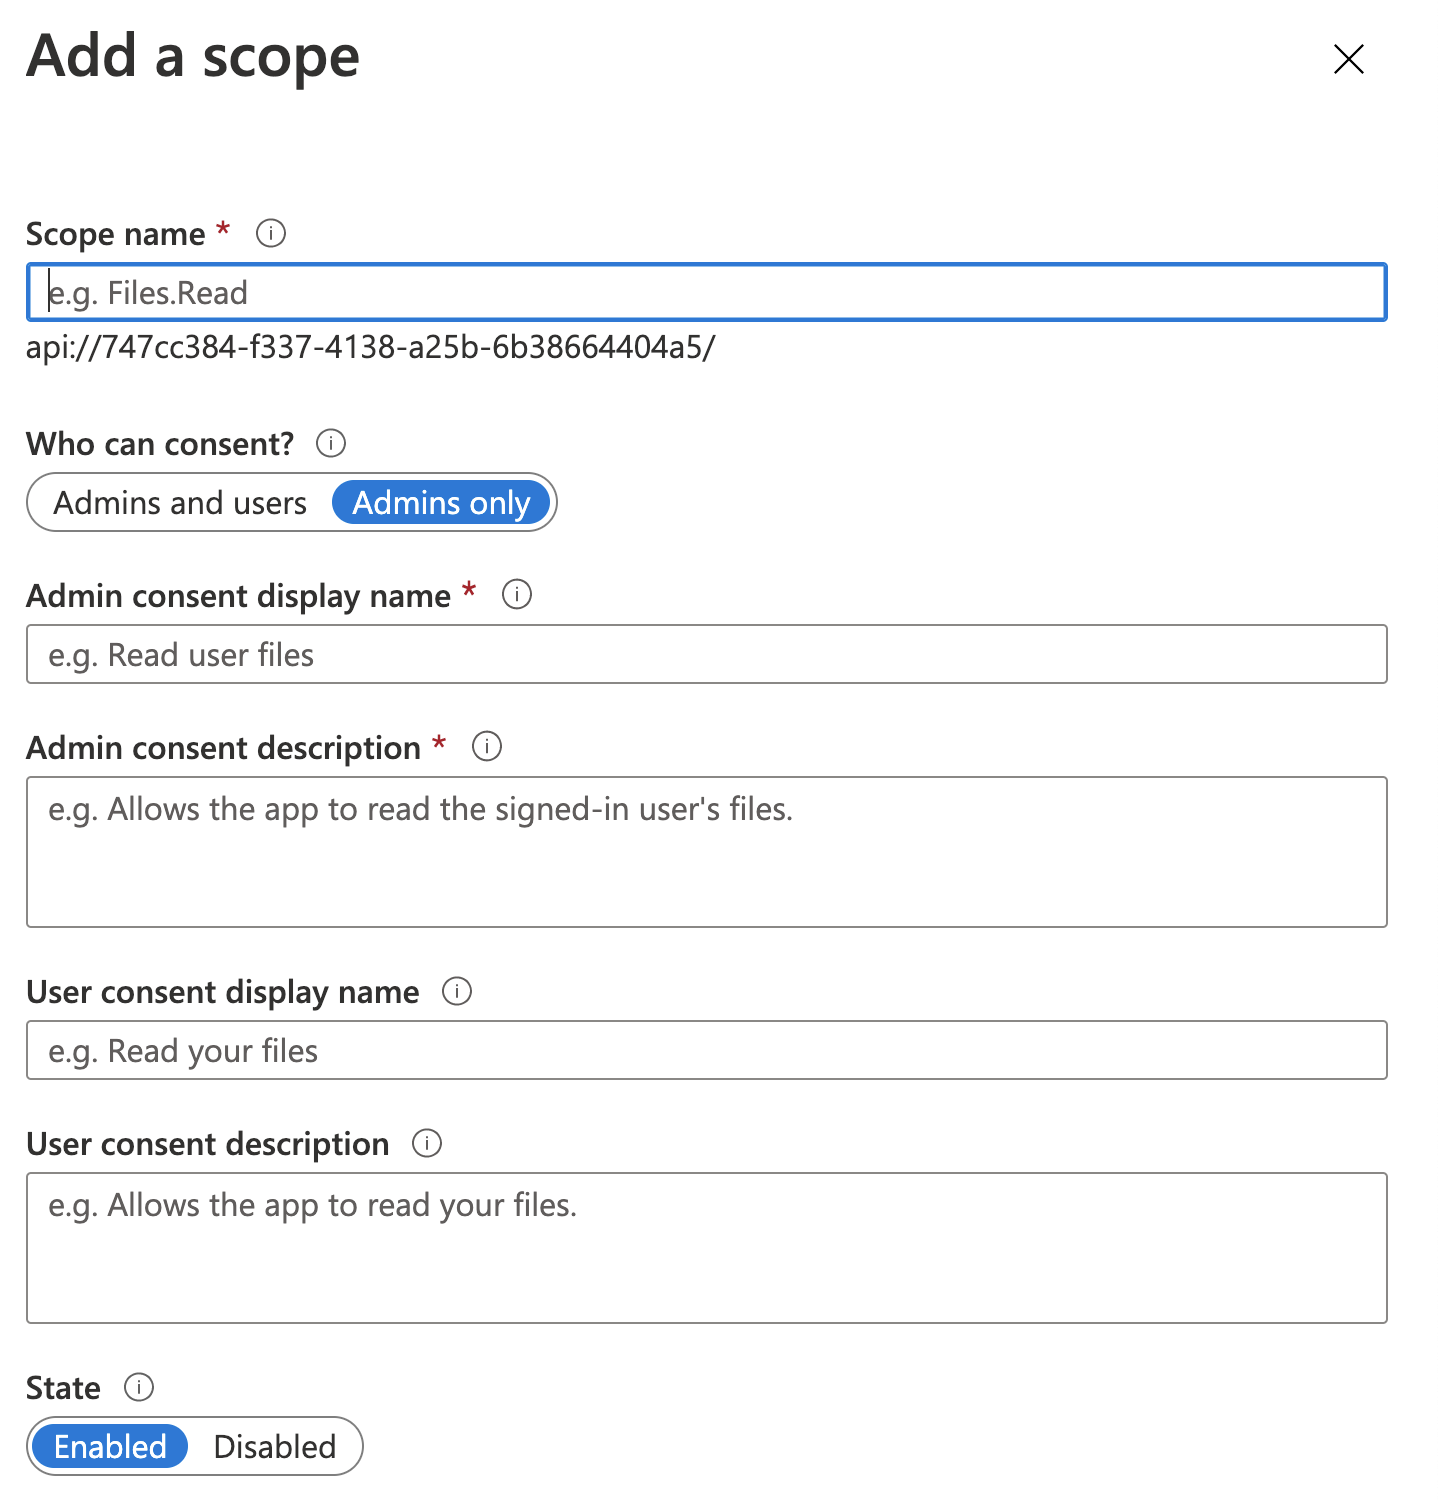
| Name | Value | Description |
| Scope Name | user_impersonation |
This is the name of the scope that you will see in the application code |
| Who can consent? | Admins and Users |
Who do you want to offer the scope to? |
| Admin consent display name | Allow User Impersonation |
This is what the scope will be called in the consent screen when admins consent to this scope. |
| Admin consent description | Enables the client application to call the Contacts API on your behalf |
This is a detailed description of the scope that is displayed when tenant admins expand a scope on the consent screen. |
| User consent display name | Allow User Impersonation |
This is what the scope will be called in the consent screen when users consent to this scope. |
| User consent description | Enables the client application to call the Contacts API on your behalf |
This is a detailed description of the scope that is displayed when tenant users expand a scope on the consent screen. |
| State | Enabled |
NOTE The scope name, in this case matters, from what I can tell. The descriptions are up to you, but these values display to the user when they are giving their consent.
Enable the New Scope in a Client App Registration
If you followed along with the previous example, you should have an API application and ‘PostMan Client’ application registered. I recommend that you create a Client Registration as outlined in Register a new client section. In general, it’s a good practice to keep separate ‘client app registrations’ for each client that accesses your API. And by each client, I mean each codebase. With the application I am building, Contacts, I have an application registered for the API, the PostMan tests, and not the Contacts MVC application. If I add other clients, like a Blazor application or React-Native application, they will get separate application ids.
Now in that newly created application, go to ‘API permissions.’
- Click ‘Add a permission’
- Choose ‘My APIs’
- Choose ‘Contacts API’
You should see the new ‘user_impersonation’ permissions under the ‘Permission’ section.
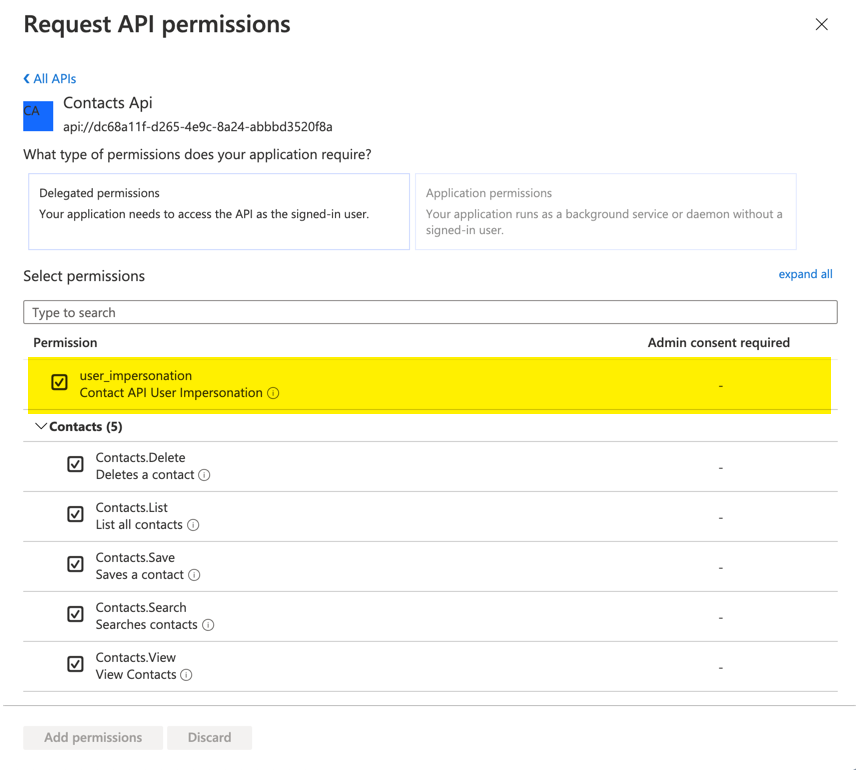
- Check ‘user_impersonation’
- Click ‘Add permissions’
When clicking ‘Add permissions’, you will probably see a message at the top of the scopes page indicating that since you change permissions, all users will have to give their consent again.
Connecting to the API from an ASP.NET Core Web Application (MVC)
There are a few different things that you have to do to enable authentication. First thing to do is install the Microsoft Identity Platform NuGet package
Microsoft.Identity.Web Package
1

Install-Package Microsoft.Identity.Web -Version 0.2.0-preview
Note The latest version number might be different.
Application Settings
Next up, add the Azure Active Directory Settings to your appsettings.Development.json file. Note, you should not store client secrets or PII in your version repository, Git, SVN, TFS, etc. you should use the ‘user secrets’ functionality, Azure App Configuration service, or Azure Key Vault service. For now, I will show it the appsettings.development.json.
You will need to add the AzureAd section.
1
2
3
4
5
6

"AzureAd": {
    "Instance": "https://login.microsoftonline.com/",
    "Domain": "replace with your domain. The domain of the AAD tenant",
    "ClientId": "replace with your Api Application client id",
    "TenantId": "common"
  }
You need specify the TenantId only if you want to accept access tokens from a single-tenant (line-of-business app). Otherwise, you can leave them set to common.
This can be:
- A GUID (Tenant ID = Directory ID)
- ‘common’ (any organization and personal accounts)
- ‘organizations’ (any organization)
- ‘consumers’ (Microsoft personal accounts)
Startup.cs
Now in your Startup.cs file, you are going to need to enable the Microsoft Identity Platform. In the ConfigureServices method, add as one of the first lines in the method
1
2
3
4
5
6
7
8
9
10
11
12
13
14
15
16
17
18
19
20
21

services.AddSignIn(Configuration);

var initialScopes = new[]
{
    // A full string array of the scopes you want the user to consent to...
    "api://dc68a11f-d265-4e9c-8a24-abbbd3123456/Scope1",
    "api://dc68a11f-d265-4e9c-8a24-abbbd3123456/Scope2"
};
// Token acquisition service based on MSAL.NET
// and chosen token cache implementation
services.AddMicrosoftWebAppAuthentication(Configuration)
    .AddMicrosoftWebAppCallsWebApi(Configuration, initialScopes)
    .AddInMemoryTokenCaches();

services.AddControllersWithViews(options =>
{
    var policy = new AuthorizationPolicyBuilder()
        .RequireAuthenticatedUser()
        .Build();
    options.Filters.Add(new AuthorizeFilter(policy));
}).AddMicrosoftIdentityUI();
Controller
Now in the controller you want to add authorization to, add the Authorize attribute to the controller.
1
2

[Authorize]
public class ContactController : Controller
Then for each controller action you want authentication for, add the AuthorizeForScopes attribute like this
1
2
3

// GET
[AuthorizeForScopes(Scopes = new []{"api://dc68a11f-d265-4e9c-8a24-abbbd3123456/Scope1"})]
public async Task<IActionResult> Index()
You don’t have to hard code the permission here. There is a parameter that allows you to read the scope from the application configuration. In this case, you will add the same AuthorizeForScopes attribute and use the ScopeKeySection.
1
2
3

// GET
[AuthorizeForScopes(ScopeKeySection = "Contacts:ContactsScope"))]
public async Task<IActionResult> Index()
Inside the method for the controller, Index, in this example you are going to need to:
- Get an access token for the given scope
- Add the
Bearertoken to the header - Make the API call
The full Index method
1
2
3
4
5
6
7
8
9
10
11
12
13
14
15
16
17
18
19
20
21
22
23
24
25
26
27
28
29
30

// GET
[AuthorizeForScopes(Scopes = new []{"api://dc68a11f-d265-4e9c-8a24-abbbd3520f8a/" + Domain.Permissions.Contacts.List})]
public async Task<IActionResult> Index()
{
    // Step 1: Check for Scope
    string[] scopes = {"api://dc68a11f-d265-4e9c-8a24-abbbd3520f8a/" + Domain.Permissions.Contacts.List};
    string accessToken = await _tokenAcquisition.GetAccessTokenForUserAsync(scopes);

    // Step 2: Build the HttpClient
    Client.DefaultRequestHeaders.Authorization = new AuthenticationHeaderValue("Bearer", accessToken);
    Client.DefaultRequestHeaders.Accept.Add(new MediaTypeWithQualityHeaderValue("application/json"));
    // Step 3: Make the API Call
    var response = await Client.GetAsync("https://localhost:5001/contacts");

    // Every below this line is how I processed the request.
    if (response.StatusCode == HttpStatusCode.OK)
    {
        // Parse the Results
        var content = await response.Content.ReadAsStringAsync();
        var options = new JsonSerializerOptions
        {
            PropertyNameCaseInsensitive = true,
        };
        List<Domain.Models.Contact> contacts =
            JsonSerializer.Deserialize<List<Domain.Models.Contact>>(content, options);

        return View(contacts);
    }
    throw new HttpRequestException($"Invalid status code in the HttpResponseMessage: {response.StatusCode}.");
}
You can see the example project at the point all this worked on Github
Gotchas
Working with a preview of any product can be challenging, here are some things I ran into and what fixed it.
No account or login hint was passed to the AcquireTokenSilent call
Exception with the text of no account or login hint was passed to the AcquireTokenSilent call. This message generally means that the token or permissions are out of sync. Typically the user needs to provide new consents, or the token expires.
Fix 1: Clear your cookies in whatever web browser you are using an try again.
Fix 2: Check to ensure that the AzureAd configuration has the correct TenantId, ClientId, and ClientSecret.
Fix 3: Implement the changes in the ‘Login Changes’ section below.
Message contains error: ‘invalid_client’ error_description: ‘AADSTS650053’
The full messages is something like
OpenIdConnectProtocolException: Message contains error: ‘invalid_client’, error_description: ‘AADSTS650053: The application ‘Application Name’ asked for scope ‘Scope Name’ that doesn’t exist on the resource ‘00000003-0000-0000-c000-000000000000’. Contact the app vendor.
Where Application Name is your application name (as known in Azure Active Directory) and Scope Name is the scope you have defined.
This is due to you NOT having the fully qualified Scope Name in the AuthorizeForScopes attributes. The Scopes parameter should be the fully qualified name with the app uri as defined in the Azure App Registration for your API. In this sample I had.
1

[AuthorizeForScopes(Scopes = new []{"Contacts.List"})]
instead of
1

[AuthorizeForScopes(Scopes = new []{"api://dc68a11f-d265-4e9c-8a24-abbbd3520f8a/Contacts.List"})]
Login Changes
When you have authentication enabled, the out-of-the-box ASP.NET Core MVC templates use the older Azure Active Directory package of Microsoft.AspNetCore.Authentication.AzureAD.UI. This package is safe to remove with respect to this sample. However, there is a small change to the _LoginPartial.cshtml that needs to happen. The SignIn\SignOut components of the _LoginPartial.cshtml page needs to change. So look for
1

<a class="nav-link text-dark" asp-area="AzureAD" asp-controller="Account" asp-action="SignOut">Sign out</a>
and
1

<a class="nav-link text-dark" asp-area="AzureAD" asp-controller="Account" asp-action="SignIn">Sign in</a>
and change the asp-area to MicrosoftIdentity
If you used the template as-is, your _LoginPartial.cshtml should look like this after the change.
1
2
3
4
5
6
7
8
9
10
11
12
13
14
15
16
17
18
19

@using Microsoft.Identity.Web

<ul class="navbar-nav">
    @if (User.Identity.IsAuthenticated)
    {
        <li class="nav-item">
            <span class="navbar-text text-dark">Hello @User.GetDisplayName()!</span>
        </li>
        <li class="nav-item">
            <a class="nav-link text-dark" asp-area="MicrosoftIdentity" asp-controller="Account" asp-action="SignOut">Sign out</a>
        </li>
    }
    else
    {
        <li class="nav-item">
            <a class="nav-link text-dark" asp-area="MicrosoftIdentity" asp-controller="Account" asp-action="SignIn">Sign in</a>
        </li>
    }
</ul>
Wrap up
I’ll continue to update this post as I add other clients to the Contacts application.
Share on
Bluesky Facebook LinkedIn Reddit XLike what you read?
Please consider sponsoring this blog.

